Deployment: Invicti Platform on-demand, Invicti Platform on-premises
Custom security checks must be enabled on your account before you can use them. To request access, contact Invicti Support.
Custom vulnerability checks
If you need to validate highly specific response conditions, detect undisclosed or cutting-edge vulnerabilities, or enforce your organization's internal security standards, you can write your own checks in JavaScript and have Invicti run them as part of any scan that uses a custom profile containing them. Results appear in the UI and flow to connected issue trackers, exactly like built-in checks.
This document explains how to write and use custom vulnerability checks in Invicti Platform.
Why this matters
Built-in checks cover well-known vulnerabilities across standard frameworks. Custom checks let you go beyond that - to validate highly specific response conditions, detect cutting-edge or undisclosed vulnerabilities before they appear in the standard database, or enforce your organization's internal security standards. You define the security logic, and Invicti runs it on any scan that uses a custom profile containing the check.
Upload a custom security check
Upload your script through the Invicti Platform UI to make it available for use in scan profiles.
- Select Scans > Custom security checks from the left-side menu.
- Click New security check.
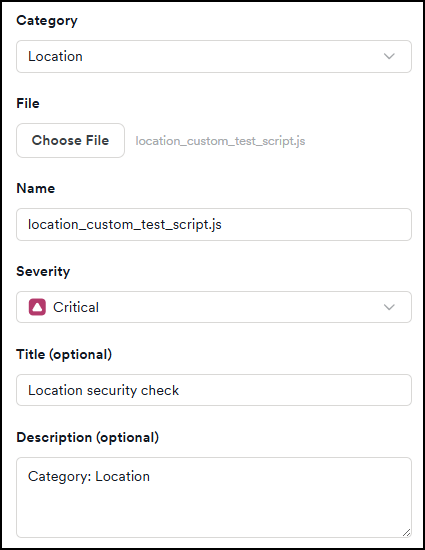
- Set Category to Target, Location, or HttpData:
- Target - runs once per scan. Use when you need to actively probe the target - create a job, send it, inspect the result. Good for one-time checks such as testing whether a specific endpoint exists or probing server-level conditions.
- Location - runs each time a new URL path is discovered during crawling. Use when you need to actively probe each discovered location - create a job, send it, inspect the result. It has access to the response body, headers, and the request that triggered it.
- HttpData - passive observation; your script is called once for every request/response pair the crawler makes, giving you complete visibility over the traffic stream without adding load to the target. You don't send requests yourself. Use for passive checks that inspect headers, response bodies, or patterns across all traffic.
- Under File, upload your
.jsscript file. - Enter a Name for the check.
- Set the Severity level.
- Optionally add a Title and Description.
- Save the check.
Add custom security checks to a scan profile
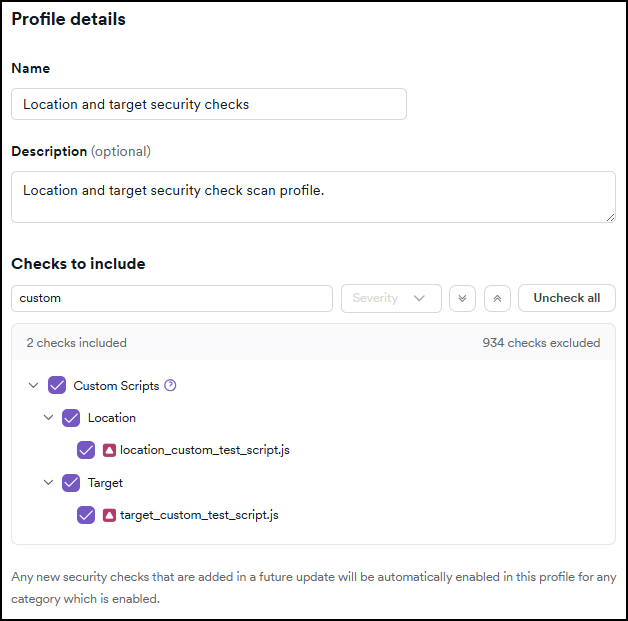
After uploading your checks, add them to a scan profile to control which scans run them.
- Select Scans > Custom profiles from the left-side menu.
- Click Add new profile.
- Enter a Name and optionally a Description for the profile.
- In Checks to include, type
Customin the filter to find your uploaded checks. - Select the checks you want to include using the checkboxes.
- Click Save.
Once saved, select this scan profile when launching a scan.
Custom security checks only run in custom profiles. They are not included in the built-in profiles (such as Full Scan), so you must add your uploaded checks to a custom profile and select that profile when launching a scan for them to run.
Examples
Target checks
- Example 1: Probes the
/admin/endpoint and raises a vulnerability alert if the admin console is accessible.
Show script: Detect an accessible admin console
let job = ax.http.job();
job.setUrl(ax.url.absolute(scriptArg.target.url, '/admin-console.html'));
ax.http.execute(job).sync();

if (!job.error
    && job.response.status !== 404
    && job.response.body.indexOf('Admin Console</title>') !== -1) {

    scanState.addVuln({
        location: scriptArg.target.root,
        http: job,
        vulnerability_type: {
            name: 'Admin console is accessible on target',
            severity: 'high',
            description: 'The admin endpoint should be restricted for internal use.',
            impact: 'An attacker may discover it and use it to exploit the application.',
            recommendation: 'Restrict the admin panel to the corporate VPN.',
        }
    });
}
- Example 2: Raises a medium-severity finding for each expected security header that's absent from the root response.
Show script: Missing security headers
let http = scriptArg.http;

let required = [
    'Content-Security-Policy',
    'X-Frame-Options',
    'X-Content-Type-Options',
    'Strict-Transport-Security',
];

for (let i = 0; i < required.length; i++) {
    let header = required[i];
    if (!http.response.headers.has(header)) {
        scanState.addVuln({
            location: scriptArg.target.root,
            http: http,
            vulnerability_type: {
                name: 'Missing security header: ' + header,
                severity: 'medium',
                description: 'The ' + header + ' response header is not set.',
                impact: 'Absence of this header may leave the application vulnerable to click-jacking, MIME-sniffing, or other browser-based attacks.',
                recommendation: 'Configure your web server or application to include the ' + header + ' header on all responses.',
                tags: ['security-headers', 'hardening'],
            }
        });
    }
}
Location checks
- Runs on each discovered directory and raises a vulnerability alert if a
.git/configfile is accessible at that location. Demonstrates the full range ofvulnerability_typefields, including a CVSS vector, classification tags, and external references.
Show script: With CVSS score and external references
if (!scriptArg.location.isFolder)
    ax.exit();

let job = ax.http.job();
job.setUrl(ax.url.absolute(scriptArg.location.url, '.git/config'));
ax.http.execute(job).sync();

if (!job.error
    && job.response.status === 200
    && job.response.body.indexOf('[core]') !== -1) {

    scanState.addVuln({
        location: scriptArg.location,
        http: job,
        vulnerability_type: {
            name: 'Git repository exposed',
            severity: 'critical',
            cvss: 'CVSS:3.1/AV:N/AC:L/PR:N/UI:N/S:U/C:H/I:N/A:N',
            description: 'The .git directory is publicly accessible, exposing the full repository history.',
            impact: 'An attacker can reconstruct all committed source code, including credentials and keys that were ever committed.',
            recommendation: 'Block access to .git at the web server level. Add .git to your .gitignore. Rotate any credentials found in commit history.',
            tags: ['information-disclosure', 'git'],
            references: [
                {
                    name: 'CWE-538: Insertion of Sensitive Information into Externally-Accessible File or Directory',
                    url: 'https://cwe.mitre.org/data/definitions/538.html'
                },
                {
                    name: 'OWASP: Security Misconfiguration',
                    url: 'https://owasp.org/Top10/A05_2021-Security_Misconfiguration/'
                }
            ]
        }
    });
}
HttpData checks
- Example 1: Flags any response that sets a cookie without the
HttpOnlyflag.
Show script: Cookie set without HttpOnly flag
if (scriptArg.http.response.status < 200 || scriptArg.http.response.status >= 300) {
    ax.exit();
}

let setCookie = scriptArg.http.response.headers.values('Set-Cookie');
for (let i = 0; i < setCookie.length; i++) {
    let cookie = setCookie[i];
    if (cookie.toLowerCase().indexOf('httponly') === -1) {
        scanState.addVuln({
            location: scriptArg.location,
            http: scriptArg.http,
            vulnerability_type: {
                name: 'Cookie set without HttpOnly flag',
                severity: 'low',
                description: 'A Set-Cookie response header was found that does not include the HttpOnly attribute.',
                impact: 'JavaScript running in the browser context can read this cookie, making it accessible to cross-site scripting attacks.',
                recommendation: 'Add the HttpOnly attribute to all session and authentication cookies.',
            }
        });
    }
}
Because this script is called for every HTTP exchange, it may run hundreds or thousands of times in a single scan. Any ax.http.execute() calls inside an HttpData script generate additional scan traffic proportional to the number of crawled URLs.
- Example 2: Scans every HTML response body for an internal API key pattern and raises a finding when one is found.
Show script: Search response bodies for a custom pattern
if (scriptArg.http.response.isType('text/html')) {
    let body = scriptArg.http.response.body;
    let match = body.match(/apikey=([0-9a-f]{32})/i);
    if (match) {
        scanState.addVuln({
            location: scriptArg.location,
            http: scriptArg.http,
            vulnerability_type: {
                name: 'Internal API key exposed in response body',
                severity: 'high',
                description: 'An internal API key was found embedded in a publicly accessible HTML response.',
                impact: 'Anyone who can read this page can extract the key and use it to call internal APIs.',
                recommendation: 'Remove API keys from rendered HTML. Pass them via server-side mechanisms or environment variables instead.',
            }
        });
    }
}
Script API reference
This section is for developers writing custom security check scripts. It covers the interfaces, methods, and properties available inside a .js file when authoring a check. If you're uploading a ready-made script, you can skip this section.
Use the scripting engine API to read scan context, send requests, report vulnerabilities, add unlisted endpoints, and log debug output. For the complete API definition, refer to the native.d.ts type definitions file included with the scripting engine.
- Read scan context data: Properties available on
scriptArgfor reading the current target, location, and HTTP exchange that triggered your script.
View scriptArg properties
Use scriptArg to read information about the current scan context - the target, the location being tested, and the HTTP exchange that triggered your script.
scriptArg.target
| Property | Type | Description |
|---|---|---|
host | string | Hostname, for example, "www.example.com" |
port | string | TCP port, for example, "443" |
secure | boolean | true if the target uses HTTPS |
url | ax.url.URL | Full start URL of the target |
origin | ax.url.URL | Origin URL: protocol://host:port/ |
ip | string[] | Resolved IP addresses of the target host |
root | ax.state.Location | Location object representing the root path / |
server | ax.state.ServerInfo | Detected server OS, banner, type, and technologies |
sensorDetected | boolean | true if AcuSensor data has been received for this target |
caseInsensitive | boolean | true if URLs on this target are treated as case-insensitive |
scriptArg.location
The URL path that triggered a Location check. In a Target check, path is '/' and name is ''.
| Property | Type | Description |
|---|---|---|
path | string | Absolute path, for example, "/dir/file.php" |
name | string | Last segment of the path, for example, "file.php" |
parentPath | string | Parent directory path, for example, "/dir/" |
url | ax.url.URL | Full URL of the location |
isFolder | boolean | true if the path ends with / |
hasInputs | boolean | true if at least one non-empty input scheme exists for this location |
isAPI | boolean | true if this location is an API endpoint |
apiType | string | API specification type: "swagger", "openapi", "raml", or "graphql" |
tags | Set<string> | Tags assigned to this location |
target | ax.state.Target | The target this location belongs to |
scriptArg.http
The ax.http.Job containing the HTTP request/response pair the script was invoked on. For HttpData checks, this is the exact exchange the crawler had with the server. See Send custom HTTP requests for the full Job interface.
- Send custom HTTP requests: Use
ax.http.Jobto create and send HTTP requests. Covers connection settings, request configuration, and execute functions.
View ax.http reference
Use ax.http.Job to send a custom HTTP request from within your script - useful when you need to probe the target for a specific condition or resource that wasn't discovered automatically.
let job = ax.http.job();
job.setUrl(scriptArg.target.url);
job.request.uri = '/path';
ax.http.execute(job).sync();

if (!job.error) {
    // safe to read job.response
}
Connection settings:
| Property | Required | Default | Description |
|---|---|---|---|
hostname | Yes | - | Host or domain name to connect to. Example: www.example.com |
secure | No | false | Whether to use HTTPS/TLS |
port | No | 80 (443 if secure is true) | TCP destination port as a string. Example: job.port = "8080" |
timeout | No | 30000 | Milliseconds before a pending connection is cancelled |
retries | No | 3 | Number of times to retry a timed-out request |
autoRedirect | No | false | Follow 3xx redirects automatically |
autoAuthenticate | No | true | Use scan session credentials |
username | No | - | HTTP auth username |
password | No | - | HTTP auth password |
Request settings (set on ax.http.Job.Request):
| Property | Description |
|---|---|
uri | URI to request. Default: / |
method | HTTP method. Default: GET |
body | Request body |
addHeader(name, value) | Append a custom request header. Example: job.request.addHeader('X-Header', 'Value') |
setHeader(name, value) | Set a header, replacing any existing value |
eraseHeader(name) | Remove a header |
setUrl(url) | Set the full URL in one call instead of setting hostname, port, secure, and uri separately |
Execute functions:
| Function | Description |
|---|---|
ax.http.execute(job).sync() | Send the request and wait synchronously for the response |
ax.http.executeAll(jobs).sync() | Send multiple jobs in parallel and wait for all to complete |
ax.http.is404Response(job) | true if the response is a soft 404 (Invicti's 404-detection heuristic) |
- Read the server response: Properties on
ax.http.Job.Responsefor reading status codes, headers, and the response body.
View response properties
After sending a request, read what the server returned through ax.http.Job.Response to determine whether a vulnerability condition exists:
| Property | Description |
|---|---|
status | Numeric HTTP status code. Example: 200 |
reason | String representation of the status code. Example: "OK" |
body | Response body |
headers | Response headers. Use has(name) to check for a header, get(name) to retrieve its first value, values(name) to retrieve all values as an array, and toString() for a plain text representation of all headers. Header names aren't case-sensitive. |
redirected | true if the response followed a redirect |
redirectLocation() | Value of the Location header on a redirect |
Example:
if (job.response.headers.has('Content-Type')) {
    ax.logi(job.response.headers.get('content-type'));
}
- Report a vulnerability from your script: Use
scanState.addVuln()to raise a finding. Covers all parameters andvulnerability_typefields including CVSS, tags, and references.
View addVuln reference
Use scanState.addVuln() to raise a vulnerability alert. Invicti treats it exactly like a built-in check result: it appears in the UI and can be sent to connected issue trackers.
Custom checks must fully describe the vulnerability inline using a vulnerability_type object. Grouping and deduplication is done by content hash of the entire vulnerability_type object, so the full definition matters.
scanState.addVuln({
    location: scriptArg.location,
    http: job,
    vulnerability_type: {
        name: 'Vulnerability name',
        severity: 'high',
        description: 'Description of the vulnerability.'
    }
});
addVuln parameters:
| Property | Required | Description |
|---|---|---|
location | Yes (if path not set) | An ax.state.Location object for where the vulnerability was found. Pass scriptArg.location to use the current invocation's location, or scriptArg.target.root for server-level findings. |
path | Yes (if location not set) | A string path to the affected location. Must be absolute (starting with /) and within the scope of the current scan. If Invicti isn't aware of the path, it assigns the vulnerability to / instead. |
vulnerability_type | Yes | Object describing the vulnerability inline. See fields below. |
http | No | The HTTP request/response pair that triggered the alert. Pass scriptArg.http for the current invocation's pair, or a manually created ax.http.Job object. Displayed alongside the alert in the UI. |
details | No | Details of the vulnerability instance. |
tags | No | Instance-level tags for this specific finding. |
vulnerability_type fields:
| Field | Required | Type | Description |
|---|---|---|---|
name | Yes | string | Display name shown in the UI. Keep it short and descriptive. |
severity | Yes | string | 'info', 'low', 'medium', 'high', or 'critical'. Case-insensitive. |
cvss | No | string | CVSS v3 vector string, for example, "CVSS:3.1/AV:N/AC:L/PR:N/UI:N/S:U/C:H/I:H/A:H" |
description | No | string | Full description of the vulnerability class. |
details_template | No | string | Mustache template for per-instance details. Variables come from the details property of addVuln. |
impact | No | string | What an attacker could do if the vulnerability is exploited. |
recommendation | No | string | Remediation guidance for developers. |
tags | No | string[] | Classification tags, for example, ['owasp-a05', 'information-disclosure']. |
references | No | Array<{name, url}> | External references. Each entry must have a name (link text) and a url. |
The engine generates a stable type ID from a content hash of the entire vulnerability_type object. Two addVuln calls that produce an identical vulnerability_type are grouped under the same type in the UI. Any difference in any field - including trailing whitespace or capitalisation - produces a different type ID and a separate entry.
- HttpData checks: Key differences when writing HttpData scripts, and how to use
getAtomicCounter()to prevent duplicate findings.
View HttpData-specific API
An HttpData script has access to the same scriptArg and scanState objects as Target and Location scripts, with two key differences:
- Called for every HTTP exchange - every request the crawler makes during the scan, including page fetches, API calls, redirects, and sub-resource loads. A scan of a medium-sized application can produce tens of thousands of invocations.
scriptArg.httpcontains the request and response that triggered this invocation. You don't need to create a job; the exchange is already there.
Deduplication with scanState.getAtomicCounter()
getAtomicCounter(scope, id).incrementBounded(limit) returns true the first limit times it's called with the same id within a scan, and false thereafter. It is thread-safe and designed for exactly this use case.
// Report at most once per scan
if (scanState.getAtomicCounter(null, 'my-finding-id').incrementBounded(1)) {
    // check logic
}

// Report at most once per location
if (scanState.getAtomicCounter(scriptArg.location, 'my-finding-id').incrementBounded(1)) {
    // check logic
}
Pass null as the scope to count globally across the entire scan, or pass a Location object to count per location.
- Add unlisted endpoints to the scan: Use
scanState.hintLinks()to tell Invicti about endpoints not linked from anywhere on the site.
View hintLinks reference
If a target has pages or endpoints that aren't referenced anywhere on the site, use scanState.hintLinks() to tell Invicti about them. Invicti then includes them in Discovery, Analysis, and Testing - so they get tested just like any other discovered page.
scanState.hintLinks(['/hidden-endpoint.php', '/admin/config']);
URIs must be absolute (starting with /) and within the scope of the current scan. Out-of-scope URIs are ignored.
- Write debug logs: Functions for writing to the scan log (
ax.logi,ax.logd,ax.logw,ax.loge) and how to access log files.
View logging functions
Use these functions to write messages to the scan log while you develop and test your scripts:
| Function | Level | Description |
|---|---|---|
ax.logd(msg) | Debug | Verbose output, shown only when debug logging is enabled |
ax.logi(msg) | Info | General informational messages |
ax.logw(msg) | Warning | Non-fatal warnings |
ax.loge(msg) | Error | Error conditions |
ax.logi('Checking target: ' + scriptArg.target.url);
ax.logd('Response status: ' + job.response.status);
To exit the script early:
if (job.error) {
    ax.loge('Request failed: ' + job.error.message);
    ax.exit();
}
Log file download is enabled by default when custom scripts are enabled for your account. After the scan completes, the log file location appears on the Events tab. If you can't access log files, contact Invicti Support.


- Encode and decode strings: Helper functions in
ax.utilfor Base64, HTML encoding, hashing, and version comparison.
View ax.util functions
Use these helper functions when you need to encode or decode string values while processing requests and responses:
| Function | Description |
|---|---|
ax.util.base64Encode(str) | Encode a string to Base64 |
ax.util.base64Decode(str) | Decode a Base64 string |
ax.util.htmlEncode(str) | Escape HTML special characters (<, >, ") |
ax.util.htmlDecode(str) | Unescape HTML entities |
ax.util.md5(str) | MD5 hash (hex string) |
ax.util.sha1(str) | SHA-1 hash (hex string) |
ax.util.sha256(str) | SHA-256 hash (hex string) |
ax.util.compareVersions(v1, v2) | Compare two version strings. Returns 1, 0, or -1. |
Example:
let testString = 'This is <b>bold</b> text';
let encoded = ax.util.htmlEncode(testString);
ax.logi('Encoded: ' + encoded);
// Output: Encoded: This is <b>bold</b> text
let decoded = ax.util.htmlDecode(encoded);
ax.logi('Decoded: ' + decoded);
// Output: Decoded: This is <b>bold</b> text
- Parse HTML and XML responses: Use
ax.struct.parseResponse()for HTML structure andax.struct.parseXml()for XML responses.
View ax.struct functions
ax.struct.parseResponse(job)
Parses the HTTP response body and returns a structural representation.
let structure = ax.struct.parseResponse(job);
if (structure) {
    let formCount = structure.statistics.formsCount;
    ax.logi('Found ' + formCount + ' forms');
}
Returned Structure properties:
| Property | Type | Description |
|---|---|---|
links | List<Link> | External resource links found in the page |
forms | List<HtmlForm> | HTML forms with their inputs |
statistics | Statistics | Response metrics: status code, word count, form count, etc. |
ax.struct.parseXml(data)
Parses an XML string and returns a DOM-like DOMDocument. Always check the error property before processing:
let parsedXML = ax.struct.parseXml(job.response.body);

if (parsedXML.error === true) {
    // Unable to parse as XML
} else {
    let outer = parsedXML.getElementsByTagName('outer')[0];
    let inner = outer.getElementsByTagName('inner')[0];

    let innerText = inner.text;
    let attrValue = inner.getAttribute('my-attribute');
}
Every DOMNodeList has a length property, which lets you iterate over elements when the XML structure isn't known in advance.
Troubleshooting
My custom security check doesn't run during the scan
Check the following:
- The check is uploaded and visible under Scans > Custom security checks.
- The scan profile you selected includes the check.
- The file uses the
.jsextension. - Check the scan log for JavaScript errors. Any uncaught exception silently stops the script.
The script runs but I can't find the log files
Log file download is enabled by default when custom scripts are enabled for your account. After the scan completes, the log file location appears on the Events tab. If you cannot access log files, contact Invicti Support.
A vulnerability alert is assigned to / instead of the correct path
This happens when you pass a path value in addVuln() that Invicti isn't aware of. Either switch to location: scriptArg.location, or make sure the path was discovered during the scan or added via scanState.hintLinks() before the alert is issued.
Two identical checks produce separate vulnerability types in the UI
The vulnerability type ID is derived from a content hash of the entire vulnerability_type object. Any difference in any field - including trailing whitespace or capitalisation - produces a different type. Make sure the vulnerability_type object is byte-for-byte identical across all addVuln calls that are meant to represent the same vulnerability type.
Findings from a previous scan are still shown
After changing vulnerability_type fields in your script, run a fresh scan. The old findings (under the old type ID) and the new findings (under the new type ID) will both appear until the old ones are resolved or archived.
An HttpData check reports the same finding dozens of times
HttpData scripts run for every HTTP exchange, so a check without deduplication raises a finding for every matching page. Use scanState.getAtomicCounter(null, 'unique-id').incrementBounded(1) to cap reporting at one per scan, or pass scriptArg.location instead of null to cap at one per location.
An HttpData check runs but produces no results
Check that you aren't calling ax.exit() too early. Add ax.logi('invoked: ' + scriptArg.http.request.uri) at the very top of the script to confirm it's being called, then progressively lower it to find where execution stops.
Need help?
Invicti Support team is ready to provide you with technical help. Go to Help Center