Deployment: Invicti Platform on-demand, Invicti Platform on-premises
Package: Invicti Ultimate
Requires: API access
Set up SCIM provisioning
SCIM 2.0 provisioning lets your identity provider automatically create, update, and remove users and teams in Invicti Platform. This document covers how to set up OAuth 2.0 client credentials for SCIM authentication. Once done, continue to Configure your directory to connect your identity provider.
Long-lived bearer tokens aren't supported, so you must use client credentials for any SCIM client such as Microsoft Entra ID.
To set up client credentials, you first obtain a short-lived token from your browser session, then use it to create and authorize a client registration. Once set up, you can exchange your client credentials for a bearer token to use in SCIM requests.
Replace <base-url> in each request with your regional platform URL: US (https://platform.invicti.com), EU (https://platform-eu.invicti.com), CA (https://platform-ca.invicti.com), or your on-premises or private tenant URL.
Follow the steps below to obtain your client credentials.
Step 1: Obtain a short-lived token
Tokens obtained this way are valid for 1 hour and are used only to set up your client registration. Use an account with an Owner role to ensure you have the required permissions for the following steps.
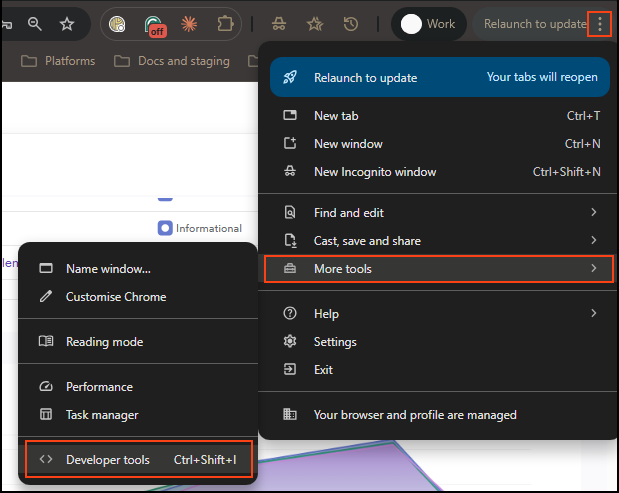
Log in to Invicti Platform in your browser, then open Developer Tools (three-dot menu > Developer Tools, or Ctrl+Shift+I).

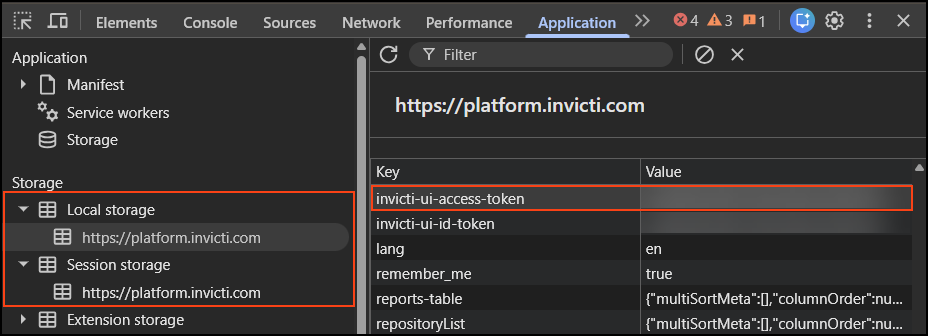
Under the Application tab, look in Local Storage or Session Storage for the key invicti-ui-access-token. Copy the full value - you need it in Steps 2 and 3.
Step 2: Create a client registration
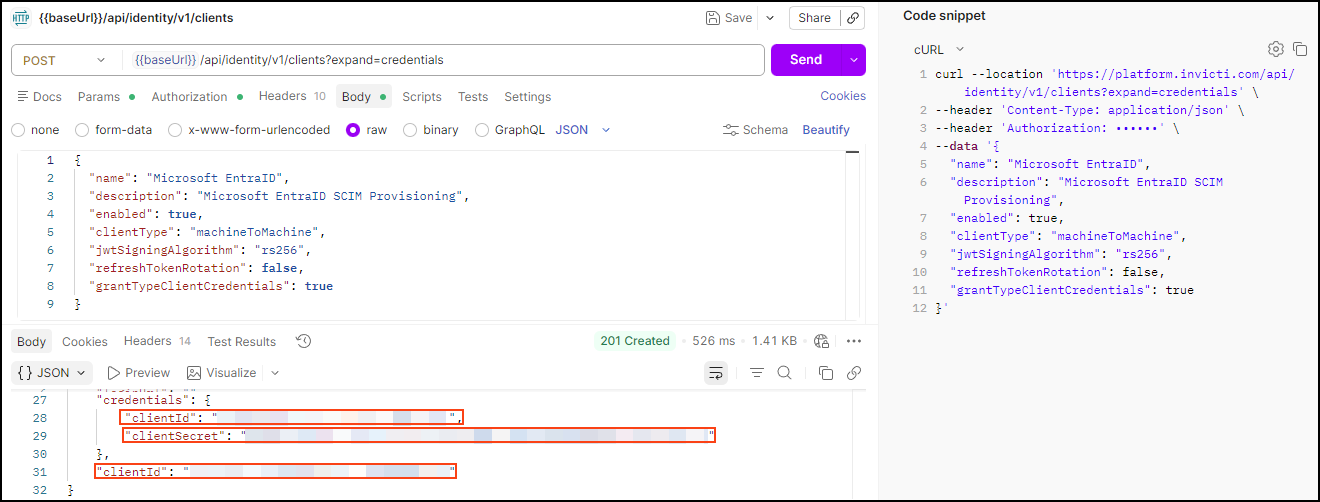
Run this request to create a client registration
POST <base-url>/api/identity/v1/clients
Headers:
  Content-Type: application/json
  Authorization: Bearer <access-token>
Body:
{
  "name": "Microsoft EntraID",
  "description": "Microsoft EntraID SCIM Provisioning",
  "enabled": true,
  "clientType": "machineToMachine",
  "jwtSigningAlgorithm": "rs256",
  "refreshTokenRotation": false,
  "grantTypeClientCredentials": true
}
Replace the following values before sending the request:
| Placeholder | Required | Description | Example |
|---|---|---|---|
<base-url> | Yes | Your regional platform URL | https://platform.invicti.com |
<access-token> | Yes | The accessToken from Step 1 | — |
Expected response: 201 Created. Save these values - you need them in Steps 3 and 4:
clientId: the UUID needed to authorize your client in Step 3credentials.clientId: used to get a bearer token in Step 4credentials.clientSecret: used to get a bearer token in Step 4

Step 3: Authorize your client
Machine-to-machine authorization grants broad access to API resources, so you must explicitly authorize the client you created.
Run this request to authorize your client
POST <base-url>/api/identity/v1/apis/00000000-0000-0000-0000-000000000001/clients
Headers:
  Content-Type: application/json
  Authorization: Bearer <access-token>
Body:
[
  { "clientId": "<clientId>" }
]
Use the clientId UUID from Step 2, not credentials.clientId.
Replace the following values before sending the request:
| Placeholder | Required | Description | Example |
|---|---|---|---|
<base-url> | Yes | Your regional platform URL | https://platform.invicti.com |
<access-token> | Yes | The accessToken from Step 1 | - |
<clientId> | Yes | The clientId UUID from Step 2 | a1b2c3d4-e5f6-7890-abcd-ef1234567890 |
Expected response: 201 Created. The response body returns the list of clients now authorized for the API.
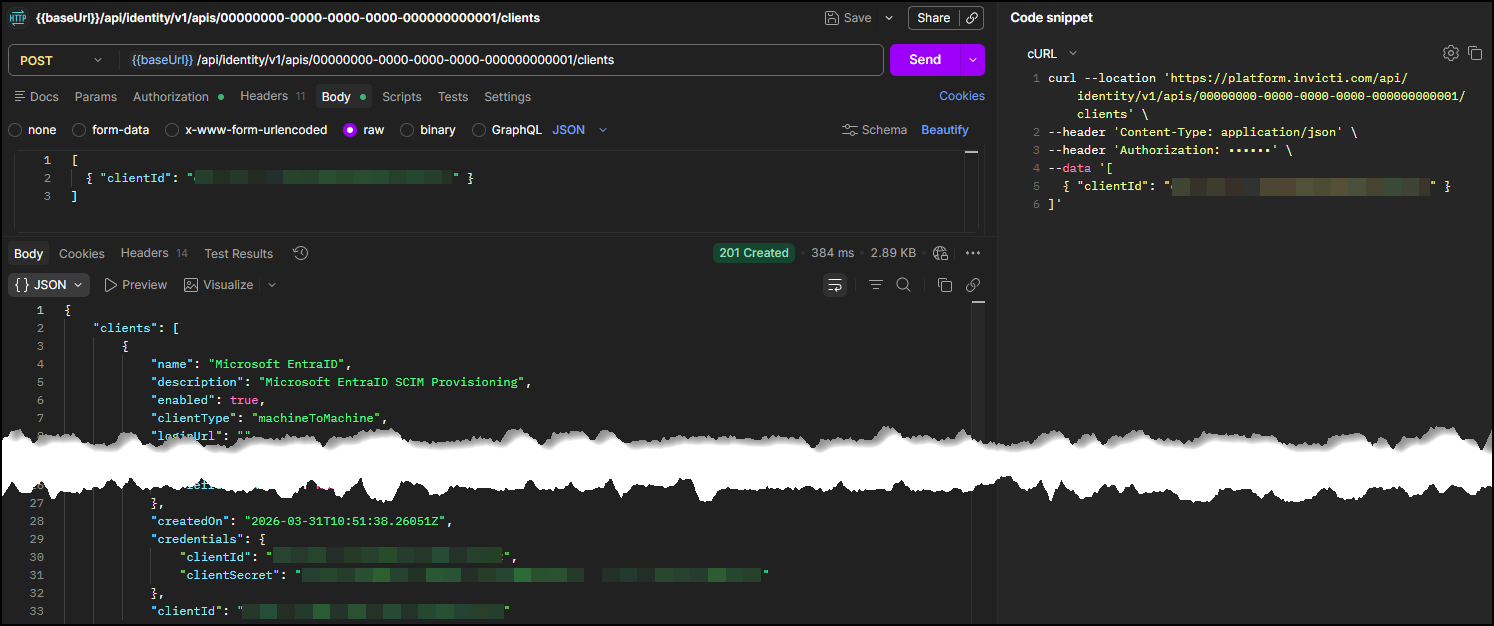
You can create as many client registrations as you need.
Keep your credentials.clientId and credentials.clientSecret safe. Anyone with an Owner role can read them.
Step 4: Get a bearer token for SCIM requests
Use your credentials.clientId and credentials.clientSecret to get a bearer token. You need this token to authenticate all SCIM API requests.
Run this request to get a bearer token
POST <base-url>/oauth/token?scope=scim2
Headers:
  Content-Type: application/x-www-form-urlencoded
Body:
  grant_type=client_credentials
  client_id=<credentials-client-id>
  client_secret=<credentials-client-secret>
In Postman, select Body > x-www-form-urlencoded and enter grant_type, client_id, and client_secret as separate key-value pairs.
Replace the following values before sending the request:
| Placeholder | Required | Description | Example |
|---|---|---|---|
<base-url> | Yes | Your regional platform URL | https://platform.invicti.com |
<credentials-client-id> | Yes | The credentials.clientId from Step 2 | - |
<credentials-client-secret> | Yes | The credentials.clientSecret from Step 2 | - |
Expected response: 200 OK
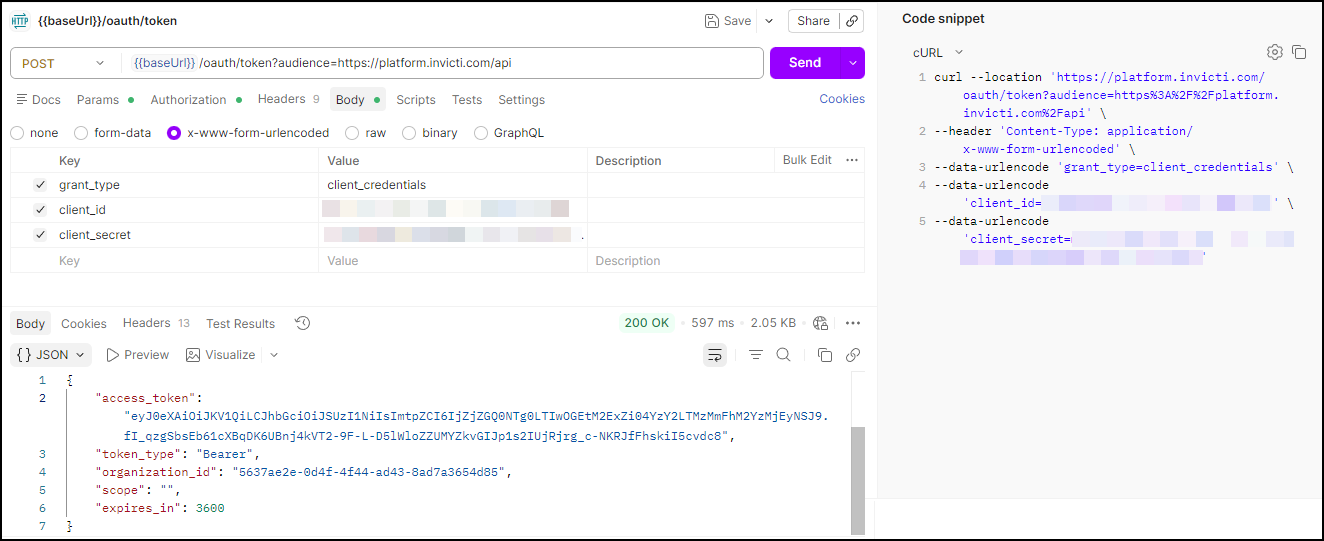
Save the access_token value. Use it as the Authorization: Bearer <bearer-token> header in all SCIM API requests.
Next steps
With your client credentials ready, configure your identity provider:
→ Continue to Configure your directory
See also
- SCIM provisioning reference for supported schemas, features, attributes, and known limitations.
Need help?
Invicti Support team is ready to provide you with technical help. Go to Help Center