Deployment: Invicti Platform on-demand, Invicti Platform on-premises
Invicti Platform Add-on for Splunk
Splunk is a Security Information and Event Management (SIEM) platform that collects and centralizes machine-generated data - operating system logs, antivirus events, and application outputs - to generate graphs, reports, and alerts. Integrating with Splunk lets you import detected vulnerabilities from Invicti Platform into your centralized security environment for streamlined monitoring and reporting.
This document explains how to set up the Invicti Platform Add-on for Splunk in five steps: getting your API key, installing the add-on, configuring your Invicti account, creating a data input, and searching your vulnerability data.
Why this matters
Without this integration, vulnerability data stays siloed in Invicti Platform while your security team works in Splunk. Connecting the add-on means Splunk automatically pulls in detected vulnerabilities so you can correlate them with other security events, build dashboards, and trigger alerts - all from your existing SIEM workflow. This removes the manual step of exporting and importing data between tools.
Prerequisites
Before you start, make sure you have:
- Splunk Enterprise 9.0 or later, or a Splunk Cloud account
- An Invicti Platform account with API access
- Network access from your Splunk instance to your Invicti Platform URL (
https://platform.invicti.comfor US,https://platform-eu.invicti.comfor EU,https://platform-ca.invicti.comfor CA, or your own hostname for on-premises)
Step 1: Get your Invicti API key
You need an API key from Invicti Platform to authenticate the add-on.
-
In Invicti Platform, select your profile icon in the top-right corner, then select User settings.
-
Go to the API key section and generate a new key.
-
Copy the key - you'll paste it into Splunk in Step 3.
The API key is sent as an encrypted header on every API request. Splunk stores it encrypted.
Step 2: Install the Splunk add-on
- Splunk Enterprise
- Splunk Cloud
-
In Splunk Web, navigate to Apps > Manage Apps.
-
Click Install app from file (top-right button).
-
Select the file
TA-invicti-platform-1.0.0.spland click Upload. -
Restart Splunk if prompted.
Alternatively, navigate to Apps > Find More Apps, search for Invicti Platform, and click Install. This requires a Splunkbase login.
-
In your Splunk Cloud instance, click Apps in the top-left navigation, then click Browse More Apps.
-
Search for Invicti Platform.
-
Click Install. You may be prompted to log in with your Splunkbase account.
-
The add-on appears in your Apps list once installed.
Step 3: Configure your Invicti account in Splunk
Add your Invicti Platform API credentials so the add-on can authenticate to the API.
-
In Splunk, navigate to Apps > Invicti Platform Add-on > Configuration > Account.
-
Click Add and complete the fields:
| Field | Description |
|---|---|
| Account name | A label for this connection, for example prod |
| Base URL | Your Invicti Platform URL. For on-demand: https://platform.invicti.com (US), https://platform-eu.invicti.com (EU), or https://platform-ca.invicti.com (CA). For on-premises: your own hostname |
| API Token | The API key you copied in Step 1 |
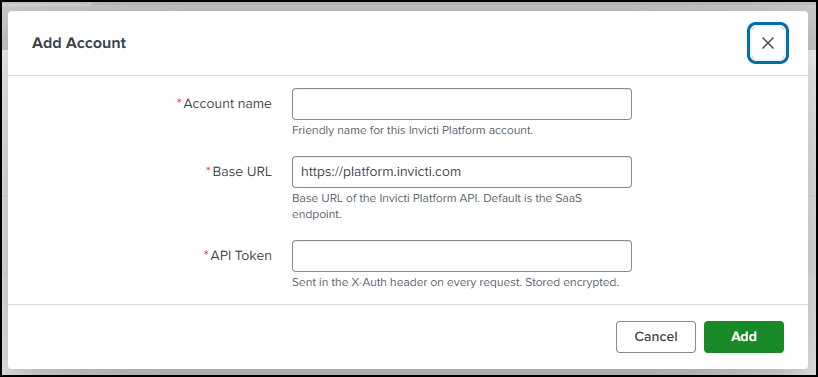
- Click Save. The account appears in the Invicti Account dropdown in the next step.
The Proxy tab configures an outbound HTTP, HTTPS, SOCKS4, or SOCKS5 proxy - use this if your Splunk instance needs a proxy to reach platform.invicti.com. The Logging tab sets the log level (default: INFO). Set it to DEBUG to log every API query parameter during troubleshooting.
Step 4: Create a data input
Create an input to tell Splunk how often to pull vulnerability data and what to collect.
-
Navigate to Apps > Invicti Platform Add-on > Inputs.
-
Click Create new input > Invicti vulnerabilities and complete the fields:
| Field | Description |
|---|---|
| Name | A unique name for this input, for example vuln |
| Interval | Seconds between collection runs. Minimum 60, default 300 (5 minutes) |
| Index | The Splunk index to write to. The default index is fine for testing |
| Invicti Account | Select the account you created in Step 3 |
| Asset ID | Optional. Filter to a single asset. Leave blank to collect all assets |
| Origin ID | Optional. Filter to a single origin. Leave blank to collect all |
| Page size | Vulnerabilities per API page. Default 50, maximum 200 |
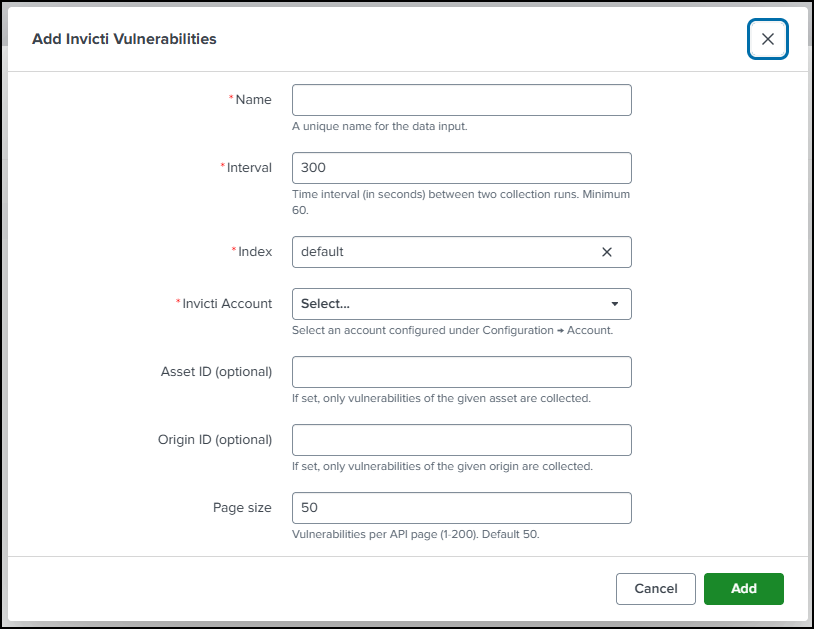
- Click Add. The input starts collecting immediately.
The first run performs a full collection of all vulnerabilities. Subsequent runs are incremental - only vulnerabilities with a lastSeen timestamp newer than the previous run are fetched.
Step 5: Search for vulnerability data
Once the input is running, vulnerabilities are indexed in Splunk under the sourcetype invicti:platform:vulnerability. Each vulnerability is a self-contained JSON event, so every API field is immediately searchable.
-
In Splunk, navigate to Apps > Search & Reporting.
-
Set the time range to Last 24 hours or All time on the first run.
-
Paste any of the following searches into the search bar and press Enter:
Confirm data is arriving
sourcetype="invicti:platform:vulnerability"
Count vulnerabilities by severity
sourcetype="invicti:platform:vulnerability"
| stats count by severity
List critical findings
sourcetype="invicti:platform:vulnerability" severity=Critical
| table _time, name, url, cvssScore, lastSeen
Troubleshooting
Splunk can't connect to Invicti Platform
Confirm that the Base URL and API Token in the add-on account settings are correct. For on-premises deployments, also confirm that your Invicti Platform instance is network-accessible from the Splunk server. If your Splunk instance uses a proxy to reach external services, configure it under Configuration > Proxy.
No vulnerability data appears after the first run
Check that the input is enabled under Invicti Platform Add-on > Inputs. Verify the Invicti Account selected in the input matches the account you saved in Step 3. For the first run, set the Splunk search time range to All time to rule out a time filter issue. Enable DEBUG logging under Configuration > Logging to see detailed API query output.
Data stops updating after the first run
Subsequent runs are incremental and only fetch vulnerabilities with a lastSeen timestamp newer than the previous run. If no new vulnerabilities have been detected, no new events are indexed - this is expected behavior.
Need help?
Invicti Support team is ready to provide you with technical help. Go to Help Center