Package: Invicti AppSec Core (on-demand)
Azure Active Directory
Azure Active Directory configuration
- Visit https://portal.azure.com/#home.
- Select Azure Active Directory from the Azure services list.
- Select App registrations from the left menu under the Manage group and click the New Registration button.
- Type "invictiappsec" into the name field, and select the supported account type to configure who can access Invicti AppSec from Azure Active Directory, select Web as the Redirect URI platform, add ''
{YOUR_INVICTI_AppSec_HOST}/login/azureactivedirectoryas Redirect URI, and click the Register button. - Select Certificates & secrets from the left menu under the Manage group in invicti-AppSec application registration.
- Select the Client Secrets tab and click the New client secret button.
- Type "invictiappsec" into the description field, select an expiration value from the list, and click the Add button.
- Copy the client's secret value to a safe place.
- Select API permissions from the left menu under the Manage group in the invicti-AppSec application registration and click the Add a permission button.
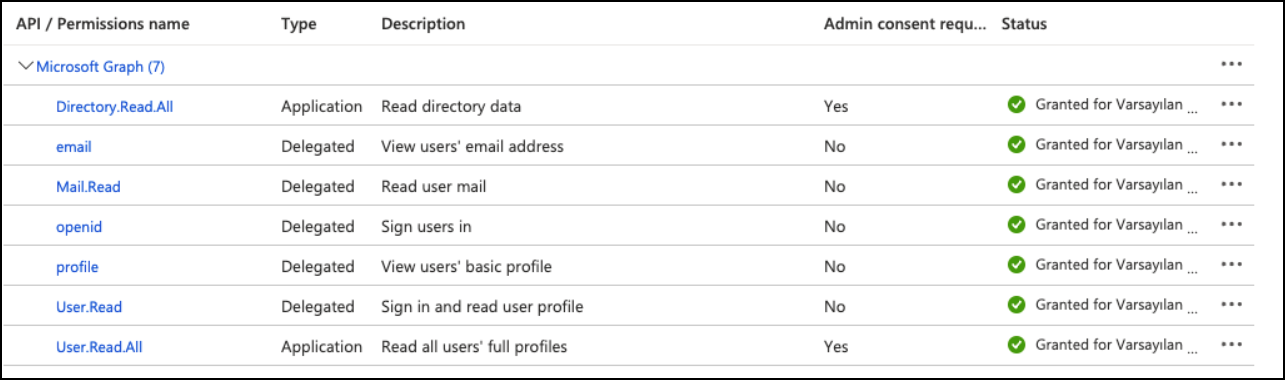
- Select the Microsoft APIs tab, select Microsoft Graph from the API list, and select the Application permissions value as the type of permission, choose and expand Directory permissions from the permissions list, and check Directory.Read.All permission and select and expand User permissions from the permissions list, check User.Read.All permission and click the Add permissions button.
- In the same Microsoft APIs tab, select Microsoft Graph from the API list, select the Delegated permissions value as the type of permission, select and expand OpenId permissions from the permissions list, check email, openid, profile permissions and select and expand Mail permissions from the permissions list, check Mail.Read permission and, select and expand User permissions from the permissions list, check User.Read permission and click the Add permissions button.
- Click the Grant admin consent for the default directory button, then click Yes on the popup confirmation panel.
-
Select Token configuration from the left menu under the Manage group in invicti-AppSec application registration and click the Add optional claim button.
-
Select ID as a token type and select the email, family_name, given_name, preferred_username claims from the claim list and click the Add button.
-
Check the checkbox and click the Add button on the optional claim popup confirmation panel.
-
Select App roles from the left menu under the Manage group in invicti-AppSec application registration and click the Create app role button.
-
Enter "Invicti AppSec Admin" value as Display name, select "User/Groups" value as Allowed member types, enter "InvictiAppSecAdmin" value as Value, and enter "Invicti AppSec Admin" value as Description and click the Apply button.
-
Enter "Invicti AppSec Product Owner" value as Display name, select "User/Groups" value as Allowed member types, enter "InvictiAppSecProductOwner" value as Value, and enter "Invicti AppSec Product Owner" value as Description and click the Apply button.
-
Enter "Invicti AppSec Manager" value as Display name, select "User/Groups" value as Allowed member types, enter "InvictiAppSecManager" value as Value, and enter "Invicti AppSec Manager" value as Description and click the Apply button.
-
Enter "Invicti AppSec Team Lead" value as Display name, select "User/Groups" value as Allowed member types, enter "InvictiAppSecTeamLead" value as Value and enter "Invicti AppSec Team Lead" value as Description and click the Apply button.
-
Enter "Invicti AppSec Developer" value as Display name, select "User/Groups" value as Allowed member types, enter "InvictiAppSecDeveloper" value as Value, and enter "Invicti AppSec Developer" value as Description and click the Apply button.
-
Enter "Invicti AppSec Pentester" value as Display name, select "User/Groups" value as Allowed member types, enter "InvictiAppSecPentester" value as Value, and enter "Invicti AppSec Pentester" value as Description and click the Apply button.
-
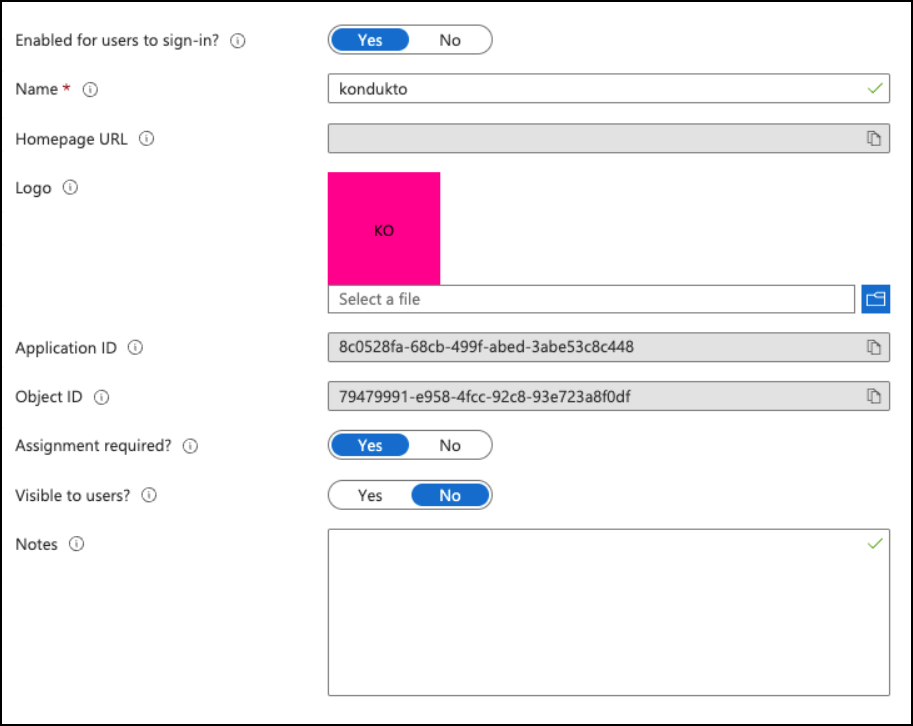
Select Overview from the left menu.
-
Copy Application (client) ID and Directory (tenant) ID to a safe place.
-
Click the "invictiappsec" value in the connection link "Managed application in local directory" in Essentials panel.
-
Select Properties from the left menu.
-
Select the value of "Assignment required?" as Yes then click the Save button.
- Select Users and groups from the left menu, then click the Add user/group button.
- Select a group and assign the group with "Invicti AppSec Admin" role and then click the Assign button.
- Select a group and assign the group with "Invicti AppSec Product Owner" role and then click the Assign button.
- Select a group and assign the group with "Invicti AppSec Manager" role and then click the Assign button.
- Select a group and assign the group with "Invicti AppSec Team Lead" role and then click the Assign button.
- Select a group and assign the group with "Invicti AppSec Developer" role and then click the Assign button.
- Select a group and assign the group with "Invicti AppSec Pentester" role and then click the Assign button.
Invicti AppSec configuration
- Login to your Invicti AppSec application with a user who has the admin role.
- Select Settings from the left menu.
- Select Single Sign-On Tools from the Integrations menu.
- Create or Update the Azure Active Directory.
- Enter Tenant ID, Client ID, and Client Secret information of your Azure Active Directory application, which is named invictiappsec.
- Map roles defined in Azure Active Directory invicti-AppSec application with listed Invicti AppSec roles.
Need help?
Invicti Support team is ready to provide you with technical help. Go to Help Center