Deployment: Invicti Platform on-demand, Invicti Platform on-premises
Azure DevOps extension
The Invicti Platform Azure DevOps extension integrates dynamic application security testing (DAST) directly into your Azure DevOps pipelines. This document explains how to install the extension, configure it, and use it to scan your targets as part of your automated build and release workflows.
Why this matters
Integrating security scanning into your CI/CD pipeline catches vulnerabilities early, without requiring manual steps or separate security testing workflows. Your team scans websites, web applications, and web services automatically and fails builds based on vulnerability severity - keeping security checks consistent and reducing the time between vulnerability discovery and remediation.
Prerequisites
Before you install the extension, you need:
- An Invicti Platform account with administrator access to generate API keys
- An Azure DevOps organization where you can install extensions
- Permission to create service connections in your Azure DevOps project
Install the extension
The extension is available free on the Visual Studio Marketplace.
- Go to the Invicti Platform Azure DevOps extension page on the Visual Studio Marketplace.
- Click Get it free.
- Select the Azure DevOps organization where you want to install the extension.
- Click Install to complete the installation.
Configure the service connection
To connect Azure DevOps to your Invicti Platform account, you need to create a service connection using an API key.
-
Generate an API key in Invicti Platform:
- Click your initials in the upper right corner.
- Select User settings > API Key.
- Click Generate new to create a new token, or copy an existing one.
- Copy the token immediately - you won't be able to view it again.
-
Create a service connection in Azure DevOps:
-
Go to your Azure DevOps project.
-
Select Project settings (gear icon in the bottom-left corner).
-
Select Service connections under Pipelines.
-
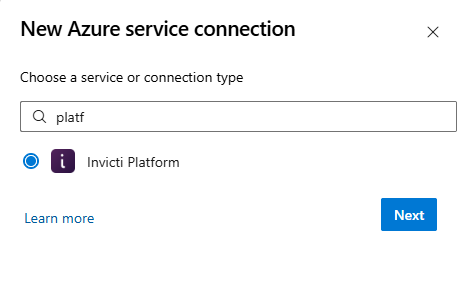
Click Create service connection, search for platform, and select the Invicti Platform service connection type. Then click Next.
-
- The Invicti Platform service connection window opens.
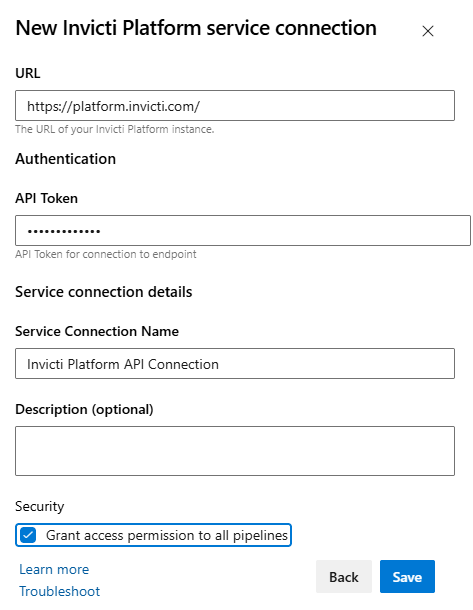
- Enter the following information:
- URL: Keep the default value (
https://platform.invicti.com) or enter the URL for your region:- United States:
https://platform.invicti.com - European Union:
https://platform-eu.invicti.com - Canada:
https://platform-ca.invicti.com
- United States:
- API Token: Paste the API key you generated in Invicti Platform.
- Service Connection name: Enter a friendly name (for example, "Invicti Platform").
- URL: Keep the default value (
- Select the Grant access permissions to all pipelines checkbox.
- Click Save.
Add the extension to your pipeline
Once you configure the service connection, you can add the Invicti Platform extension as a task to any build or release pipeline.
- From within Azure DevOps, create or find the pipeline where you want to add the task.
- Edit the pipeline.
- Identify the agent used for running the task and select the + (plus) icon to add a new task.
- Search or scroll the list of tasks until you find Invicti Platform and select Add.

-
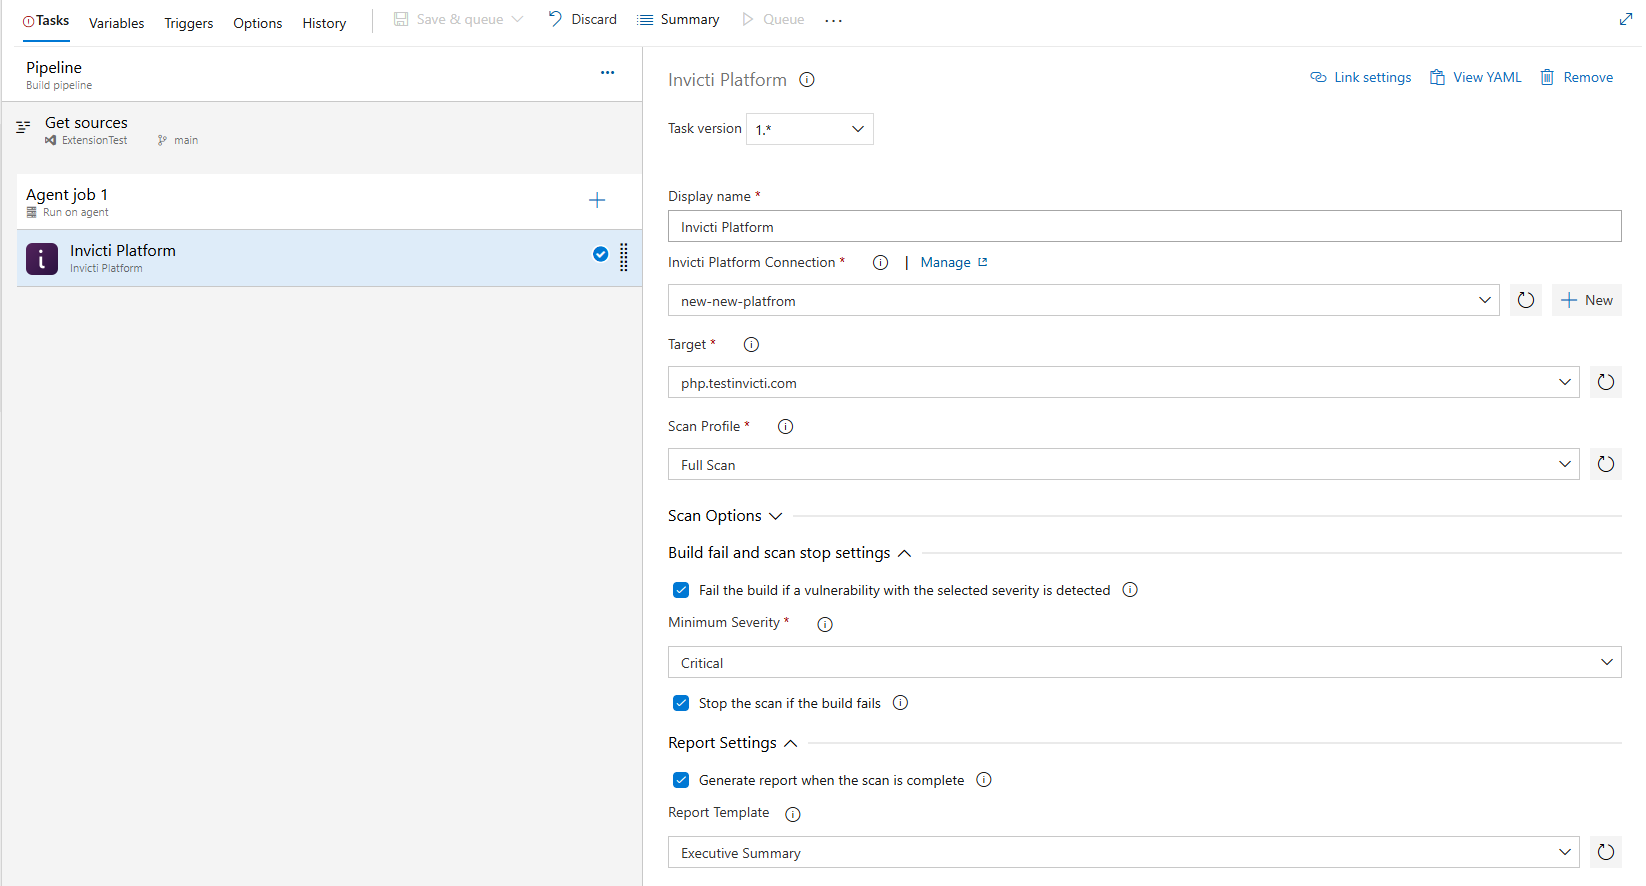
Configure the task with the following required and optional settings:
Required fields:
- Display name: Enter a name for this task (for example, "Invicti Platform").
- Invicti Platform connection: Select the service connection you created. You can also click Manage to edit the connection or New to create a new one.
- Target: Select the target URL you want to scan from the available targets in your Invicti Platform account.
- Scan profile: Select the scan profile to use for the scan.
Optional settings:
- Scan options: Expand this section for additional scanning configuration options.
- Build fail and scan stop settings: Expand this section to:
- Enable Fail the build if a vulnerability with the selected severity is detected and select the Minimum Severity level (Critical, High, Medium, Low).
- Enable Stop the scan if the build fails to stop the scan immediately if the build fails.
- Report Settings: Expand this section to:
- Enable Generate report when the scan is complete.
- Select a Report Template for the generated report (for example, "Executive Summary").
- Save and run your pipeline. The extension launches a scan in Invicti Platform and monitors its progress.
For more information on CI/CD integration, refer to:
- Integrate CI-driven scans - Configure automated scans triggered by your CI/CD pipeline
- CI/CD environment variables - Learn about environment variables for CI/CD integrations
View scan reports
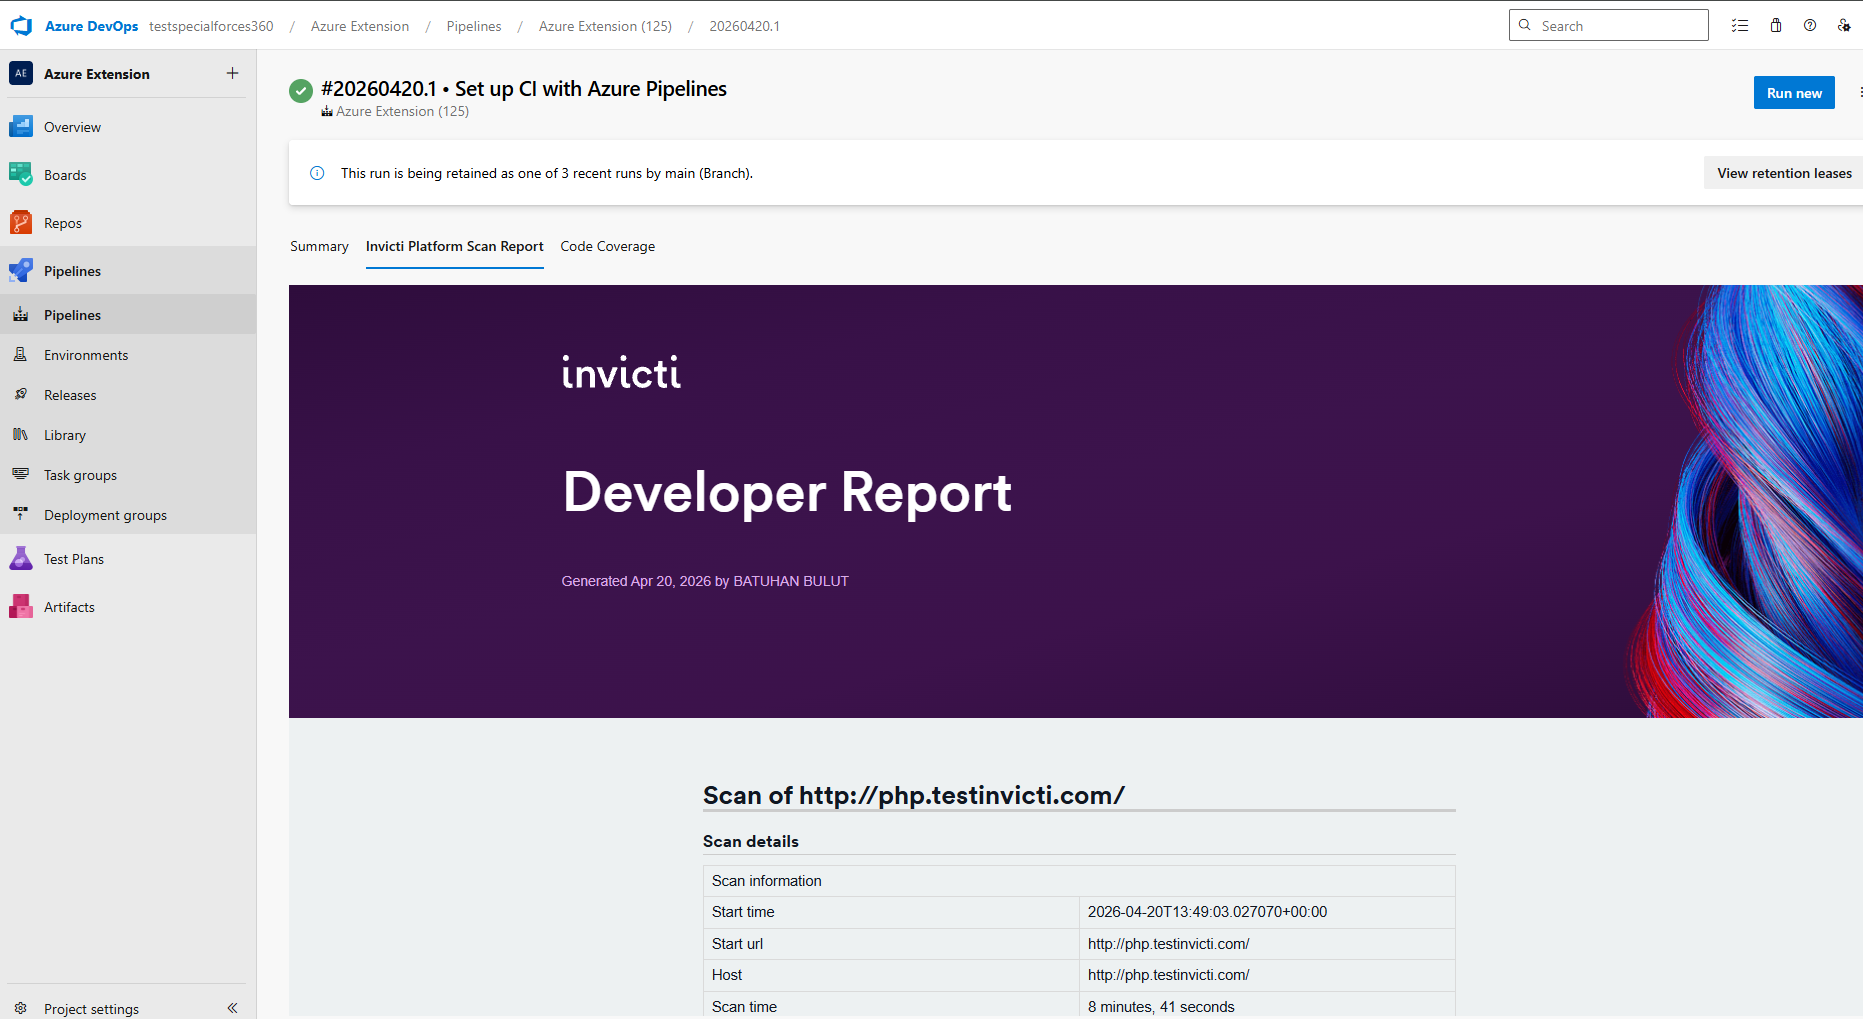
After a scan completes, the system generates reports that you can access within your Azure DevOps pipeline interface.
- Go to the pipeline run that executed the Invicti Platform task.
- Look for the Invicti Platform Scan Report tab in the pipeline output.
- View vulnerability findings, scan summary, and other details directly in Azure DevOps without switching to Invicti Platform.
Troubleshooting
The scan didn't start or the task failed to connect
Verify that your service connection credentials are correct:
- Go to Project settings > Service connections and click your Invicti service connection.
- Check that the Server URL matches your region and that the API key is current.
- If your API key expires or someone revokes it, generate a new one in Invicti Platform and update the service connection.
Also confirm that the target URL you entered in the pipeline task is valid and accessible from your Azure DevOps agents.
The build passed even though the scan found vulnerabilities
Check your Build failure settings in the pipeline task configuration:
- Confirm that you enable "fail on severity" and set it to the severity level you expect.
- If you don't select any severity levels, the build won't fail based on vulnerability findings.
- Redeploy the pipeline after adjusting these settings.
The scan report tab isn't appearing
Ensure that you enable Generate report in the pipeline task configuration. If you enable the report, wait a few minutes - report generation can take time after the scan completes. Refresh the pipeline page to see if the tab appears.
You see an "unauthorized" or "forbidden" error
This typically indicates that your API key doesn't have the necessary permissions or has expired:
- Generate a new API key in your Invicti Platform account.
- Update your Azure DevOps service connection with the new token.
- Rerun the pipeline.
Need help?
Invicti Support team is ready to provide you with technical help. Go to Help Center