Deployment: Invicti Platform on-demand, Invicti Platform on-premises
Integrate CI-driven scans
This document explains how to integrate Invicti Platform with your CI/CD pipelines (Jenkins, GitLab CI/CD, Azure Pipelines, GitHub Actions, CircleCI) to automate web application vulnerability scans and identify security issues before deployment.
The integration uses the Invicti scan-cli container-a lightweight Docker container configured entirely through environment variables. It connects to Invicti Platform to trigger and monitor scans, works with any CI/CD platform that supports Docker, and stores all scan results and reports centrally in Invicti Platform.
The scan-cli container triggers scans and monitors them. The actual scan duration is the same as running the same scan in the UI - you're using the pipeline to trigger it.
Prerequisites
Ensure the following requirements are met before proceeding:
- Permission to create and configure pipeline jobs in your CI/CD tool (Jenkins, GitLab CI/CD, Azure Pipelines, CircleCI, etc.). Admin access is not required.
- Docker command-line tool installed and running on the agent or node that executes your pipeline
- Invicti Platform account with API Security enabled
- Access to the Invicti Scan CLI Docker image. Refer to access Invicti registries for more information.
- A scan profile configured in Invicti Platform
Step 1: Generate an API token
You need an API token to authenticate the scan requests.
- In Invicti Platform, select your initials or avatar in the top right corner, then select User settings.
- Select API key.
- Copy the existing token, or select Generate new to create a new one. (If you generate a new token, the previous one becomes invalidated.)
- Store this token securely using your CI/CD platform's secret management. You'll need it for your CI/CD script.
Step 2: Get your target ID (API-based workflows only)
If you're preparing your script manually via API (rather than using the Invicti Platform UI script generator), retrieve the target ID:
curl -X 'GET' \
'https://platform.invicti.com/api/inventory/v1/assets?assetType=target&pageSize=50&pageNumber=1' \
-H 'accept: application/json' \
-H 'X-Auth: {your-api-token}'
The asset ID is located at $.items[0].id in the JSON response. For more options, refer to Retrieve the target ID.
Target IDs don't change, so you can save them alongside the website name and reuse them across different pipelines and configurations.
If you're using the Invicti Platform UI to generate your script, skip this step - the asset ID is automatically populated based on the target you select in Step 3.
Step 3: Prepare your script
- Generate from Invicti Platform
- Write a custom script
Invicti Platform provides a tool-specific script generator that produces pre-configured scripts with environment variables and platform-specific syntax.
- Choose Integrations from the left-side menu.
- Open the Browse Integrations tab.
- Choose your CI/CD platform (for example, Jenkins) and click Configure.
- Choose the Asset (target) and Scan Profile you want to use.
- (Optional) Set Build failure conditions. If you want the pipeline to fail when vulnerabilities are found, select Fail if vulnerability severity equals and choose a severity level (Critical, High, Medium, Low, or Info).
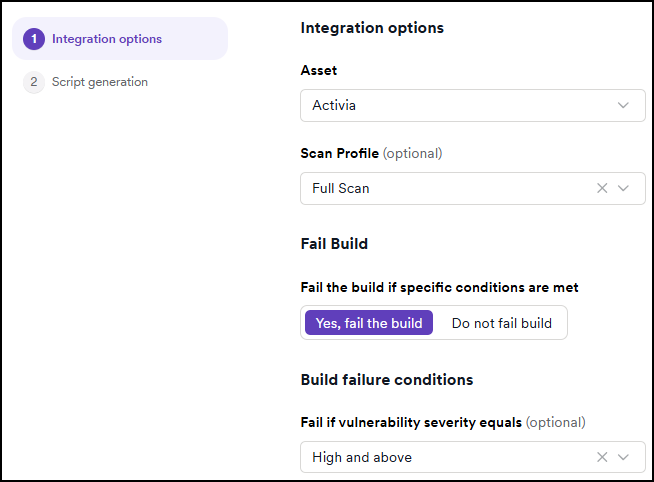
- Click Generate script.
If you selected an internal target, the generated script defaults to CloudAgent. You must manually:
- Change
INVICTI_SCAN_AGENT: "CloudAgent"toINVICTI_SCAN_AGENT: "EphemeralAgent" - Replace
INVICTI_TARGET_IDwithINVICTI_TARGET_URL - Set the target URL to your internal application's address
See the CI/CD platform examples below for full script examples.
Write your own script to pull the image, define environment variables, and run the container. This offers more control and is useful for complex pipelines. The general flow is the same: pull the container, define environment variables, and run it.
Step 4: Amend your script
If you generated a script from the UI, review and amend it as needed. The most common change is for internal targets: the script generator defaults to CloudAgent, but internal targets require EphemeralAgent.
Common amendments for internal targets:
- Change
INVICTI_SCAN_AGENTfrom"CloudAgent"to"EphemeralAgent" - Replace
INVICTI_TARGET_IDwithINVICTI_TARGET_URL - Set the target URL to your internal application's address (for example,
https://staging-internal.company.net)
Refer to the examples below and the CI environment variables reference for guidance.
Environment variables overview
All scripts require these core variables:
| Variable | Description | Publicly accessible target (CloudAgent) | Internal target (not publicly accessible) (EphemeralAgent) |
|---|---|---|---|
INVICTI_API_BASE_URL | API base URL for your Invicti instance | Required | Required |
INVICTI_API_TOKEN | Your API token for authentication | Required | Required |
INVICTI_TARGET_ID | ID of the pre-configured target | Required | - |
INVICTI_TARGET_URL | URL of the target to scan | - | Required |
INVICTI_SCAN_AGENT | Which agent type to use | CloudAgent | EphemeralAgent |
INVICTI_SCAN_PROFILE | Scan profile name | Required | Required |
For optional variables (timeout, report template, etc.), refer to CI environment variables.
Generic Docker examples
- Publicly accessible target (CloudAgent)
- Internal target (not publicly accessible) (EphemeralAgent)
docker pull invicti/scan-cli:latest
docker run \
  -e INVICTI_API_BASE_URL="https://platform.invicti.com" \
  -e INVICTI_API_TOKEN="<your-api-token>" \
  -e INVICTI_TARGET_ID="<your-target-id>" \
  -e INVICTI_SCAN_AGENT="CloudAgent" \
  -e INVICTI_SCAN_PROFILE="Full Scan" \
  invicti/scan-cli:latest
docker pull invicti/scan-cli:latest
docker run \
  -e INVICTI_API_BASE_URL="https://platform.invicti.com" \
  -e INVICTI_API_TOKEN="<your-api-token>" \
  -e INVICTI_TARGET_URL="https://staging-internal.company.net" \
  -e INVICTI_SCAN_AGENT="EphemeralAgent" \
  -e INVICTI_SCAN_PROFILE="Full Scan" \
  invicti/scan-cli:latest
The Invicti Scan CLI is available from:
- Docker Hub (public):
invicti/scan-cli - Invicti private registry:
platform-registry.invicti.com/invicti-platform/invicti-scan-cli
For access to private registries, refer to access Invicti registries.
Optional variables and advanced configuration
For optional variables (scan timeout, report templates, export formats, etc.) and advanced options, refer to CI environment variables.
Target authentication
If your target requires authentication:
- Publicly accessible target (CloudAgent): Configure credentials in Targets > Edit > Authentication in Invicti Platform.
- Internal target (not publicly accessible) (EphemeralAgent): Credentials must be passed via environment variables. Refer to CI environment variables for
INVICTI_API_USERNAMEandINVICTI_API_PASSWORD.
Network accessibility
- On-premises Invicti with cloud-hosted CI/CD: Ensure your CI/CD environment can reach your on-premises
INVICTI_API_BASE_URL. Network connectivity must exist before running scans. - Cloud-hosted CI/CD with internal targets: Use
EphemeralAgentso the scan runs from within your CI/CD network, allowing access to internal applications.
Step 5: Embed the script in your CI/CD pipeline
Once you have your script (generated or custom), integrate it into your pipeline:
- Share the script with your developer team.
- Add it as a build step towards the end of your pipeline, after your application has been built.
- Deploy the application to a test environment before running the scan.
- Configure the scan to run against that deployed environment.
This ensures you're scanning the actual built and deployed version of your application, not source code.
Each CI/CD tool has its own method for embedding the script. Make sure the script runs at the appropriate phase (for example, post-build, pre-deploy).
GitHub Actions
- Publicly accessible target
- Internal target (not publicly accessible)
name: Invicti Scan

on:
  workflow_dispatch: {}
  push:
    branches: [ main ]
  pull_request: {}

jobs:
  scan:
    runs-on: ubuntu-latest
    container:
      image: invicti/scan-cli:latest
    env:
      INVICTI_API_BASE_URL: "https://platform.invicti.com"
      INVICTI_API_TOKEN: ${{ secrets.INVICTI_API_TOKEN }}
      INVICTI_TARGET_ID: "<your-target-id>"
      INVICTI_SCAN_AGENT: "CloudAgent"
      INVICTI_SCAN_PROFILE: "Full Scan"

    steps:
      - name: Run Invicti Scan CLI
        run: /home/invicti/scancli/ScanCLI

      - name: Upload scan artifacts
        if: always()
        uses: actions/upload-artifact@v4
        with:
          name: invicti-scan-results
          path: |
            ./scan-results/**
            ./reports/**
            ./*.json
            ./*.html
          if-no-files-found: ignore
          retention-days: 7
name: Invicti Scan - Internal Target

on:
  workflow_dispatch: {}
  push:
    branches: [ main ]
  pull_request: {}

jobs:
  scan:
    runs-on: ubuntu-latest
    container:
      image: invicti/scan-cli:latest
    env:
      INVICTI_API_BASE_URL: "https://platform.invicti.com"
      INVICTI_API_TOKEN: ${{ secrets.INVICTI_API_TOKEN }}
      INVICTI_TARGET_URL: "https://staging-internal.company.net"
      INVICTI_SCAN_AGENT: "EphemeralAgent"
      INVICTI_SCAN_PROFILE: "Full Scan"
      INVICTI_MINIMUM_SEVERITY: "Critical"

    steps:
      - name: Run Invicti Scan CLI
        run: /home/invicti/scancli/ScanCLI

      - name: Upload scan artifacts
        if: always()
        uses: actions/upload-artifact@v4
        with:
          name: invicti-scan-results
          path: |
            ./scan-results/**
            ./reports/**
            ./*.json
            ./*.html
          if-no-files-found: ignore
          retention-days: 7
- Replace
<your-target-id>(CloudAgent) orhttps://staging-internal.company.net(EphemeralAgent) with your actual target details. - Store
INVICTI_API_TOKENas a GitHub secret, not in plain text. Refer to GitHub Actions secrets. - Adjust
INVICTI_SCAN_PROFILEto match a profile configured in your Invicti Platform instance.
Jenkins
Jenkins requires the Docker Pipeline plugin (via Manage Jenkins > Manage Plugins). Add the script to your pipeline configuration as a stage.
- Publicly accessible target
- Internal target (not publicly accessible)
pipeline {
    agent {
        docker {
            image "invicti/scan-cli:latest"
            args '--entrypoint=""'
        }
    }
    environment {
        INVICTI_API_BASE_URL = "https://platform.invicti.com"
        INVICTI_API_TOKEN = credentials('INVICTI_API_TOKEN')
        INVICTI_TARGET_ID = "<your-target-id>"
        INVICTI_SCAN_AGENT = "CloudAgent"
        INVICTI_SCAN_PROFILE = "Full Scan"
    }
    stages {
        stage('Scan') {
            steps {
                sh '/home/invicti/scancli/ScanCLI'
            }
        }
    }
}
pipeline {
    agent {
        docker {
            image "invicti/scan-cli:latest"
            args '--entrypoint=""'
        }
    }
    environment {
        INVICTI_API_BASE_URL = "https://platform.invicti.com"
        INVICTI_API_TOKEN = credentials('INVICTI_API_TOKEN')
        INVICTI_TARGET_URL = "https://staging-internal.company.net"
        INVICTI_SCAN_AGENT = "EphemeralAgent"
        INVICTI_SCAN_PROFILE = "Full Scan"
    }
    stages {
        stage('Scan') {
            steps {
                sh '/home/invicti/scancli/ScanCLI'
            }
        }
    }
}
If you selected an internal target using the script generator, it defaults to CloudAgent. You must manually:
- Change
INVICTI_SCAN_AGENT = "CloudAgent"toINVICTI_SCAN_AGENT = "EphemeralAgent" - Replace
INVICTI_TARGET_IDwithINVICTI_TARGET_URL - Set the target URL to your internal application's address
GitLab CI/CD
Place the script in a job step within your .gitlab-ci.yml file.
- Publicly accessible target
- Internal target (not publicly accessible)
test:
  image: invicti/scan-cli:latest
  stage: test
  variables:
    INVICTI_API_BASE_URL: "https://platform.invicti.com"
    INVICTI_API_TOKEN: $INVICTI_API_TOKEN
    INVICTI_TARGET_ID: "<your-target-id>"
    INVICTI_SCAN_AGENT: "CloudAgent"
    INVICTI_SCAN_PROFILE: "Full Scan"
  script:
    - /home/invicti/scancli/ScanCLI
  artifacts:
    expire_in: 1 week
test:
  image: invicti/scan-cli:latest
  stage: test
  variables:
    INVICTI_API_BASE_URL: "https://platform.invicti.com"
    INVICTI_API_TOKEN: $INVICTI_API_TOKEN
    INVICTI_TARGET_URL: "https://staging-internal.company.net"
    INVICTI_SCAN_AGENT: "EphemeralAgent"
    INVICTI_SCAN_PROFILE: "Full Scan"
  script:
    - /home/invicti/scancli/ScanCLI
  artifacts:
    expire_in: 1 week
If you selected an internal target using the script generator, it defaults to CloudAgent. You must manually:
- Change
INVICTI_SCAN_AGENT: "CloudAgent"toINVICTI_SCAN_AGENT: "EphemeralAgent" - Replace
INVICTI_TARGET_IDwithINVICTI_TARGET_URL - Set the target URL to your internal application's address
Azure Pipelines
Add the script steps within your azure-pipelines.yml file.
- Publicly accessible target
- Internal target (not publicly accessible)
trigger:
  - main

pool:
  name: "your-pool-name"

variables:
  INVICTI_API_BASE_URL: "https://platform.invicti.com"
  INVICTI_API_TOKEN: "INVICTI_API_TOKEN"
  INVICTI_TARGET_ID: "<your-target-id>"
  INVICTI_SCAN_AGENT: "CloudAgent"
  INVICTI_SCAN_PROFILE: "Full Scan"

steps:
  - task: DockerInstaller@0
    displayName: "Ensure Docker is installed"

  - script: |
      echo "Pulling Invicti CLI image..."
      docker pull invicti/scan-cli:latest
    displayName: "Pull Scan CLI Image"

  - script: |
      echo "Running Invicti Scan CLI..."
      docker run --rm \
        -e INVICTI_API_BASE_URL="$(INVICTI_API_BASE_URL)" \
        -e INVICTI_API_TOKEN="$(INVICTI_API_TOKEN)" \
        -e INVICTI_TARGET_ID="$(INVICTI_TARGET_ID)" \
        -e INVICTI_SCAN_AGENT="$(INVICTI_SCAN_AGENT)" \
        -e INVICTI_SCAN_PROFILE="$(INVICTI_SCAN_PROFILE)" \
        invicti/scan-cli:latest \
        /home/invicti/scancli/ScanCLI
    displayName: "Run Invicti Scan"
    failOnStderr: true

  - task: PublishBuildArtifacts@1
    inputs:
      PathtoPublish: "$(Build.ArtifactStagingDirectory)"
      ArtifactName: "scan-results"
      publishLocation: "Container"
    displayName: "Publish Scan Results"
trigger:
  - main

pool:
  name: "your-pool-name"

variables:
  INVICTI_API_BASE_URL: "https://platform.invicti.com"
  INVICTI_API_TOKEN: "INVICTI_API_TOKEN"
  INVICTI_TARGET_URL: "https://staging-internal.company.net"
  INVICTI_SCAN_AGENT: "EphemeralAgent"
  INVICTI_SCAN_PROFILE: "Full Scan"

steps:
  - task: DockerInstaller@0
    displayName: "Ensure Docker is installed"

  - script: |
      echo "Pulling Invicti CLI image..."
      docker pull invicti/scan-cli:latest
    displayName: "Pull Scan CLI Image"

  - script: |
      echo "Running Invicti Scan CLI..."
      docker run --rm \
        -e INVICTI_API_BASE_URL="$(INVICTI_API_BASE_URL)" \
        -e INVICTI_API_TOKEN="$(INVICTI_API_TOKEN)" \
        -e INVICTI_TARGET_URL="$(INVICTI_TARGET_URL)" \
        -e INVICTI_SCAN_AGENT="$(INVICTI_SCAN_AGENT)" \
        -e INVICTI_SCAN_PROFILE="$(INVICTI_SCAN_PROFILE)" \
        invicti/scan-cli:latest \
        /home/invicti/scancli/ScanCLI
    displayName: "Run Invicti Scan"
    failOnStderr: true

  - task: PublishBuildArtifacts@1
    inputs:
      PathtoPublish: "$(Build.ArtifactStagingDirectory)"
      ArtifactName: "scan-results"
      publishLocation: "Container"
    displayName: "Publish Scan Results"
If you selected an internal target using the script generator, it defaults to CloudAgent. You must manually:
- Change
INVICTI_SCAN_AGENT: "CloudAgent"toINVICTI_SCAN_AGENT: "EphemeralAgent" - Replace
INVICTI_TARGET_IDwithINVICTI_TARGET_URL - Set the target URL to your internal application's address
CircleCI
Create a file named config.yml inside the .circleci directory with the appropriate configuration.
- Publicly accessible target
- Internal target (not publicly accessible)
version: 2.1

jobs:
  invicti-scan:
    docker:
      - image: invicti/scan-cli:latest
    resource_class: medium
    environment:
      INVICTI_API_BASE_URL: "https://platform.invicti.com"
      INVICTI_API_TOKEN: "INVICTI_API_TOKEN"
      INVICTI_TARGET_ID: "<your-target-id>"
      INVICTI_SCAN_AGENT: "CloudAgent"
      INVICTI_SCAN_PROFILE: "Full Scan"
    steps:
      - run:
          name: Run Invicti Security Scan
          command: /home/invicti/scancli/ScanCLI
      - store_artifacts:
          path: /home/invicti/publicdata/
          destination: invicti-scan-results

workflows:
  version: 2
  security-scan-workflow:
    jobs:
      - invicti-scan
version: 2.1

jobs:
  invicti-scan:
    docker:
      - image: invicti/scan-cli:latest
    resource_class: medium
    environment:
      INVICTI_API_BASE_URL: "https://platform.invicti.com"
      INVICTI_API_TOKEN: "INVICTI_API_TOKEN"
      INVICTI_TARGET_URL: "https://staging-internal.company.net"
      INVICTI_SCAN_AGENT: "EphemeralAgent"
      INVICTI_SCAN_PROFILE: "Full Scan"
    steps:
      - run:
          name: Run Invicti Security Scan
          command: /home/invicti/scancli/ScanCLI
      - store_artifacts:
          path: /home/invicti/publicdata/
          destination: invicti-scan-results

workflows:
  version: 2
  security-scan-workflow:
    jobs:
      - invicti-scan
If you selected an internal target using the script generator, it defaults to CloudAgent. You must manually:
- Change
INVICTI_SCAN_AGENT: "CloudAgent"toINVICTI_SCAN_AGENT: "EphemeralAgent" - Replace
INVICTI_TARGET_IDwithINVICTI_TARGET_URL - Set the target URL to your internal application's address
For more information, refer to the official CircleCI documentation.
Step 6: Run and monitor the pipeline
- Trigger a pipeline run.
- The CI/CD tool performs the following actions:
- Pulls the Invicti Scan CLI Docker image
- Runs the scan
- Generates a security report
- Monitor the console/log output.
- Download and review the report if required.
Scan results and reports are stored centrally in Invicti Platform:
- Select Scans from the left-side menu to view all scan activities
- Select Reports to access generated reports
- Check Vulnerabilities for detailed findings
Best practices
- Use the script generation feature in Invicti Platform as a starting point - every CI/CD environment has different requirements.
- Store API tokens securely using your CI/CD platform's secret management.
- Run scans after your application is built and deployed to a test environment, not against source code.
- Multiple shorter scans are better than one large scan. Use
INVICTI_SCAN_TIMEOUTto set the maximum scan duration. - Schedule regular scans using scheduled pipelines or cron jobs.
- Use environment-specific scan profiles (for example, staging vs. production).
- Enforce policies to block builds if critical vulnerabilities are found.
Troubleshooting
Target not found
This error typically occurs when the scan-cli can't locate the target using the provided credentials.
For CloudAgent:
- Verify that
INVICTI_TARGET_IDis correct. Copy the target ID from the URL in Invicti Platform or use the Inventory API. - Confirm the target exists in Invicti Platform under Targets.
- Verify
INVICTI_API_TOKENis valid and hasn't expired.
For EphemeralAgent:
- Verify that
INVICTI_TARGET_URLis set (notINVICTI_TARGET_ID). - Ensure the URL is accessible from the CI/CD environment. Test with
curlorpingfrom the same CI/CD agent. - Confirm the URL format is correct (for example,
https://staging.company.net, notstaging.company.netwithout the protocol). - Check that you changed
INVICTI_SCAN_AGENTfromCloudAgenttoEphemeralAgentin the generated script.
Scan started but timed out
Scans are limited by the INVICTI_SCAN_TIMEOUT variable (default from target configuration, typically 48 hours).
- Increase the timeout:
INVICTI_SCAN_TIMEOUT: "240"(in minutes). - Check that your target is responding and the scan is actively running. Monitor the Invicti Platform UI under Scans.
- Verify the CI/CD environment has network access to the target and to
INVICTI_API_BASE_URL.
API token rejected or authentication failed
- Verify
INVICTI_API_TOKENis correct and hasn't been regenerated. Regenerating an API token invalidates the previous one. - Confirm the token is stored as a secret in your CI/CD platform (not visible in logs).
- Check that the user account associated with the token still has active access to Invicti Platform.
EphemeralAgent: Network timeout or connection refused
This occurs when the ephemeral agent can't reach the target URL from the CI/CD environment.
- Verify the target URL is accessible from the CI/CD agent: run
curl https://<target-url>in a test step. - If using an internal URL, ensure the CI/CD agent is on the same network (VPC, private network, etc.).
- For self-hosted CI/CD agents, verify firewall rules allow outbound access to the target.
- For cloud-hosted CI/CD (GitHub Actions on GitHub-hosted runners), confirm the internal target is accessible from the internet or use a self-hosted runner on your internal network.
Scan profile not found
- Verify
INVICTI_SCAN_PROFILEmatches exactly a profile configured in Invicti Platform under Scans > Scan profiles. - Profile names are case-sensitive. For example,
Full Scanandfull scanare different. - Check for extra spaces or typos in the profile name.
Need help?
Invicti Support team is ready to provide you with technical help. Go to Help Center