GitHub Issues
Integrating Invicti Platform with GitHub Issues streamlines your vulnerability management by automatically creating and tracking security issues within your GitHub projects. This integration enables seamless collaboration between development and security teams, ensuring vulnerabilities are identified, assigned, and resolved efficiently.
This document walks you through the steps required to connect Invicti with GitHub, configure issue tracking, and automate vulnerability reporting.
Prerequisites
Before integrating Invicti with GitHub, ensure you have completed the following prerequisites:
- Active GitHub Account: You must have an active GitHub account.
- Project Setup: Create a project that houses the source code for your target web application.
- GitHub project members/collaborators must have Write permissions for the field values / mappings to work correctly.
- API Access Verification: Confirm that your GitHub system allows incoming API requests from online.acunetix.com or app.invicti.com (for EU-based customers: app-eu.invicti.com).
Integrating Invicti Platform with GitHub is a four-step process:
- Create an access token
- Create GitHub labels
- Configure Invicti
- Submit vulnerabilities to GitHub
Step 1: Create an access token
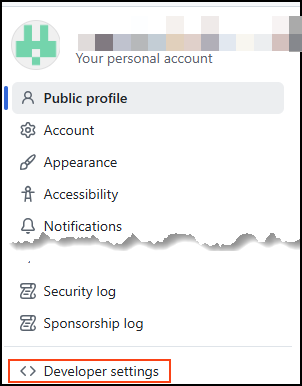
- From your GitHub profile dropdown, click Settings.

- Scroll down to the bottom of the left-side menu and choose Developer settings.
- From Personal access tokens in the left-side menu, choose Tokens (classic).
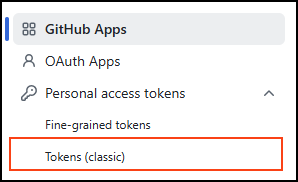
- Click Generate new token. For this integration the classic token is used.

- On the New personal access token (classic) page:
- In the Note field, enter Invicti Integration for identification purposes.
- Set the Expiration date according to your requirements.
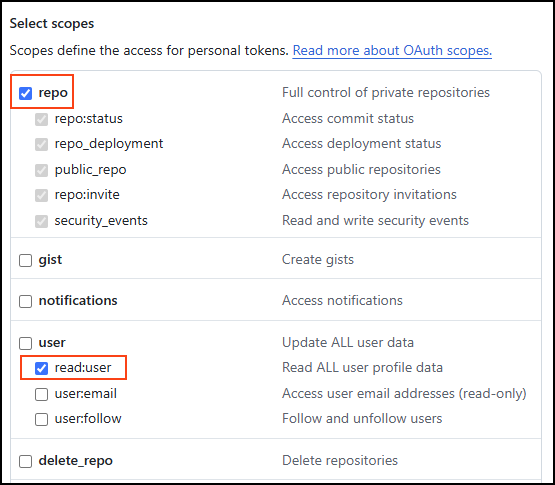
- In the Scopes section, choose the following:
- repo (the entire section)
- Under user choose read:user
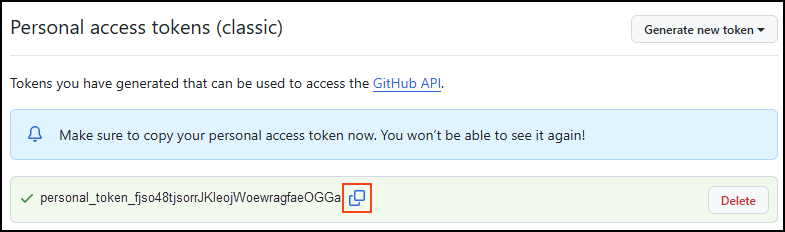
- Scroll to the bottom of the page and click Generate token.
- Ensure you keep a copy of the token as it cannot be retrieved after leaving the page. Losing the token necessitates creating a new one and repeating the process.
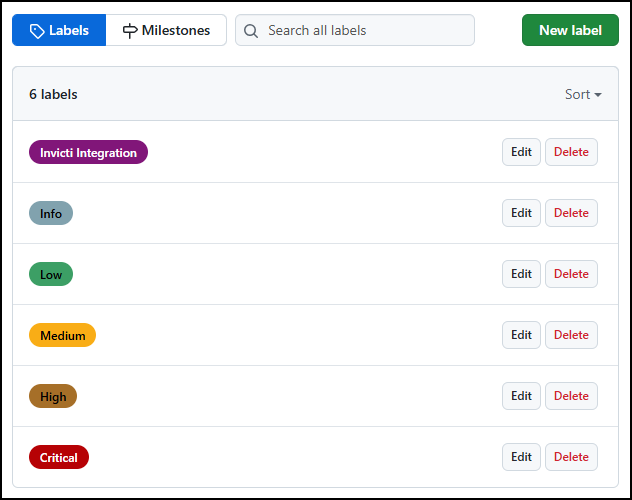
Step 2: Create GitHub labels
-
Open your repository's main page on GitHub and directly append
/labelsto your repository's URL. For example:https://github.com/your-username/your-repository/labels. -
Alternatively, from the repository's main page:
- Click the Issues tab.
- On the Issues page, click the Labels button.

-
Click New label to add your own labels.
-
Fill in the Label name, description, and choose a color.
-
Click Create label to save.
If you don't see the Labels button or encounter any issues, ensure you have the necessary permissions (write access) to manage labels in the repository.
Step 3: Configure Invicti
-
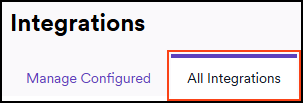
In Invicti, choose Integrations from the left-side menu.
-
Switch to the All integrations tab.
-
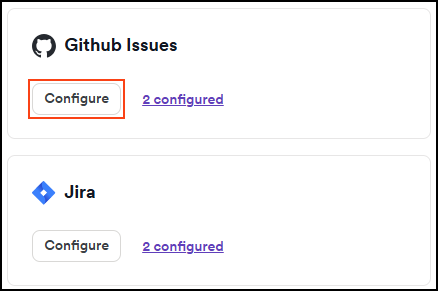
Scroll down to the Issues trackers and choose Configure in the GitHub issues tile.
-
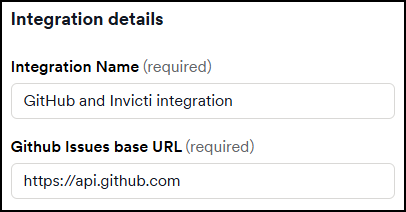
In the Configure and authorize section:
- Enter a name for your integration. For this example, the name used is GitHub and Invicti integration.
- Fill in the GitHub Issues base URL.
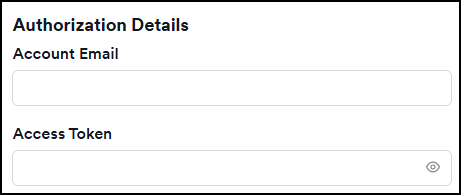
- In the Authentication details, enter your Account email and the Personal Access Token (classic) you generated in Step 1.
- Click Validate & load projects, to load your organization and issue details.
-
In the Project configuration section, provide the following details:
- Choose a project from the drop-down list.
- Repository: The GitHub repository where the discovered vulnerabilities are sent.
- Issue title formatting: Choose the format for the issue title.
- Included details: Use the drop-down menu to choose the information to include in the issue details.
- Optionally, choose Yes to include a link to the report and attach a PDF report.
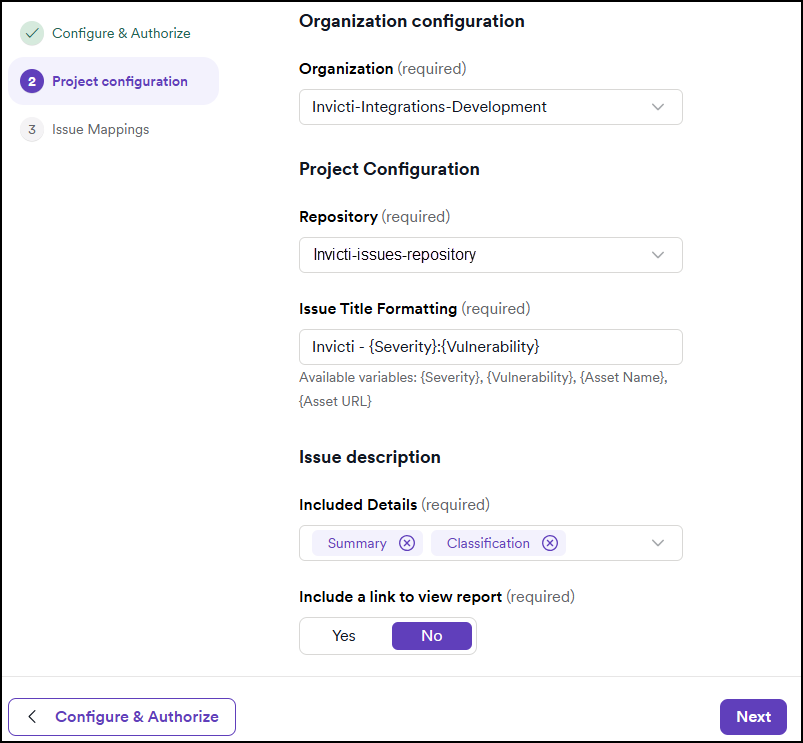
- Click Next.
-
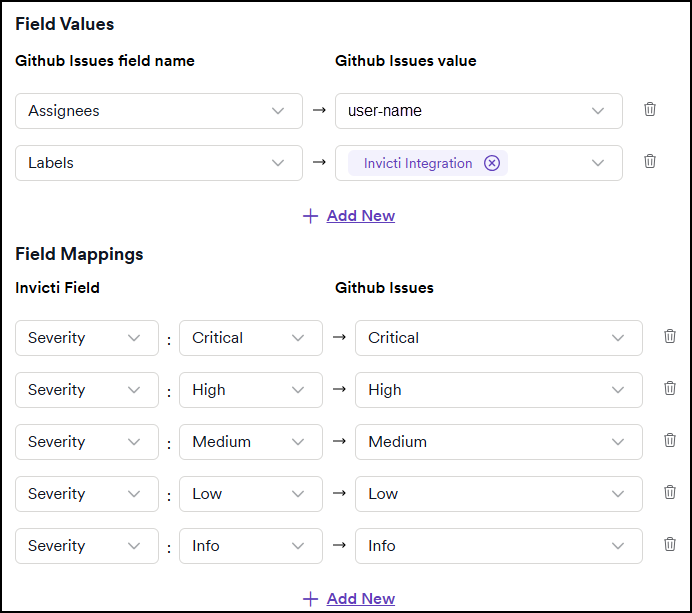
In the Issue mappings section, assign Field values and Field mappings.
- Field values: Here, you decide who the assignee is, and add a label to the reported issues. Only one assignee can be chosen.
- Field mappings: Map Invicti Vulnerability Severities to GitHub Issues Labels.
-
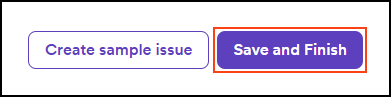
Click Create sample issue to test the configuration. A green Success message appears at the top of the page.
-
The vulnerability is now created in the specified GitHub repository.

-
In Invicti, click Save and finish to complete the GitHub integration.
Step 4: Submit vulnerabilities to GitHub
After identifying vulnerabilities, you can forward them to the designated issue tracker. There are two ways to do this:
- Manually, through the Vulnerabilities page
- Automatically, using Automations
The process is consistent across all supported issue trackers. For detailed instructions, refer to the linked documents.
Need help?
Invicti Support team is ready to provide you with technical help. Go to Help Center