Package: Invicti API Security Standalone or Bundle
NTA with Cloudflare Worker
This document walks you through deploying the Invicti Network Traffic Analysis (NTA) Cloudflare Worker to monitor and forward HTTP traffic for analysis.

Prerequisites
Before deploying, ensure you have:
- Node.js (v16 or later recommended) installed
- Git installed
- A Cloudflare account with Worker administrator rights:
- Worker Scripts: Edit
- Zone Settings: Read
- (Optional) DNS: Edit if assigning a route to a custom domain
- A domain registered with Cloudflare
- Cloudflare Wrangler command-line tool installed:
npm install -g wrangler
Step 1: Clone the repository and install dependencies
- Run this command to clone the Invicti NTA Cloudflare worker:
git clone https://github.com/Invicti-Security/Invicti-NTA-Cloudflare-Worker.git
cd Invicti-NTA-Cloudflare-Worker
- Running this command installs all required packages listed in package.json:
npm install
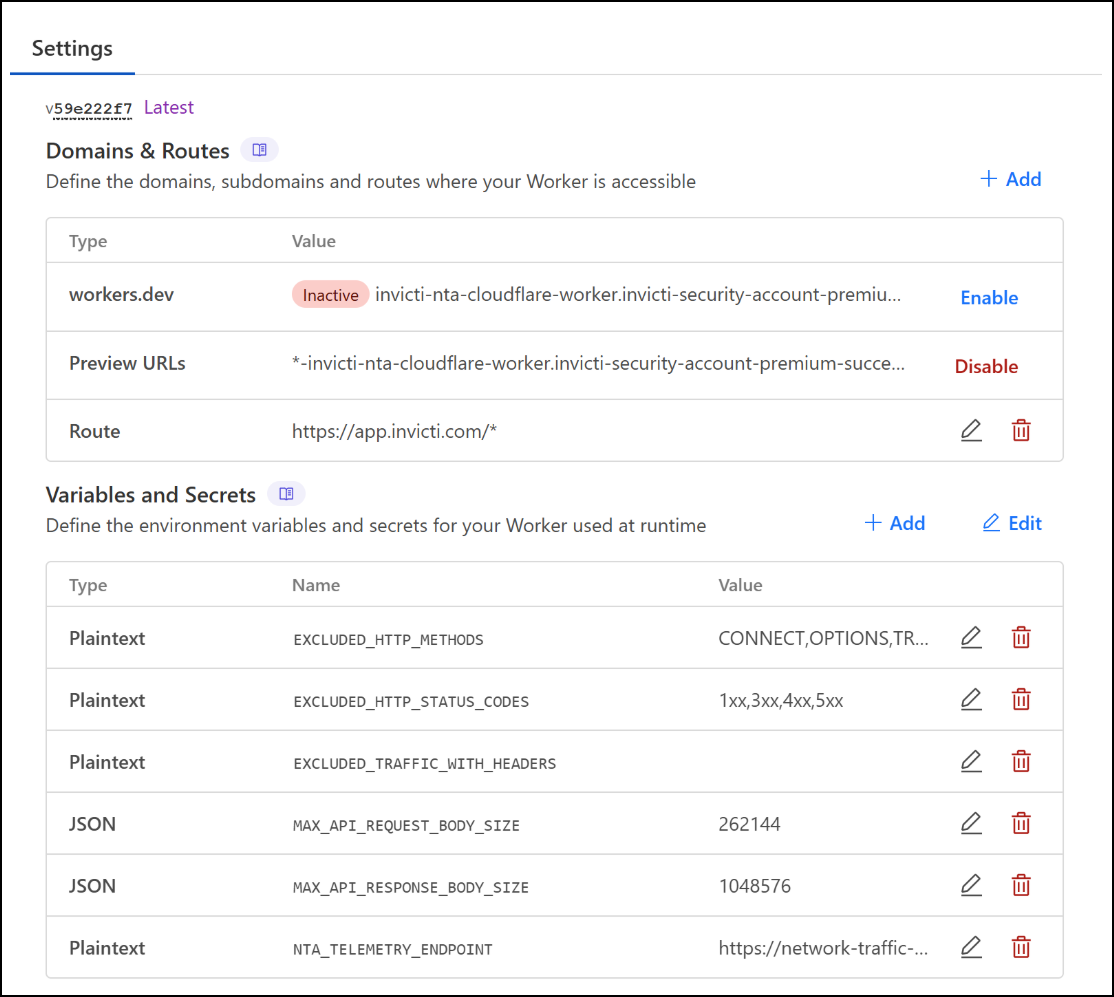
Step 2: Configure environment variables
Update your wrangler.toml file to audit or edit the following configuration variables. You can also do it via Cloudflare UI, see below:
[vars]
NTA_TELEMETRY_ENDPOINT = "https://your-nta-instance.example.com/api/telemetry"
MAX_API_REQUEST_BODY_SIZE = 262144
MAX_API_RESPONSE_BODY_SIZE = 1048576
EXCLUDED_HTTP_STATUS_CODES = "1xx,3xx,4xx,5xx"
EXCLUDED_HTTP_METHODS = "CONNECT,OPTIONS,TRACE"
EXCLUDED_TRAFFIC_WITH_HEADERS = ""
Where NTA_TELEMETRY_ENDPOINT:
- Must be an HTTPS URL of NTA server endpoint (API endpoint is
/api/telemetry)- If not, Cloudflare does not transmit telemetries to this server
- Should point to Invicti, which receives traffic data from the worker
- Self-signed certificates are not supported
Step 3: Configure the route
Before deploying, configure the route for your Worker in the wrangler.toml file:
route = { pattern = "https://your-subdomain.yourdomain.com/*", zone_name = "yourdomain.com" }
Defining routes
Cloudflare Workers operate by being attached to specific routes within a domain. A route defines both a hostname and a URL path pattern. For example:
route = { pattern = "https://api.yourdomain.com/*", zone_name = "yourdomain.com" }
Serving multiple routes with a single worker
A single Worker can be assigned to multiple routes. You can configure this either in the Cloudflare dashboard or directly in your wrangler.toml file:
routes = [
  { pattern = "https://app.yourdomain.com/*", zone_name = "yourdomain.com" },
  { pattern = "https://api.yourdomain.com/*", zone_name = "yourdomain.com" }
]
Matching all subdomains
You can also use a wildcard to apply the Worker to all subdomains:
route = { pattern = "https://*.yourdomain.com/*", zone_name = "yourdomain.com" }
Step 4: Deploy the worker
- Once the route is configured, deploy the Worker by running the following command. This command uploads your Worker script and makes it live on your configured routes in your Cloudflare environment:
npx wrangler deploy
- If prompted, follow the login flow to authenticate with your Cloudflare account. The Cloudflare Dashboard opens in your internet browser.
Step 5: Verify the configuration
After deployment, verify the following:
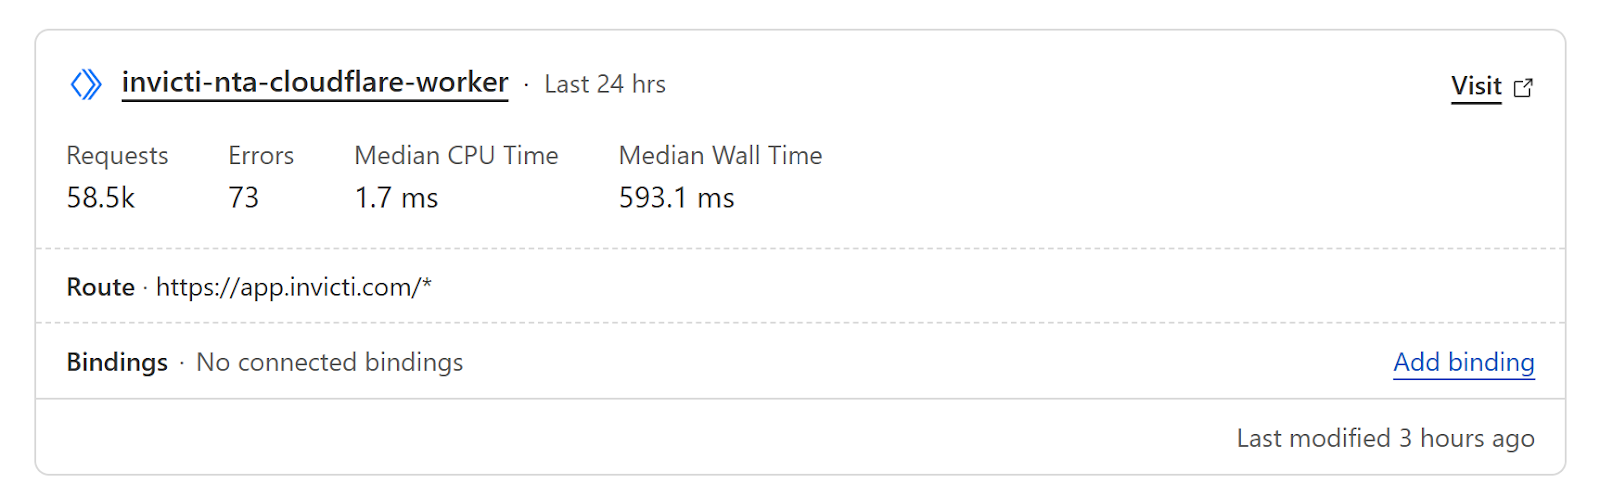
- The Worker appears in your Cloudflare dashboard under Workers & Pages
- It is bound to a route (for example, yourdomain.com/) if configured
- The NTA endpoint is receiving HTTP traffic events
Steps to verify the configuration:
- Go to the Worker & Pages page for your domain, and ensure the new Cloudflare worker is installed:
- Click on its name and in the Settings tab, select the settings again.
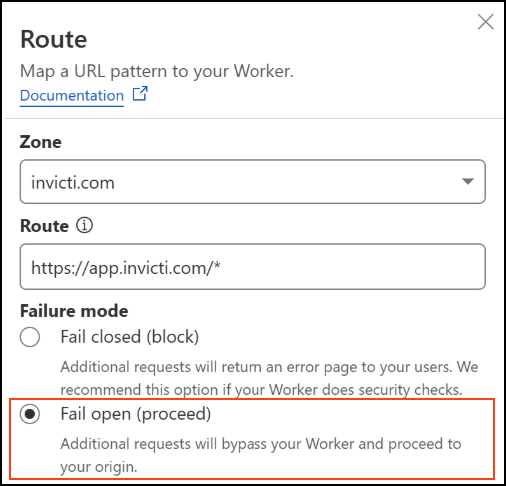
- Click Edit route to see additional details and verify how worker failures should be handled.
- When configuring the Worker route in the Cloudflare dashboard, you are asked to select a failure mode:
- Fail open (recommended): If the Worker is unavailable, requests skip the Worker and proceed to your origin server. This ensures that users are not affected by telemetry failures.
- Fail closed: If the worker fails, requests return an error page to users. Use this only if your Worker performs critical logic, such as access control.
Setting Failure mode to Fail open for NTA Cloudflare Worker is recommended to ensure end-user traffic continues uninterrupted in case of any unexpected worker error.
- Filtering behavior can be customized through the configuration variables
EXCLUDED_HTTP_METHODS,EXCLUDED_HTTP_STATUS_CODES, andEXCLUDED_TRAFFIC_WITH_HEADERSto exclude specific types of traffic. - For performance optimization, adjust the
MAX_API_REQUEST_BODY_SIZEandMAX_API_RESPONSE_BODY_SIZEsettings.
Step 6: Set up an NTA server
Follow Step 3: prepare and deploy Invicti Helm chart in the NTA with Tap Plugin document to complete the configuration.
Example of how to expose Reconstructor via HTTPS using NGINX
Use the code snippet below for an example of how to expose Reconstructor via HTTPS using NGINX. You then need to save this content to /etc/nginx/sites-enabled/invicti-reconstruct and reload your NGINX:
server {
  listen 443 ssl;
  server_name your-domain.com www.your-domain.com;
  ssl_certificate     /etc/ssl/network-traffic-analysis.com/fullchain.pem;
  ssl_certificate_key /etc/ssl/network-traffic-analysis.com/your-domain.com.key;

  location / {
      proxy_pass http://localhost:8090;
      proxy_set_header Host $host;
      proxy_set_header X-Real-IP $remote_addr;
  }
}
The NTA processes all data sent from the Cloudflare Worker, typically consisting of metadata about API traffic. This metadata is used for API discovery and to help reconstruct API specifications.
After the initial sync, the table in Discovery → Configuration → API Sources is updated, and the sync status is marked as completed. Additionally, the Discovery → API Discovery page is refreshed to display any newly discovered APIs. You can then optionally link these APIs to specific targets.
Need help?
Invicti Support team is ready to provide you with technical help. Go to Help Center