Deployment: Invicti Platform on-demand, Invicti Platform on-premises
Restrict access to IP address
The Restrict access to IP feature lets Owners control which IP addresses can access Invicti Platform. When enabled, Invicti validates each user's origin IP address after successful authentication - if it isn't on the allowed list, the user sees an error and can't access the platform.
This document explains how to enable IP access restriction, manage the allowed IP address list, and remove the restriction.
The feature applies to both UI and API access, including API keys. Internal services such as scanning agents aren't exempt - if they use API keys or client credentials and IP address restrictions are enabled, their egress IPs must be in the allowed list.
The following IP address formats are supported:
- Single IP address (for example,
192.168.1.50) - IP range using CIDR notation (for example,
192.168.1.0/24) - IP range using a hyphen (for example,
192.168.1.0-192.168.1.255)
Only IPv4 is supported. Wildcards aren't supported.
Turn on IP address restriction
Turning on IP restrictions doesn't immediately log out existing users - those whose IPs aren't in the allowed list lose access when their session next refreshes, within 15 minutes.
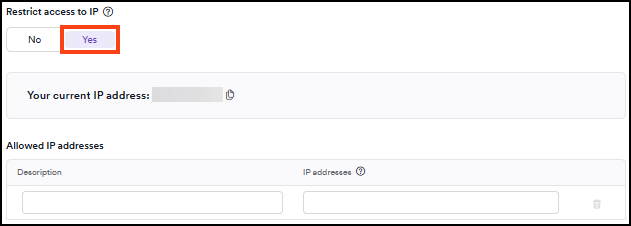
Your current IP address is displayed in the settings panel when you toggle Restrict access to IP to Yes. You can copy it with the copy icon and add it to the allowed list before saving to avoid losing access.
- Select Settings from the left-side menu.
- In the Security & access control section, select Data privacy & security.
- Scroll to the Session and lockout settings section.
- Toggle Restrict access to IP to Yes.
- In the Allowed IP addresses table, enter a description in the Description field and an IP address or range in the IP addresses field.

- Click Save at the bottom of the page.
Users whose IP address isn't in the allowed list can't access the platform once their session refreshes, within 15 minutes of saving. This applies to all access methods, including API keys.
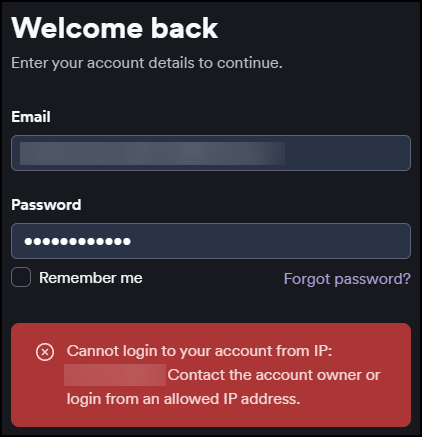
A user trying to log in from a blocked IP address sees the following error:
Cannot login to your account from IP [IP address]. Contact the account owner or login from an allowed IP address.

Remove an allowed IP address
You can remove an individual IP address entry at any time.
- Select Settings from the left-side menu.
- In the Security & access control section, select Data privacy & security.
- Scroll to the Session and lockout settings section.
- In the Allowed IP addresses table, click the trash icon next to the entry you want to remove.
- Click Save at the bottom of the page.
Turn off IP address restriction
You can turn off IP address restriction at any time, regardless of whether your current IP address is in the allowed list.
- Select Settings from the left-side menu.
- In the Security & access control section, select Data privacy & security.
- Scroll to the Session and lockout settings section.
- Toggle Restrict access to IP to No.
- Click Save at the bottom of the page.
Activity log
Changes to IP restriction settings and blocked login attempts are recorded in the activity log:
- Enabling or disabling IP restrictions is logged as Organization updated in the Organization area.
- Login attempts blocked by IP restrictions are logged as User login failed in the Users area.
Need help?
Invicti Support team is ready to provide you with technical help. Go to Help Center