Deployment: Invicti Platform on-demand, Invicti Platform on-premises
Authentication scripts
This document explains authentication scripts - custom JavaScript scripts that manage login sessions and token-based authentication during scans. It covers how to write, upload, and debug authentication scripts with practical examples for Bearer token and JWT authentication.
Contact the Support team to enable the pre-request scripts in Invicti Platform on-demand.
Step 1: understand authentication scripts
Authentication scripts are custom JS scripts, a subset of pre-request scripts, that manage how a system logs in and maintains a valid session for authentication, for example where an authentication code such as a token needs to be requested at the very beginning of the scan, and possibly re-requested periodically during the scan. The token needs to be used in all requests to avoid an authentication error and lack of scan coverage.
How authentication scripts work
Authentication scripts provide 3 main entry points, each defining an expected logic implemented within them.
-
acquireSession()- Get a new token depending on the type specified by the user and add it to the session. For example, by adding an Authorization header with the token received as value.
- This operation is atomic and blocking; when invoked, all outgoing requests requiring a session are queued and wait for this process to complete before proceeding.
-
authenticateRequest()- Add any authentication data such as tokens to a request. This could also include signatures and any other mechanism related to authorization, authentication, or verification.
-
isReAuthenticationRequired()- Determine whether a token is still valid. In token authentication, this could be:
- time-dependent where a token needs to be re-obtained every x minutes
- depending on response received for every request within the session for example by checking response status code, or possibly even body contents.
- Determine whether a token is still valid. In token authentication, this could be:
Structure of authentication scripts
An authentication script consists of a mandatory directive and three interface functions, each with an optional external modules section.
Directive
Authentication scripts need only one directive at the very top which is always fixed. This serves to identify the JS file as an authscript.
/// script_type: authscript
Script arguments per interface function
Three primary entry points define any authentication script:
function acquireSession(session)
function authenticateRequest(http)
function isReAuthenticationRequired(http)
The session and http arguments are native objects provided by the engine at runtime, representing the active session state and the current HTTP task. The Session and Job interfaces in the native.d.ts definition file define the specific properties and methods available within these objects.
External modules
Scripts can load and call external modules if they meet the following criteria:
- The modules use vanilla JavaScript only.
- The script loads them using the API call
ax.loadModule(<module name>). - You also upload the module and its name matches
<module name>.
Step 2: write your script
To create an authentication script:
- Add the directive at the top to identify the script as an authentication script.
- Use the provided example templates and write your logic using vanilla JavaScript and call the Invicti Platform's native API through defined interfaces (
native.d.ts) as needed. - Call the external modules via
ax.loadModule. These modules must be written in vanilla JavaScript, imported into the target settings and the imported filename must match exactly the argument toax.loadModule. - Save the script as a JS file.
Each target supports only one script: pre-request or authentication.
Authentication scripts examples
The following are examples of auth scripts available for use in scans.
Basic skeleton template
This example provides just layout structure and requires logic edits in the script to authenticate calls. Refer to the specific script examples in the following sections to authenticate with a Bearer token or JWT.
/// script_type: authscript

const AuthScriptSettings = {
    reauthenticationTimeInMs: 0
};

let tokenObtainedTime = 0;

function acquireSession(session)
{
    //request token
    let newjob = ax.http.job();
    //add url, headers , method and any payload to the job
    ax.http.execute(newjob).sync();
    if (newjob.error)
    {
        ax.loge("error returned for acquireSession request from auth script");
        return false;
    }

    //parse response for possible session information
    const response = newjob.response;

    let success = true; //replace this with result of response parsing

    if (success)
    {
        tokenObtainedTime = new Date().getTime();
        return true;
    }
    return false;
}

function authenticateRequest(http)
{
    // Add token to request (for example, set Authorization header with Bearer token). Return true if authentication is applied successfully.
    return false;
}

function isReAuthenticationRequired(http)
{
    //reauthenticationTimeInMs = 0 means that no time-base re-authentication is needed
    const currentTime = new Date().getTime();
    if (AuthScriptSettings.reauthenticationTimeInMs && (currentTime - tokenObtainedTime >= AuthScriptSettings.reauthenticationTimeInMs))
    {
        return true;
    }

    //if no time-based expiry or if still within token life-time
    // match response code and body content

    const responseStatus = http.response.status;
    const responseBody = http.response.body;

    // this entry point is called after http.response is available, so it can be evaluated
    // for possible hints about whether re-authentication is needed

    return false;
}
Authentication by Bearer token
The same Bearer token flow is available as a built-in UI feature. Refer to the Dynamic token configuration document for a no-code alternative.
/// script_type: authscript

const AuthScriptSettings = {
    authenticationType: `Bearer`,

    tokenRequest: {
        url: `$targetUrl/getToken`,
        method: "GET",
        headers: {
            'TestHeader': 'TestValue',
            'TestHeader2': 'TestValue2'
        },
        body: ''
    },
    expectedResponseContentType: `application/json`,
    tokenPathInResponse: `/token`,
    tokenLifetimeInMs: 60000,
    tokenResponseTriggers: [
        {
            statusCode: "401",
            bodyContentRegex: "\\btoken\\b"
        }
    ]
};

let tokenValue = "";
let tokenObtainedTime = 0;

function acquireSession(session)
{
    //request token
    let tokenJob = ax.http.job();
    tokenJob.request.method = AuthScriptSettings.tokenRequest.method;
    tokenJob.setUrl(ax.url.parse(AuthScriptSettings.tokenRequest.url));
    for (const [key, value] of Object.entries(AuthScriptSettings.tokenRequest.headers)) {
        tokenJob.request.setHeader(key, value);
    }
    tokenJob.request.body = AuthScriptSettings.tokenRequest.body;

    ax.http.execute(tokenJob).sync();
    if (tokenJob.error)
    {
        ax.loge("error returned for acquireSession request from auth script");
        return false;
    }

    //parse token from response
    const response = tokenJob.response;

    if (response.headers.get('Content-Type').includes('/json'))
    {
        tokenValue = ax.util.extractValueFromJSON(response.body, AuthScriptSettings.tokenPathInResponse);
    }
    else
    {
        tokenValue = response.body;
    }

    tokenObtainedTime = new Date().getTime();
    ax.logi("Token acquired: " + tokenValue);
    return true;

}

function authenticateRequest(http)
{
    if (AuthScriptSettings.authenticationType === `Bearer`)
    {
        http.request.setHeader(`Authorization`, `Bearer ` + tokenValue);
        return true;
    }
    ax.loge(`Unsupported authentication type : ` + AuthScriptSettings.authenticationType);
    return false;
}

function isReAuthenticationRequired(http)
{
    //tokenLifetimeInMs = 0 means that token expiry is not time-based
    const currentTime = new Date().getTime();
    if (AuthScriptSettings.tokenLifetimeInMs && (currentTime - tokenObtainedTime >= AuthScriptSettings.tokenLifetimeInMs))
    {
        ax.logi("authentication token needs to be reacquired [token lifetime exceeded]");
        return true;
    }

    //if no time-based expiry or if still within token life-time
    // match response code and body content
    const responseStatus = http.response.status;
    const responseBody = http.response.body;

    for (const responseTrigger of AuthScriptSettings.tokenResponseTriggers) {
        if (responseTrigger.statusCode === responseStatus.toString()) {
            const regex = new RegExp(responseTrigger.bodyContentRegex);
            if (regex.test(responseBody)) {
                ax.logi("authentication token needs to be reacquired based on response");
                return true;
            }
        }
    }

    return false;
}
-
Line 3:
AuthScriptSettingsclass defines all the data needed by the script. -
Line 7: replace
$targetUrl/getTokenwith a valid URL. -
Line 10: replace the placeholder HTTP header and value (
'TestHeader': 'TestValue') with your own. -
Line 29:
acquireSession()sends a request to retrieve a new token, waits for the response and attempts to extract the token. If successful, it saves the token to be used to authenticate requests. -
Line 65:
authenticateRequest()adds and Authorization Bearer token to the request and includes the current token value. -
Line 76:
isReauthenticationRequired()checks whether the token's lifetime has ended, in which case it returns true meaning that the engine should callacquireSession()again before continuing the authenticated scan.- Even if lifetime hasn’t expired or wasn’t specified, the response of the current job is evaluated for potential errors related to expired token. In which case it also returns true.
- If none are found, then it returns false meaning that the engine can continue the authenticated scan without further action related to session.
Authentication by JWT
This example demonstrates how to use a template to customize an authentication script for a specific target, such as one requiring JWT.
/// script_type: authscript

const AuthScriptSettings = {
    getTokenRequestUrl: `$targetUrl/getJWT`,
    headers: {
        'Content-Type': 'application/json'
    },
    clientId: `your-client-id`,
    clientSecret: `your-client-secret`,
    grantType: `client_credentials`,
    expectedResponseContentType: `application/json`,
    tokenPathInResponse: `/token`,
    tokenLifetimeInMs: 60000,
    authenticationType: `JWT`,
    responses: [
        {
            statusCode: "401",
            bodyContentRegex: "\\bexpired\\b"
        }
    ]
};

let tokenValue = "";
let tokenObtainedTime = 0;

function acquireSession(session) {
    // Request token
    let newjob = ax.http.job();
    newjob.setUrl(ax.url.parse(AuthScriptSettings.getTokenRequestUrl));
    newjob.request.method = "POST";
    for (const [key, value] of Object.entries(AuthScriptSettings.headers)) {
        newjob.request.setHeader(key, value);
    }
    newjob.request.body = JSON.stringify({
        client_id: AuthScriptSettings.clientId,
        client_secret: AuthScriptSettings.clientSecret,
        grant_type: AuthScriptSettings.grantType
    });
    ax.http.execute(newjob).sync();
    if (newjob.error) {
        ax.loge("Error returned for acquireSession request from auth script");
        return false;
    }

    // Parse token from response
    const response = newjob.response;

    if (AuthScriptSettings.expectedResponseContentType.endsWith("/json")) {
        tokenValue = ax.util.extractValueFromJSON(response.body, AuthScriptSettings.tokenPathInResponse);
    } else {
        ax.loge("Unsupported expected response content type [?]", AuthScriptSettings.expectedResponseContentType);
        return false;
    }

    tokenObtainedTime = new Date().getTime();
    ax.logi("JWT Token acquired: " + tokenValue);
    return true;
}

function authenticateRequest(http) {
    if (AuthScriptSettings.authenticationType === `JWT`) {
        http.request.setHeader(`Authorization`, `Bearer ` + tokenValue);
        return true;
    }
    ax.loge(`Unsupported authentication type: ` + AuthScriptSettings.authenticationType);
    return false;
}

function isReAuthenticationRequired(http) {
    // Token lifetime check
    const currentTime = new Date().getTime();
    if (AuthScriptSettings.tokenLifetimeInMs && (currentTime - tokenObtainedTime >= AuthScriptSettings.tokenLifetimeInMs)) {
        ax.logi("JWT token needs to be reacquired [token lifetime exceeded]");
        return true;
    }

    // Match response code and body content
    const responseStatus = http.response.status;
    const responseBody = http.response.body;

    for (const responseTrigger of AuthScriptSettings.responses) {
        if (responseTrigger.statusCode === responseStatus.toString()) {
            const regex = new RegExp(responseTrigger.bodyContentRegex);
            if (regex.test(responseBody)) {
                ax.logi("JWT token needs to be reacquired based on response");
                return true;
            }
        }
    }

    return false;
}
- Line 26: The
acquireSession()function contains additional implementation related to forming a standard request for a JWT , but the other interface functions are very similar to the Authentication Bearer template.
Step 3: upload the file into UI
Follow the steps to upload the authentication script file for a specific target:
- Select Inventory > Targets from the left-side menu.
- Use the three-dot menu (⋮) > Edit target for the specific target you want to update.
- In the Scan configuration menu select General.
- Upload the JS file with the script by clicking Upload file.
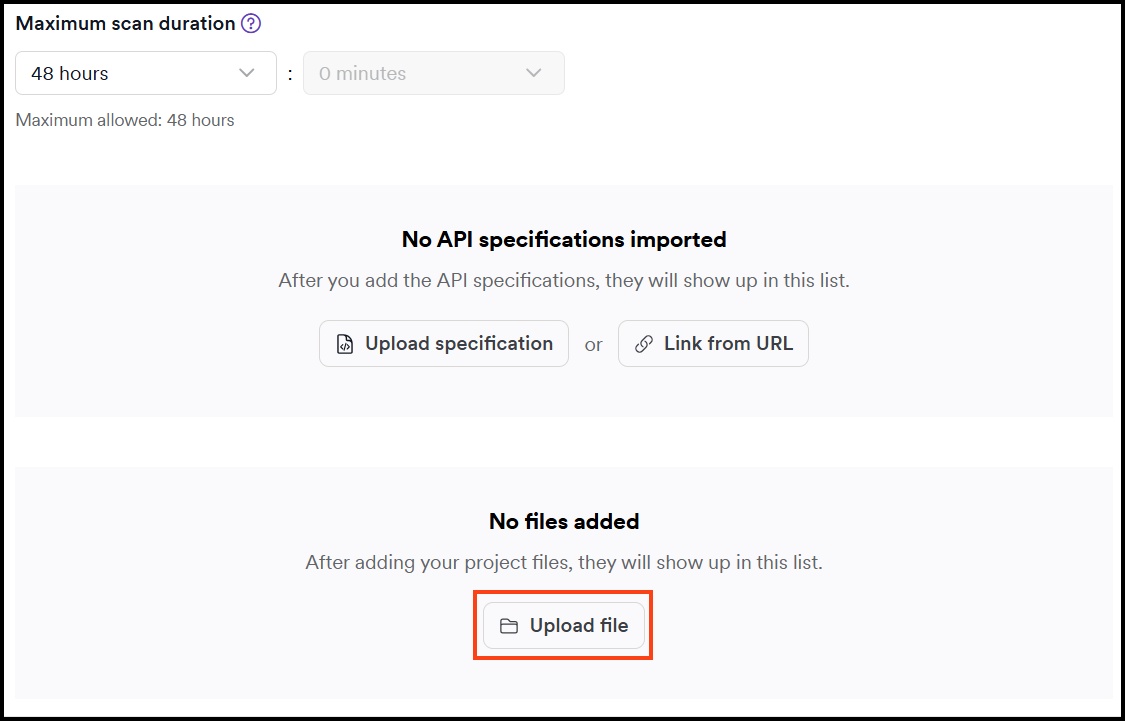
- In Type drop-down select Pre-request Script (.js) option then click Choose file to select the script file.

- Click Upload file to save it.
- Optionally, if you're using external modules, repeat the steps 4 - 6 to upload the module.js file.
- Save the settings to target by clicking Save target configuration or Save and scan.
Step 4: test and debug authentication scripts
This section covers script validation, logging techniques for debugging, analyzing scan logs and error notifications, and debugging strategies.
Test your script before uploading
Before uploading your authentication script to Invicti Platform, validate it locally to catch errors early:
-
Verify the mandatory directive: ensure the script begins with the exact line
/// script_type: authscript. This directive is mandatory for the engine to recognize and execute the file as an authentication script. -
Validate syntax and formatting: run your code through a JavaScript linter or an IDE to catch basic errors, missing semicolons, or typos that would cause the script to fail immediately upon upload.
-
Test logical functions locally: test your
acquireSessionandisReAuthenticationRequiredlogic in a local Node.js or browser environment to ensure your math and conditional statements behave as expected. -
Check for secure transmission: use a network proxy or console log to confirm that tokens are sent exclusively via HTTPS and that the
authenticateRequestfunction correctly attaches the Authorization header. -
Simulate session expiry and recovery: manually trigger a
401 Unauthorizedresponse or a timeout condition to verify that the script detects the failure and recovers the session without manual intervention.
Use logging for debugging
Add logging statements to your authentication scripts to track execution flow and state of your script by inserting them at key entry points:
-
Inside
acquireSession: log when a login attempt starts and whether it succeeds. For example,ax.logi("Attempting to acquire new session...");. -
Inside
authenticateRequest: log that a token is being attached to an outgoing request to verify the function is actually running. -
Inside
isReAuthenticationRequired: log the reason why a re-auth was triggered. For example,ax.logi("Token expired based on time: " + currentTime);.
Review the Bearer and JWT authentication script examples for examples of how to use logging for debugging.
Debug failed scripts in Invicti Platform
When an auth script fails during a scan, Invicti Platform provides error information in multiple locations.
Find error notifications
Failed pre-request scripts trigger notifications in the Scan details page:
In the Scan Summary tab:
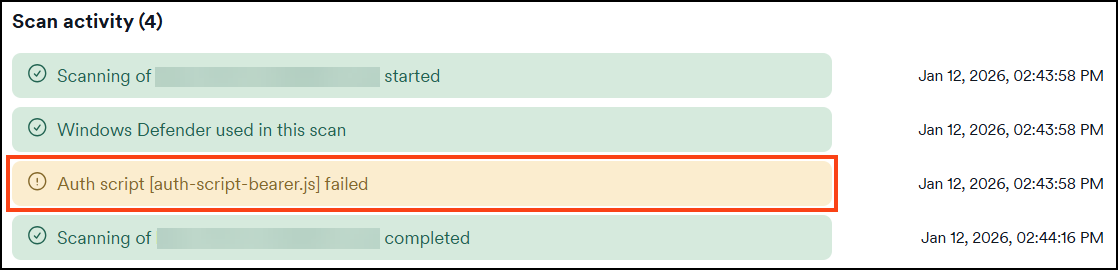
In the Activity tab:
The Activity tab shows a scanner event with details about the authentication script failure.
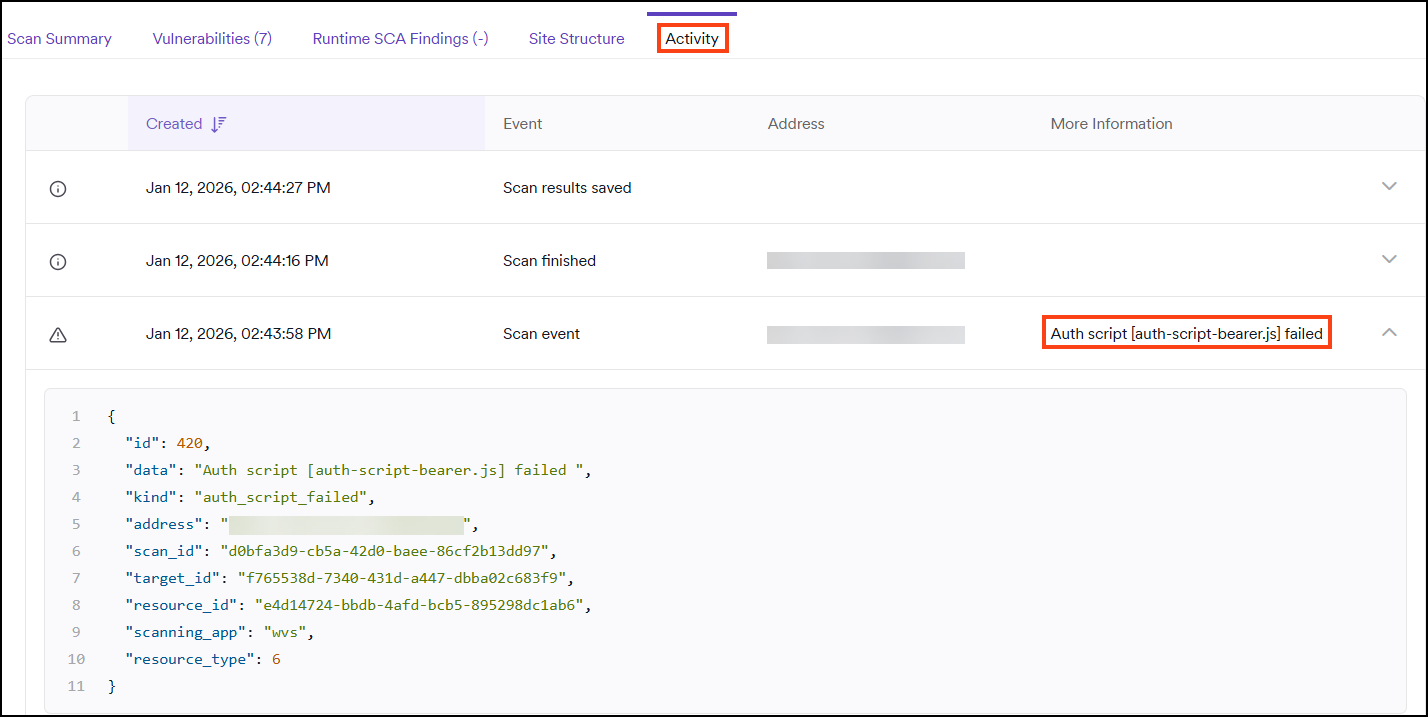
Analyze scan logs for detailed errors
For information on downloading scan logs, refer to the Download scan logs document.
Scan logs contain the complete error messages with stack traces. Look for entries starting with ERROR and including auth scripts or your script filename.
Example error in scan log:
ERROR	session	42188	Error: HttpJob: unable to set url: $placeholder/getToken in auth-script-bearer.js:34
	    tokenJob.setUrl(ax.url.parse(AuthScriptSettings.tokenRequest.url));
Error: HttpJob: unable to set url: $placeholder/getToken
    at acquireSession (auth-script-bearer.js:34:14)
This error shows:
- Object:
HTTPJob- object handling the request - Problem:
unable to set url- provided URL wasn't a valid web address - Location:
auth-script-bearer.js:34- line 34 in your script file - Fix: Change
$placeholderto a valid URL
If you added logging statements with ax.logi() or ax.loge(), those messages also appear in the scan logs with your custom text.
Debugging strategies
Start simple and build up:
- Begin with a minimal script that only logs token acquisition
- Verify
acquireSession()executes successfully - Add authentication and re-authentication logic incrementally, testing after each addition
Trace authentication state:
- Use
ax.logi()to log state transitions (Logged out → Logging in → Logged in → Expired) - Log when
isReAuthenticationRequired()triggers a new token request - Verify token values are correctly extracted and applied
Inspect network requests:
- Use a proxy tool like Fiddler to examine raw HTTP requests
- Check for formatting issues in the Authorization header (double spaces, typos)
- Look for hidden characters like
%0Aor%0Dthat could invalidate tokens
Test failure handling:
- Temporarily change the token endpoint to an invalid URL to force an error
- Verify that
isReAuthenticationRequired()correctly detects expired tokens - Confirm that
acquireSession()is called when needed
Need help?
Invicti Support team is ready to provide you with technical help. Go to Help Center