Pre-request scripts
Pre-request scripts allow you to manipulate requests easily before sending them to the target. This feature also helps the scanner achieve better scan coverage and provide better results.
Before sending a request, you may need to manipulate it by adding, changing, or computing some part of the data.
Contact the Support team to enable the pre-request scripts in Invicti Platform on-demand.
This document explains how to understand, write, upload, use with Postman Collections, and debug pre-request scripts.
Step 1: Understand pre-request scripts
Pre-request scripts use a structured approach with four key components: the Context API provides access to HTTP requests and persistent variables, Directives control which URLs trigger your script and identify it to the scanner engine, External modules let you load reusable JavaScript libraries, and Variables maintain state across multiple requests during a scan.
Context
Every pre-request script receives context structures from the scanner engine through the scriptArg API member:
scriptArg.http
- Access and modify request headers and body using the Request interface
- Read or change the request URL using the URL member
- The Response interface is available but you shouldn't use at this stage-
scriptArg.variables - Manage variables that persist for the scan duration
Directives
Directives are special comments at the top of your script that tell the scanner engine when and how to execute your code. Include the following directives in your script:
URL directive (mandatory)
Specifies which request URLs trigger your pre-request script.
Examples:
/// url: /- applies to all requests in the target's scope/// url: /v3/users/- applies to all requests under /v3/users/*
Pre-request script directive (mandatory)
Include this directive exactly as shown so the engine recognizes the file as a pre-request script:
/// script_type: prerequestscript
API specification directive (optional)
Enables IDE code completion for Invicti Platform's native API calls:
/// <reference path="/scan-scripts/native.d.ts"/>
External modules
Scripts can load and call external modules if they meet the following criteria:
- The modules use vanilla JavaScript only.
- The script loads them using the API call
ax.loadModule(<module name>) - You also upload the module and its name matches
<module name>
Variables
The pre-request script doesn't save the data it accesses after the request is sent. The only exceptions are variables.
During a scan, pre-request scripts can:
- Create a new variable and associate a value with it.
- Store this variable-value pair so that upcoming pre-request scripts within the same scan can access them.
- Load a variable-value pair that previous pre-request scripts created or saved.
To use variables from a Postman Collection, refer to the Step 4: Advanced - use Postman Collections section.
Variables API
Variables API functions available for pre-request scripts:
getScopedVar(variable name, scope name)returns the value of the variable within the specified scope. If the variable doesn't exist, it returns an empty string.getVar(variable name)returns the value of the variable. If you use Postman scope names for variable storage (for example, "Collection," "Environment," or "Global"), and the scope isn't explicitly provided, Postman's precedence rules apply to determine which variable value is returned.hasVarInScope(variable name, scope name)returns true if a variable with the specified name exists within the given scope name.hasVar(variable name)returns true if a variable with the given name exists in any scope.setScopedVar(variable name, value, scope name)sets the value of the stored variable with the given name within the given scope. Creates a new variable if it doesn't exist.setVar(variable name, value)sets the value of the stored variable with the given name. Creates a new variable with empty scope if it doesn't exist.
Step 2: Write your script
To create a pre-request script:
- Add special directives at the top to identify the script as a pre-request script.
- Use the Context to communicate with the scanner engine.
- Write your logic using vanilla JavaScript and call the Invicti Platform's native API (
native.d.ts) as needed. - Save the script as a
.jsfile.
Each target supports only one pre-request script file.
Pre-request script examples
The following are examples of pre-request scripts available for use in scans.
Add a custom header for some requests
This script adds a custom header to all requests matching the /custom/ URL pattern.
/// url: /custom/
/// script_type: prerequestscript
var job = scriptArg.http;
var request = job.request;
request.setHeader("Custom-Header", "Custom-Header-Value");
- In line 1, the pre-request script is being set to be called only when the request URL is /custom/* (includes recursive child paths).
- Lines 3 and 4 process the HTTP job script argument to access the specific request being sent.
- Line 5 adds a custom header forcefully to a request.
Edit the request body of all POST requests
This script wraps the body of all POST requests with custom text at the start and end.
/// url: /
/// script_type: prerequestscript
var job = scriptArg.http;
var request = job.request;
let currentBody = request.Body;
if (request.method == "POST")
 request.body = "CUSTOM START " + request.body + " CUSTOM END";
- Line 1 sets the pre-request script to be called for all requests within the target's scope.
- Lines 6 and 7 act on POST requests, by wrapping the body with a custom header and footer.
Using this script may change the result of the scan and vulnerabilities found.
Simple variable handling
This script demonstrates how to create, increment, and store a variable across multiple requests within the same scan.
/// url:  /
/// script_type: prerequestscript
var vars = scriptArg.variables;
var job = scriptArg.http;
var request = job.request;
var testValue = 0;
if (vars.hasVarInScope("myVariable", "collection"))
   testValue = parseInt(vars.getScopedVar("myVariable", "collection"));
testValue++;
vars.setScopedVar("myVariable", testValue.toString(),"collection");
request.setHeader("requestIndex", testValue.toString());
- Line 3 refers to the variables stored within the engine's context, possibly set in the previous calls to this pre-request script within the same scan.
- Lines 7 and 8 load the "collection" (scope) variable named "myVariable".
- Lines 10 and 11 update the same variable.
You can set up any scope name.
Send external requests
This script sends an additional HTTP request to an external logging server before processing the main request.
/// url: /
/// script_type: prerequestscript
const url = scriptArg.http.url.toString();
let newjob = ax.http.job();
newjob.setUrl(ax.url.parse("http://127.0.0.1/testServer/log?url=" + url));
   	newjob.request.method = "GET";
 	let http = ax.http.execute(newjob).sync();
- Line 4 creates a new job.
- Lines 5 and 6 set the URL and method of this request.
- Line 7 sends this request immediately (sync). The response is available to the script within http.
Sign all requests
This script generates a SHA256 signature using an API key and secret, then adds it to the request header.
/// url:  /
/// script_type: prerequestscript
var variables = scriptArg.variables;
var request = scriptArg.http.request;
if (!variables.hasVar('ifsl_key')) {
   variables.setVar('ifsl_key', 'MY_KEY');
}
if (!variables.hasVar('ifsl_secret')) {
   variables.setVar('ifsl_secret', 'MY_SECRET');
}
var timestamp = Math.round((new Date()).getTime()/1000);
var apikey = variables.getVar('ifsl_key');
var apisecret = variables.getVar('ifsl_secret');
var sig = ax.util.sha256(apikey + apisecret + timestamp).toString();
request.setHeader('x-signature',sig);
- Line 14 uses the SHA256 function implemented by the engine to generate a signature for the request.
- Line 15 adds the signature within the request's x-signature header.
Sign requests using HMAC-SHA512
This script creates an HMAC-SHA512 signature for request authentication and adds it to the Authorization header.
/// url:  /
/// script_type: prerequestscript
var request = scriptArg.http.request;
function getPath(url) {
       var pathRegex = /.+?\:\/\/.+?(\/.+?)(?:#|\?|$)/;
       var result = url.match(pathRegex);
       return result && result.length > 1 ? result[1] : '';

  }
function getQueryString(url) {
       var arrSplit = url.split('?');
       return arrSplit.length > 1 ? url.substring(url.indexOf('?')+1) : '';
  }
function getAuthHeader(httpMethod, requestUrl, requestBody) {
       var CLIENT_KEY = 'REPLACE_WITH_YOUR_CLIENT_KEY';
       var SECRET_KEY = 'REPLACE_WITH_YOUR_SECRET_KEY';
       var AUTH_TYPE = 'HMAC-SHA512';
       var requestPath = getPath(requestUrl);
       var queryString = getQueryString(requestUrl);
       if (httpMethod == 'GET' || !requestBody) {
           requestBody = '';
       } else {
           requestBody = JSON.stringify(requestBody);
       }
       var hashedPayload = ax.util.sha512(requestBody).toString();
       var timestamp = Math.round((new Date()).getTime()/1000);
       var requestData = [httpMethod, requestPath, queryString, timestamp,
         hashedPayload].join("\n");
       var hashedRequestData = ax.util.sha512(requestData).toString();
       var hmacDigest = ax.util.hmac512(SECRET_KEY,hashedRequestData).toString();
       var authHeader = AUTH_TYPE + ' timestamp=' + timestamp + ", client=" +
         CLIENT_KEY + ', signature=' + hmacDigest;
       return authHeader;
  }
request.setHeader('Authorization', getAuthHeader(request.method, request.uri,
  request.body));
Block requests by URL and method
This script prevents DELETE requests to URLs matching the /Templates/
pattern from being sent.
/// url:  /Templates/
/// script_type: prerequestscript
var request = scriptArg.http.request;
if (request.method == 'DELETE')
{
   ax.logi("Aborting request: " + scriptArg.http.url.toString());
   scriptArg.http.abort();
}
Step 3: Upload the file into UI
Follow the steps to upload the pre-request script file for a specific target:
- Select Inventory > Targets from the left-side menu.
- Use the three-dot menu (⋮) > Edit target for the specific target you want to update.
- In the Scan sconfiguration menu select General.
- Upload the JS file with the script by clicking Upload file.
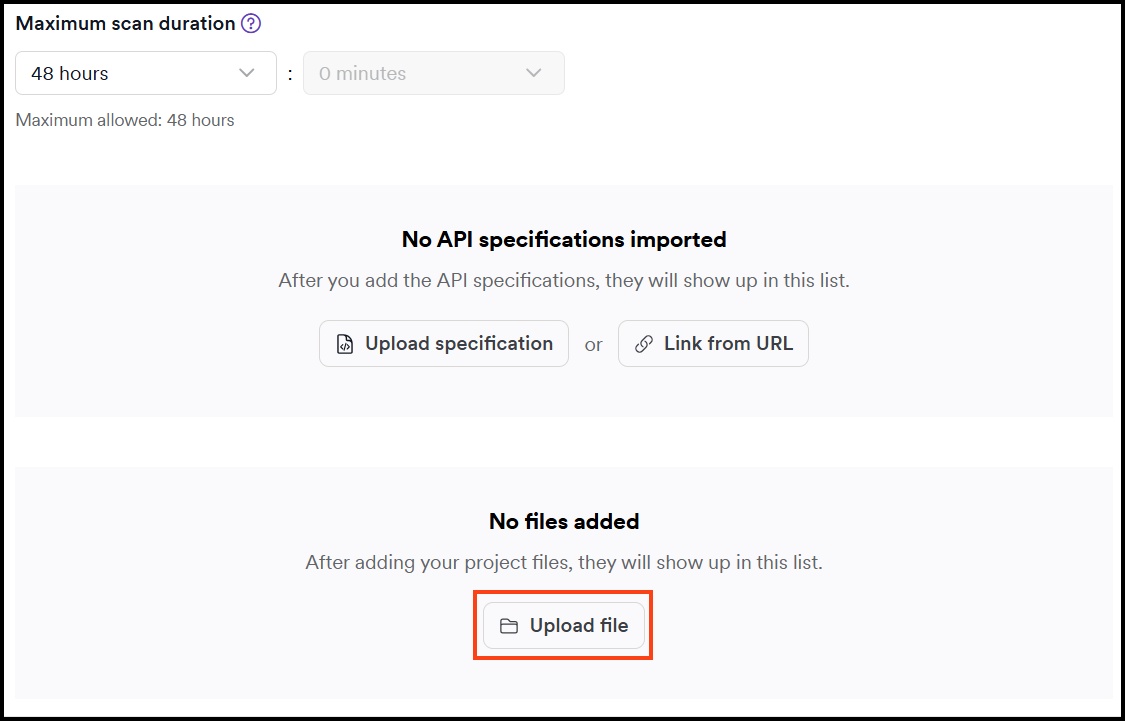
- In Type drop-down select Pre-request Script (.js) option then click Choose file to select the script file.

- Click Upload file to save it.
- Optionally, if you're using external modules, repeat the steps 4 - 6 to upload the module.js file.
- Save the settings to target by clicking Save target configuration or Save and scan.
Step 4: Advanced - use Postman Collections (optional)
Postman Collections allow you to import predefined variables and configurations into your scans. This is useful when you have existing API testing setups in Postman that you want to reuse with Invicti Platform.
When to use Postman Collections
Use Postman Collections to:
- Import API keys, authentication tokens, or other credentials as variables
- Reuse existing API configurations from your Postman workspace
- Share standardized variable sets across multiple targets
- Set up complex variable hierarchies (Collection, Environment, Global scopes)
Import a Postman Collection
To upload a Postman Collection file:
- Export your collection from Postman as a JSON file.
- Follow the same steps as Step 3: Upload the file into UI.
- In the Type drop-down, select Postman (.json) instead of Pre-request Script.
- Click Choose file and select your Postman Collection JSON file.
- Click Upload file to save it.
Once uploaded, all variables defined in the collection become available to your pre-request scripts during the scan.
Example: Using variables from a Postman Collection
This example demonstrates how a pre-request script accesses variables that were defined in an uploaded Postman Collection.
Postman Collection (KeyCollection.json):
The collection defines a variable called MyKey with the value testKeyValue:
{
	"info": {
		"_postman_id": "a085cb9c-2e8d-46b9-868f-2e3c836f6327",
		"name": "KeyCollection",
		"schema": "https://schema.getpostman.com/json/collection/v2.1.0/collection.json",
		"_exporter_id": "14719474"
	},
	"item": [],
	"event": [
		{
			"listen": "prerequest",
			"script": {
				"type": "text/javascript",
				"packages": {},
				"exec": [
					""
				]
			}
		},
		{
			"listen": "test",
			"script": {
				"type": "text/javascript",
				"packages": {},
				"exec": [
					""
				]
			}
		}
	],
	"variable": [
		{
			"key": "MyKey",
			"value": "testKeyValue",
			"type": "string"
		}
	]
}
Pre-request script that uses the collection variable:
This script checks if the "MyKey" variable exists (loaded from the Postman Collection) and adds it as a custom header to every request:
/// url:  /
/// script_type: prerequestscript
var variables = scriptArg.variables;
var request = scriptArg.http.request;

// Check if the variable from Postman Collection exists
if (variables.hasVar('MyKey')) {
   // Add the variable value as a custom header
   request.setHeader('test-postman', variables.getVar('MyKey'));
}
When the scan runs, the pre-request script retrieves "testKeyValue" from the MyKey variable and adds it to the test-postman header in every request.
Understanding variable scopes
Postman uses three fixed scope levels for variables, each with different precedence:
- Global - Available across all collections and environments (lowest precedence)
- Collection - Available only within the specific collection (medium precedence)
- Environment - Available when the environment is active (highest precedence)
When multiple variables have the same name in different scopes, Postman's precedence rules determine which value is used: Environment overrides Collection, which overrides Global.
Invicti Platform preserves these Postman scope names and precedence rules. However, pre-request scripts can also create variables with custom scope names that don't follow Postman's three-level hierarchy. If you
mix Postman scopes with custom scopes, use getScopedVar() to explicitly specify which scope to read from.
Step 5: Test and debug pre-request scripts
Testing and debugging pre-request scripts ensures they work correctly before production use. This section covers pre-upload validation using syntax checkers and local testing, logging techniques with ax.logi() to track execution, common errors and their solutions, and how to use Invicti Platform's scan logs and notifications to diagnose failures during scans.
Test your script before uploading
Before uploading your pre-request script to Invicti Platform, validate it to catch errors early:
- Check syntax - Use a JavaScript linter or IDE with syntax checking to identify basic errors.
- Verify directives - Ensure the mandatory directives are present and correctly formatted:
/// url: /your/path/// script_type: prerequestscript
- Review variable names - Confirm that variable names match those in your Postman Collection (if using one).
- Test logic - If your script contains complex logic, test the functions in a local JavaScript environment before integration.
Use logging for debugging
Add logging statements to your pre-request scripts to track execution and variable values:
/// url: /
/// script_type: prerequestscript
var request = scriptArg.http.request;

// Log the request URL being processed
ax.logi("Processing request: " + scriptArg.http.url.toString());

// Log variable values
var myVar = scriptArg.variables.getVar('MyKey');
ax.logi("MyKey value: " + myVar);

// Log when headers are added
request.setHeader('Custom-Header', 'value');
ax.logi("Added Custom-Header to request");
These log messages appear in the scan logs and help you verify that your script executes correctly.
Common errors and solutions
| Error | Cause | Solution |
|---|---|---|
TypeError: request.setHeaderr is not a function | Typo in function name | Check spelling - should be setHeader not setHeaderr |
ReferenceError: variable is not defined | Variable doesn't exist or wrong scope | Verify variable exists using hasVar() before accessing it |
Script not executing | Missing or incorrect directives | Ensure /// script_type: prerequestscript is present |
Script not matching URLs | Incorrect URL pattern | Check the /// url: directive matches your target URLs |
Module not found | External module not uploaded or wrong name | Upload the module file and ensure the name matches ax.loadModule() parameter |
Variables not persisting | Using wrong storage method | Use setVar() or setScopedVar() to store variables, not regular JavaScript variables |
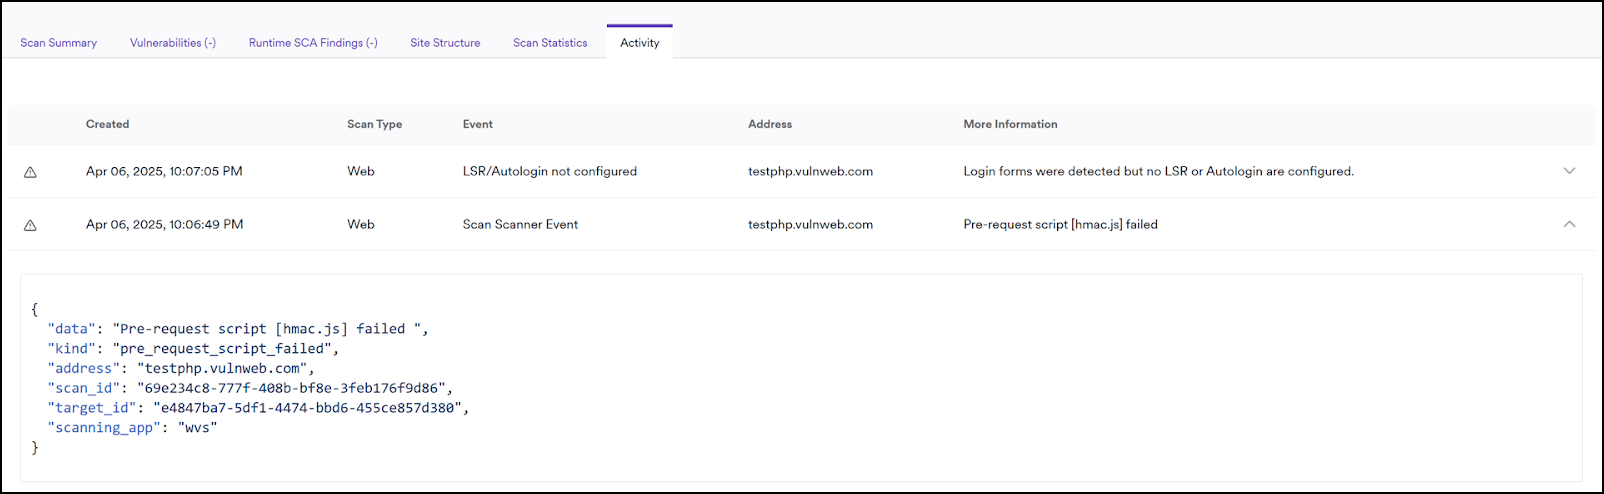
Debug failed scripts in Invicti Platform
When a pre-request script fails during a scan, Invicti Platform provides error information in multiple locations.
Find error notifications
Failed pre-request scripts trigger notifications in the Scan details page:
In the Scan Summary tab:

In the Activity tab:
The Activity tab shows a scanner event with details about the pre-request script failure.
Analyze scan logs for detailed errors
For information on downloading scan logs, refer to the Download scan logs document.
Scan logs contain the complete error messages with stack traces. Look for entries starting with ERROR and PreRequestScripts:
Example error in scan log:
ERROR	PreRequestScripts	17076	TypeError: request.setHeaderr is not a
  function in hmac.js:42
	request.setHeaderr('Authorization', getAuthHeader(request.method,
    request.uri, request.body));
TypeError: request.setHeaderr is not a function
   at hmac.js:42:9
This error shows:
- Error type:
TypeError- indicates a function call issue - Problem:
request.setHeaderr is not a function- function name is misspelled - Location:
hmac.js:42- line 42 in your script file - Fix: Change
setHeaderrtosetHeader
Confirm successful execution:
When a pre-request script runs successfully, look for confirmation messages:
INFO PreRequestScripts 22024 pre-request script hmac.js successfully executed
If you added logging statements with ax.logi(), those messages also appear in the scan logs with your custom text.
Debugging strategies
Start simple and build up:
- Begin with a minimal script that only logs a message
- Verify it executes successfully
- Add features incrementally, testing after each addition
Isolate the problem:
- Comment out sections of your script to identify which part fails
- Test each function or logic block separately
- Verify that variables exist before using them
Check the scan scope:
- Ensure your URL directive matches the requests you want to modify
- Use
/// url: /temporarily to apply the script to all requests for testing - Narrow the scope once the script works correctly
Need help?
Invicti Support team is ready to provide you with technical help. Go to Help Center