Invicti IAST for PHP overview
Before deploying the Invicti PHP IAST sensor, note the list of supported servers and frameworks.
| Environment | 🔍 Supported Servers and Frameworks |
|---|---|
| PHP Language |
|
| Application Frameworks |
|
| Web Servers |
|
| Database Engines |
|
| Package Manager |
|
To deploy Invicti IAST, you should keep in mind that the mechanism to use is to invoke the PHP directive "auto_prepend_file" and point this directive to the Invicti PHP IAST sensor file.
Deploying the Invicti IAST agent is a 3-step process.
Step 1: Download Invicti IAST for your Target
The instructions to download the Invicti IAST agent file can be found in the Introduction to Invicti IAST document.
Step 2: Copy the Invicti IAST agent to the Target
For the purposes of this document, it's assumed that a dedicated folder is created inside the ROOT folder of your operating system to hold the Invicti IAST agent.
- Windows
- Linux
- Create a folder
C:\iastsensor\ - Copy the
iastsensor.phpfile intoC:\iastsensor\
- Run the following command:
mkdir /iastsensor/ - Use
cdto navigate to the folder which contains your downloaded Invicti IAST agent file and run the following command:
cp iastsensor.php /iastsensor/
Step 3: Configure your web server to invoke the "auto_prepend_file" directive
- Windows with IIS
- Windows with Apache
- Linux with Apache
- Linux with Nginx
- Identify the
php.inifile which contains the PHP directives for your website. If your website has its own INI file (typically a.user.inifile in your website's root folder), you need to add a line to that website's specific INI file. Otherwise, you need to add a line to the generalphp.inifile - keeping in mind it affects all websites on the web server. The line to be added is:
auto_prepend_file="c:\iastsensor\iastsensor.php"
- Option 1: add this line to the
.htaccessfile in the root folder of your website:php_value auto_prepend_file C:\iastsensor\iastsensor.php - Option 2: Identify the
php.inifile which contains the PHP directives for your website. In a 64-BIT "wampserver" installation, typically the file to be edited would beC:\wamp64\bin\php\php7.3.12\phpForApache.ini. Add this line to the file:auto_prepend_file="c:\iastsensor\iastsensor.php"
- Option 1: add this line to the
.htaccessfile in the root folder of your website:php_value auto_prepend_file /iastsensor/iastsensor.php - Option 2: Identify the
php.inifile which contains the PHP directives for your website. If your website has its own INI file (typically a.user.inifile in your website's root folder), you need to add a line to that website's specific INI file. Otherwise, you need to add a line to the generalphp.inifile - keeping in mind it affects all websites on the web server. The line to be added is:auto_prepend_file = /iastsensor/iastsensor.php
- Option 1: Identify your NGINX conf file (for example,
/etc/nginx/sites-enabled/mysite.conf), and in the section forlocation ~ \.php$, add a line as follows:fastcgi_param PHP_VALUE "auto_prepend_file = /iastsensor/iastsensor.php"; - Option 2: Identify the
php.inifile which contains the PHP directives for your website. If your website has its own INI file (typically a.user.inifile in your website's root folder), you need to add a line to that website's specific INI file. Otherwise, you need to add a line to the generalphp.inifile - keeping in mind it affects all websites on the web server. The line to be added is:auto_prepend_file = /iastsensor/iastsensor.php
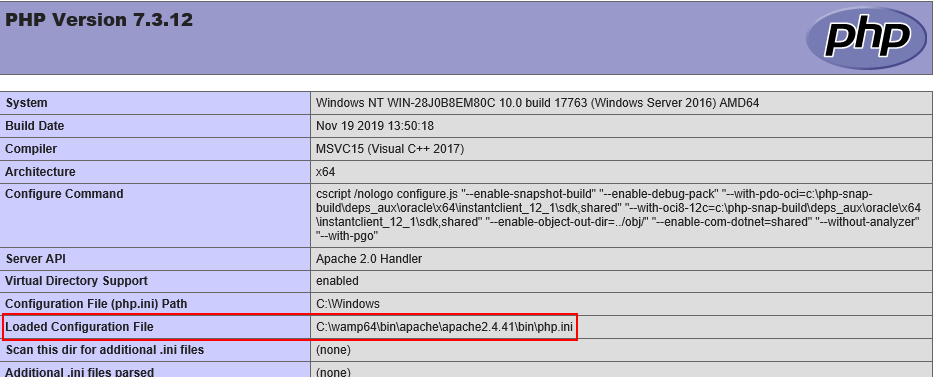
Where to find the general php.ini file?
Temporarily create a simple PHP file with phpinfo(); - the "Loaded Configuration File" is the general php.ini file to change.
You should ALWAYS remove any phpinfo() pages from your web application - the information disclosed by such a file is in itself a vulnerability, and provides malicious hackers with essential information with which to potentially craft an exploit targeting your web application.
Docker example for Apache + PHP + Invicti IAST
Step 1: Prepare example website
For this single-page example, here are the contents of /home/myuser/www/index.php:
auto_prepend_file = /iastsensor/iastsensor.php
Step 2: Configure loading of Invicti IAST agent for the website
Contents of /home/myuser/www/.htaccess:
php_value auto_prepend_file /var/www/mysite/iastsensor.php
Step 3: Configure Apache configuration for the website
Contents of /home/myuser/mysite-apache.conf:
<VirtualHost *:80>
    ServerAdmin me@mydomain.com
    DocumentRoot /var/www/mysite
    <Directory /var/www/mysite/>
        Options Indexes FollowSymLinks MultiViews
        AllowOverride All
        Order deny,allow
        Allow from all
    </Directory>
    ErrorLog ${APACHE_LOG_DIR}/error.log
    CustomLog ${APACHE_LOG_DIR}/access.log combined
</VirtualHost>
Step 4: Place the iastsensor.php file in /home/myuser/www
Step 5: Configure the Dockerfile for building the container
Contents of /home/myuser/Dockerfile:
FROM ubuntu:latest
# Install apache, PHP
RUN apt-get update
RUN apt-get -y upgrade
RUN DEBIAN_FRONTEND=noninteractive apt-get -y install apache2 php libapache2-mod-php
# Expose apache
EXPOSE 80
# Copy website and Invicti IAST agent into place
COPY www /var/www/mysite
# Update the default apache site with the website config
COPY mysite-apache.conf /etc/apache2/sites-enabled/000-default.conf
# Start up apache in the foreground
CMD /usr/sbin/apache2ctl -D FOREGROUND
Step 6: Build the container
Run the following commands from the docker machine:
cd /home/myuser
docker build -t mysite .
Uninstall Invicti IAST
- First you need to reverse the changes made to your configuration files to invoke the "auto_prepend_file" directive
- Next, remove the Invicti IAST sensor file as follows:
- Under Windows, remove the
C:\iastsensor\iastsensor.phpfile and then remove theC:\iastsensorfolder - Under Linux, run the following command:
rm -rf /iastsensor/
- Under Windows, remove the
Although Invicti IAST files are secured with a unique strong built-in password, it's recommended that the Invicti IAST files be uninstalled and removed from the web application if they're no longer in use.
Need help?
Invicti Support team is ready to provide you with technical help. Go to Help Center