Make your first call
Deployment: Invicti Platform on-demand, Invicti Platform on-premises
This is part 4 of 5 in the API fundamentals series.
Previous: Authenticate | Next: Handle responses
Now that you have your API key and access to the documentation, let's make your first authenticated API call to the Invicti Platform. This document shows you how to test API connectivity and authentication using three popular tools.
Choose your API testing tool
Select the tool that best fits your comfort level and workflow:
| Tool | Best for | Notes |
|---|---|---|
| Postman | Beginners and interactive testing | Graphical interface with built-in authentication helpers and request collections |
| curl | Quick tests and scripting | Available on most systems by default, minimal setup required |
| Python | Building automation | Full programming capabilities, easy integration with other systems |
Authentication setup
All Invicti Platform API calls require authentication using your API key. The authentication header format is:
X-Auth: YOUR_API_KEY_HERE
Replace YOUR_API_KEY_HERE with the actual API key you generated in the previous step.
Test API call: Get user information
Let's start with a simple GET request to retrieve your user information. This confirms both connectivity and authentication.
Endpoint: GET /api/identity/v1/me
Purpose: Returns information about the authenticated user
Base URL + Endpoint = Full URL
To make an API call, you combine your platform's base URL with the endpoint path:
Base URL (depends on your deployment):
- US region:
https://platform.invicti.com - EU region:
https://platform-eu.invicti.com - Canada region:
https://platform-ca.invicti.com - On-premises: Your custom platform URL
Full URL example:
https://platform.invicti.com/api/identity/v1/me
Use your deployment's base URL + the endpoint path shown above
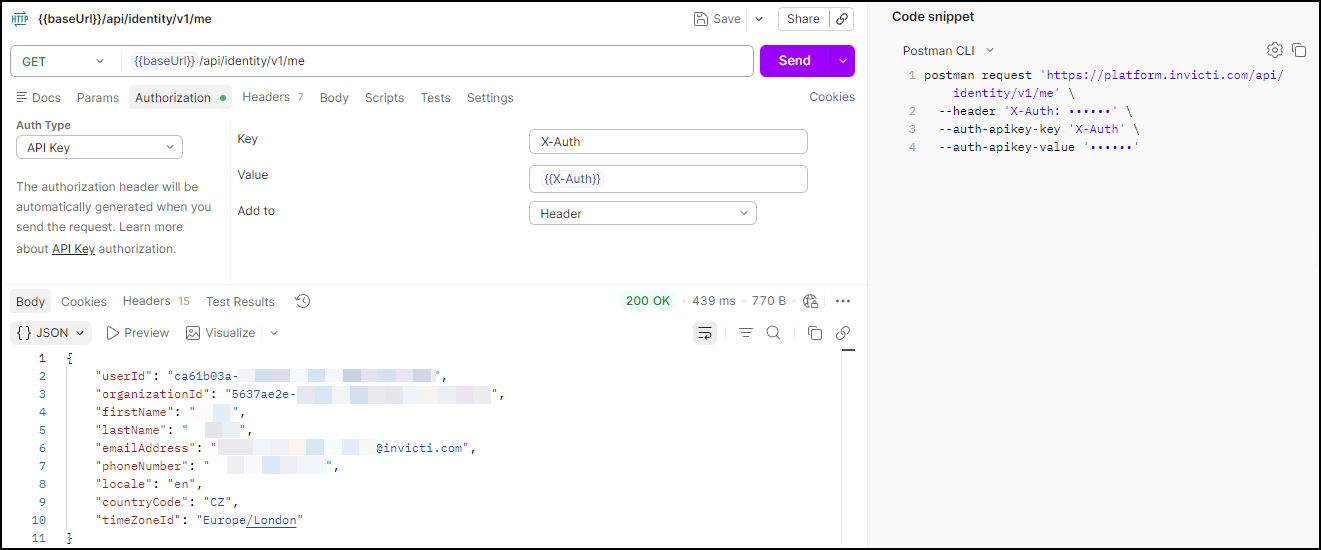
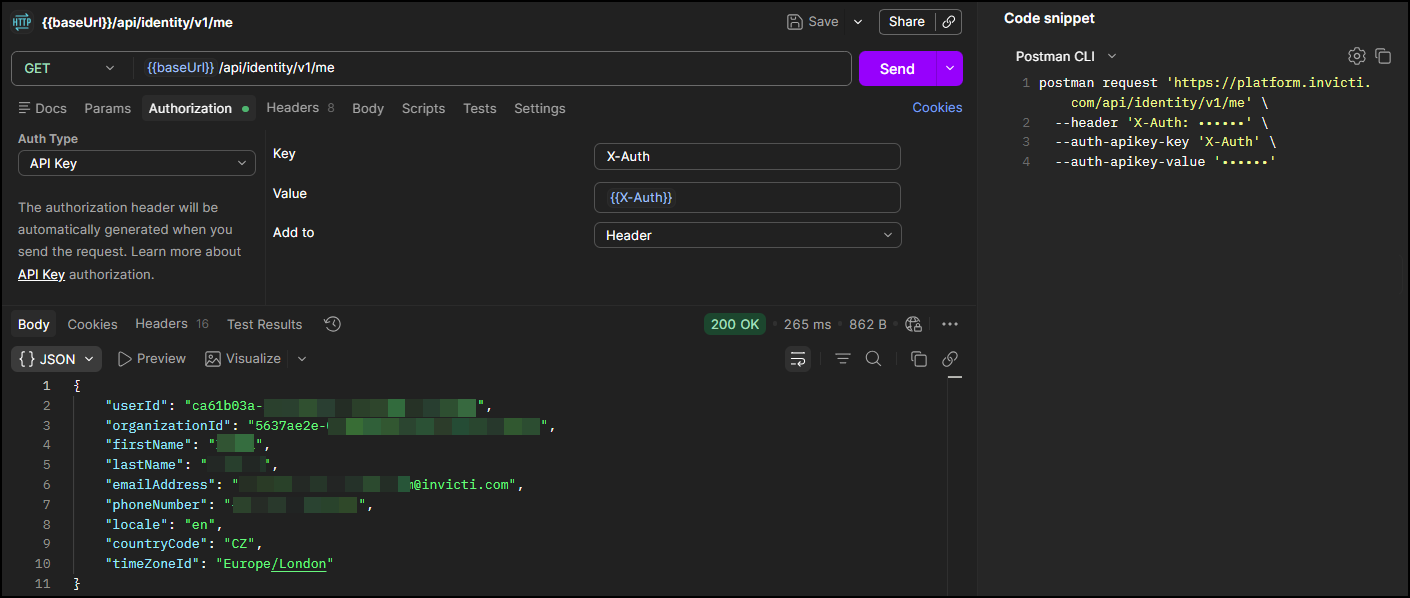
Using Postman
Use this option if you prefer a graphical interface. Postman lets you set headers, inspect responses, and save requests for reuse without writing any code.
Show Postman steps
-
Create a new request:
- Open Postman and click New > HTTP Request
- Set method to GET
-
Set the URL:
<base-url>/api/identity/v1/meReplace the base URL with your deployment's URL if different
-
Add authentication:
- Go to the Authorization tab
- Select API Key from the Type dropdown
- Set Key to
X-Auth - Set Value to your API key
- Set Add to to
Header
-
Send the request:
- Click Send
- You should see a 200 OK response with your user information
Using curl
Use this option for a quick test from the terminal. curl is available on most systems by default and requires no additional setup.
Show curl command
Open your terminal and run:
curl -X GET "https://platform.invicti.com/api/identity/v1/me" \
  -H "X-Auth: YOUR_API_KEY_HERE" \
  -H "Content-Type: application/json"
Expected response:
{
  "userId": "00000000-0000-0000-0000-000000000001",
  "organizationId": "00000000-0000-0000-0000-000000000002",
  "firstName": "Jane",
  "lastName": "Developer",
  "emailAddress": "jane.developer@yourcompany.com",
  "phoneNumber": "+1 555 000 0000",
  "locale": "en",
  "countryCode": "US",
  "timeZoneId": "America/New_York"
}
Using Python
Use this option if you're building automation or integrating the API into a script. The example uses the requests library and shows how to check the response and print user details.
Show Python code
import requests
import json

# Configuration
base_url = "https://platform.invicti.com"
api_key = "YOUR_API_KEY_HERE"

# Headers for authentication
headers = {
    "X-Auth": api_key,
    "Content-Type": "application/json"
}

# Make the request
response = requests.get(f"{base_url}/api/identity/v1/me", headers=headers)

# Check the response
if response.status_code == 200:
    user_info = response.json()
    print(f"Authenticated as: {user_info['firstName']} {user_info['lastName']}")
    print(f"Email: {user_info['emailAddress']}")
else:
    print(f"Error: {response.status_code} - {response.text}")
What a successful response looks like
A successful API call returns:
Status Code: 200 OK - Request completed successfully
Response Body: JSON object containing user information
Headers: Include content type, rate limiting info, and more
Sample response:
{
  "userId": "00000000-0000-0000-0000-000000000001",
  "organizationId": "00000000-0000-0000-0000-000000000002",
  "firstName": "Jane",
  "lastName": "Doe",
  "emailAddress": "jane.doe@yourcompany.com",
  "phoneNumber": "+1 555 000 0000",
  "locale": "en",
  "countryCode": "US",
  "timeZoneId": "America/New_York"
}
Common issues and solutions
If your API call fails, check the status code and follow the guidance below.
| Error | Cause | Solution |
|---|---|---|
401 Unauthorized | Invalid or missing API key | Double-check your API key is correct and properly formatted in the X-Auth header |
403 Forbidden | Valid authentication but insufficient permissions | Check your user role has API access permissions |
404 Not Found | Wrong base URL or endpoint path | Verify you're using the correct base URL for your deployment |
| Network/Connection error | Firewall, proxy, or network connectivity issues | Verify network access to your Invicti Platform instance |
Test with different endpoints
Once your first call succeeds, try these other simple GET endpoints to build confidence:
# List of targets
GET /api/v1/targets

# Get scan summary
GET /api/v1/scans

# Check API version info
GET /api/v1/info
Next steps
You've successfully made your first authenticated API call to the Invicti Platform. Now move on to handling responses and errors:
→ Continue to Handle responses
Complete fundamentals series
- Overview
- Part 1: When to use the API
- Part 2: Get your API key
- Part 3: Authenticate
- Part 4: Make your first call ← You are here
- Part 5: Handle responses
Need help?
Invicti Support team is ready to provide you with technical help. Go to Help Center