Package: Invicti AppSec Enterprise (on-premise, on-demand)
Rapid7 Insight VM / Nexpose
Rapid7 InsightVM and Nexpose are vulnerability management platforms that provide continuous visibility into infrastructure risks. In Invicti AppSec, the integration connects to your Rapid7 instance to import site-level vulnerability findings into your projects.
Prerequisites
| Field | Description |
|---|---|
| Username | username for the Rapid7 InsightVM or Nexpose account |
| Password | password for the Rapid7 account |
| URL | the base URL of your InsightVM or Nexpose instance (e.g., https://nexpose.example.com) |
Get credentials (on Rapid7 side)
- Log in to your Rapid7 InsightVM or Nexpose console.
- Create or identify a service account with access to the sites you want to integrate.
- Note the Username and Password for this account.
- Copy the URL of your InsightVM or Nexpose web console (without a trailing path).
For InsightVM cloud, the URL typically follows the format https://<region>.api.insight.rapid7.com.
Step 1: Navigate to Integrations
From the left sidebar menu, click Integrations.
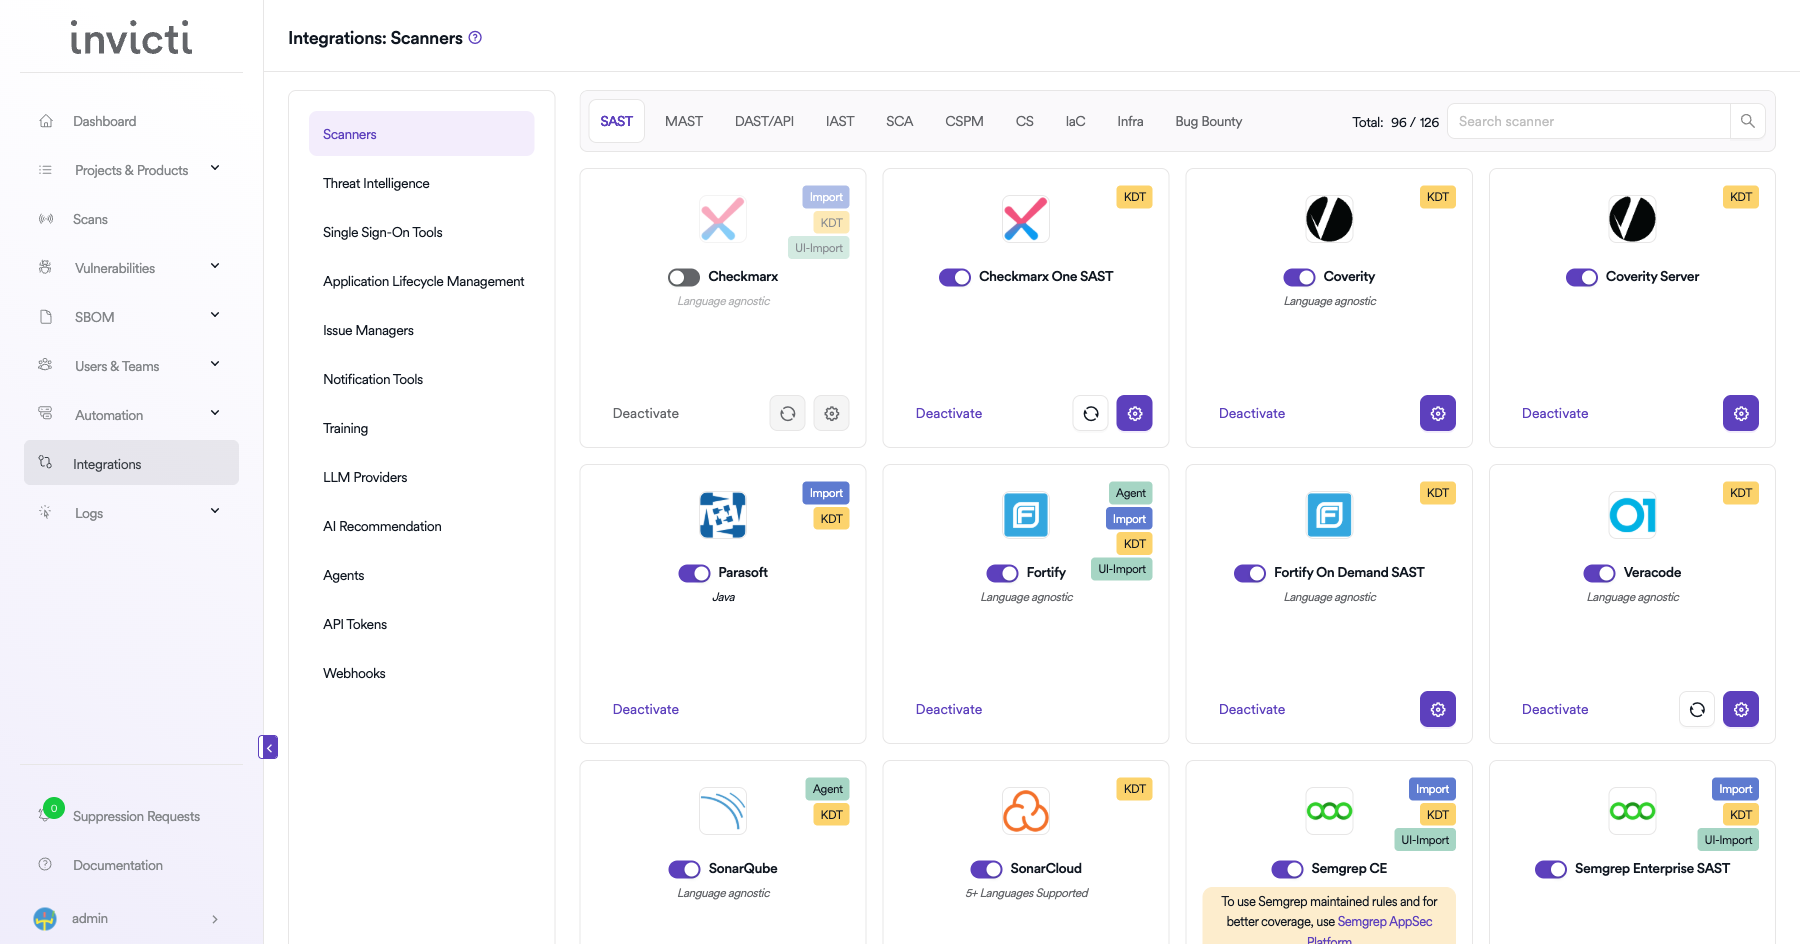
Step 2: Select the Infra tab
On the Integrations > Scanners page, click the Infra tab.
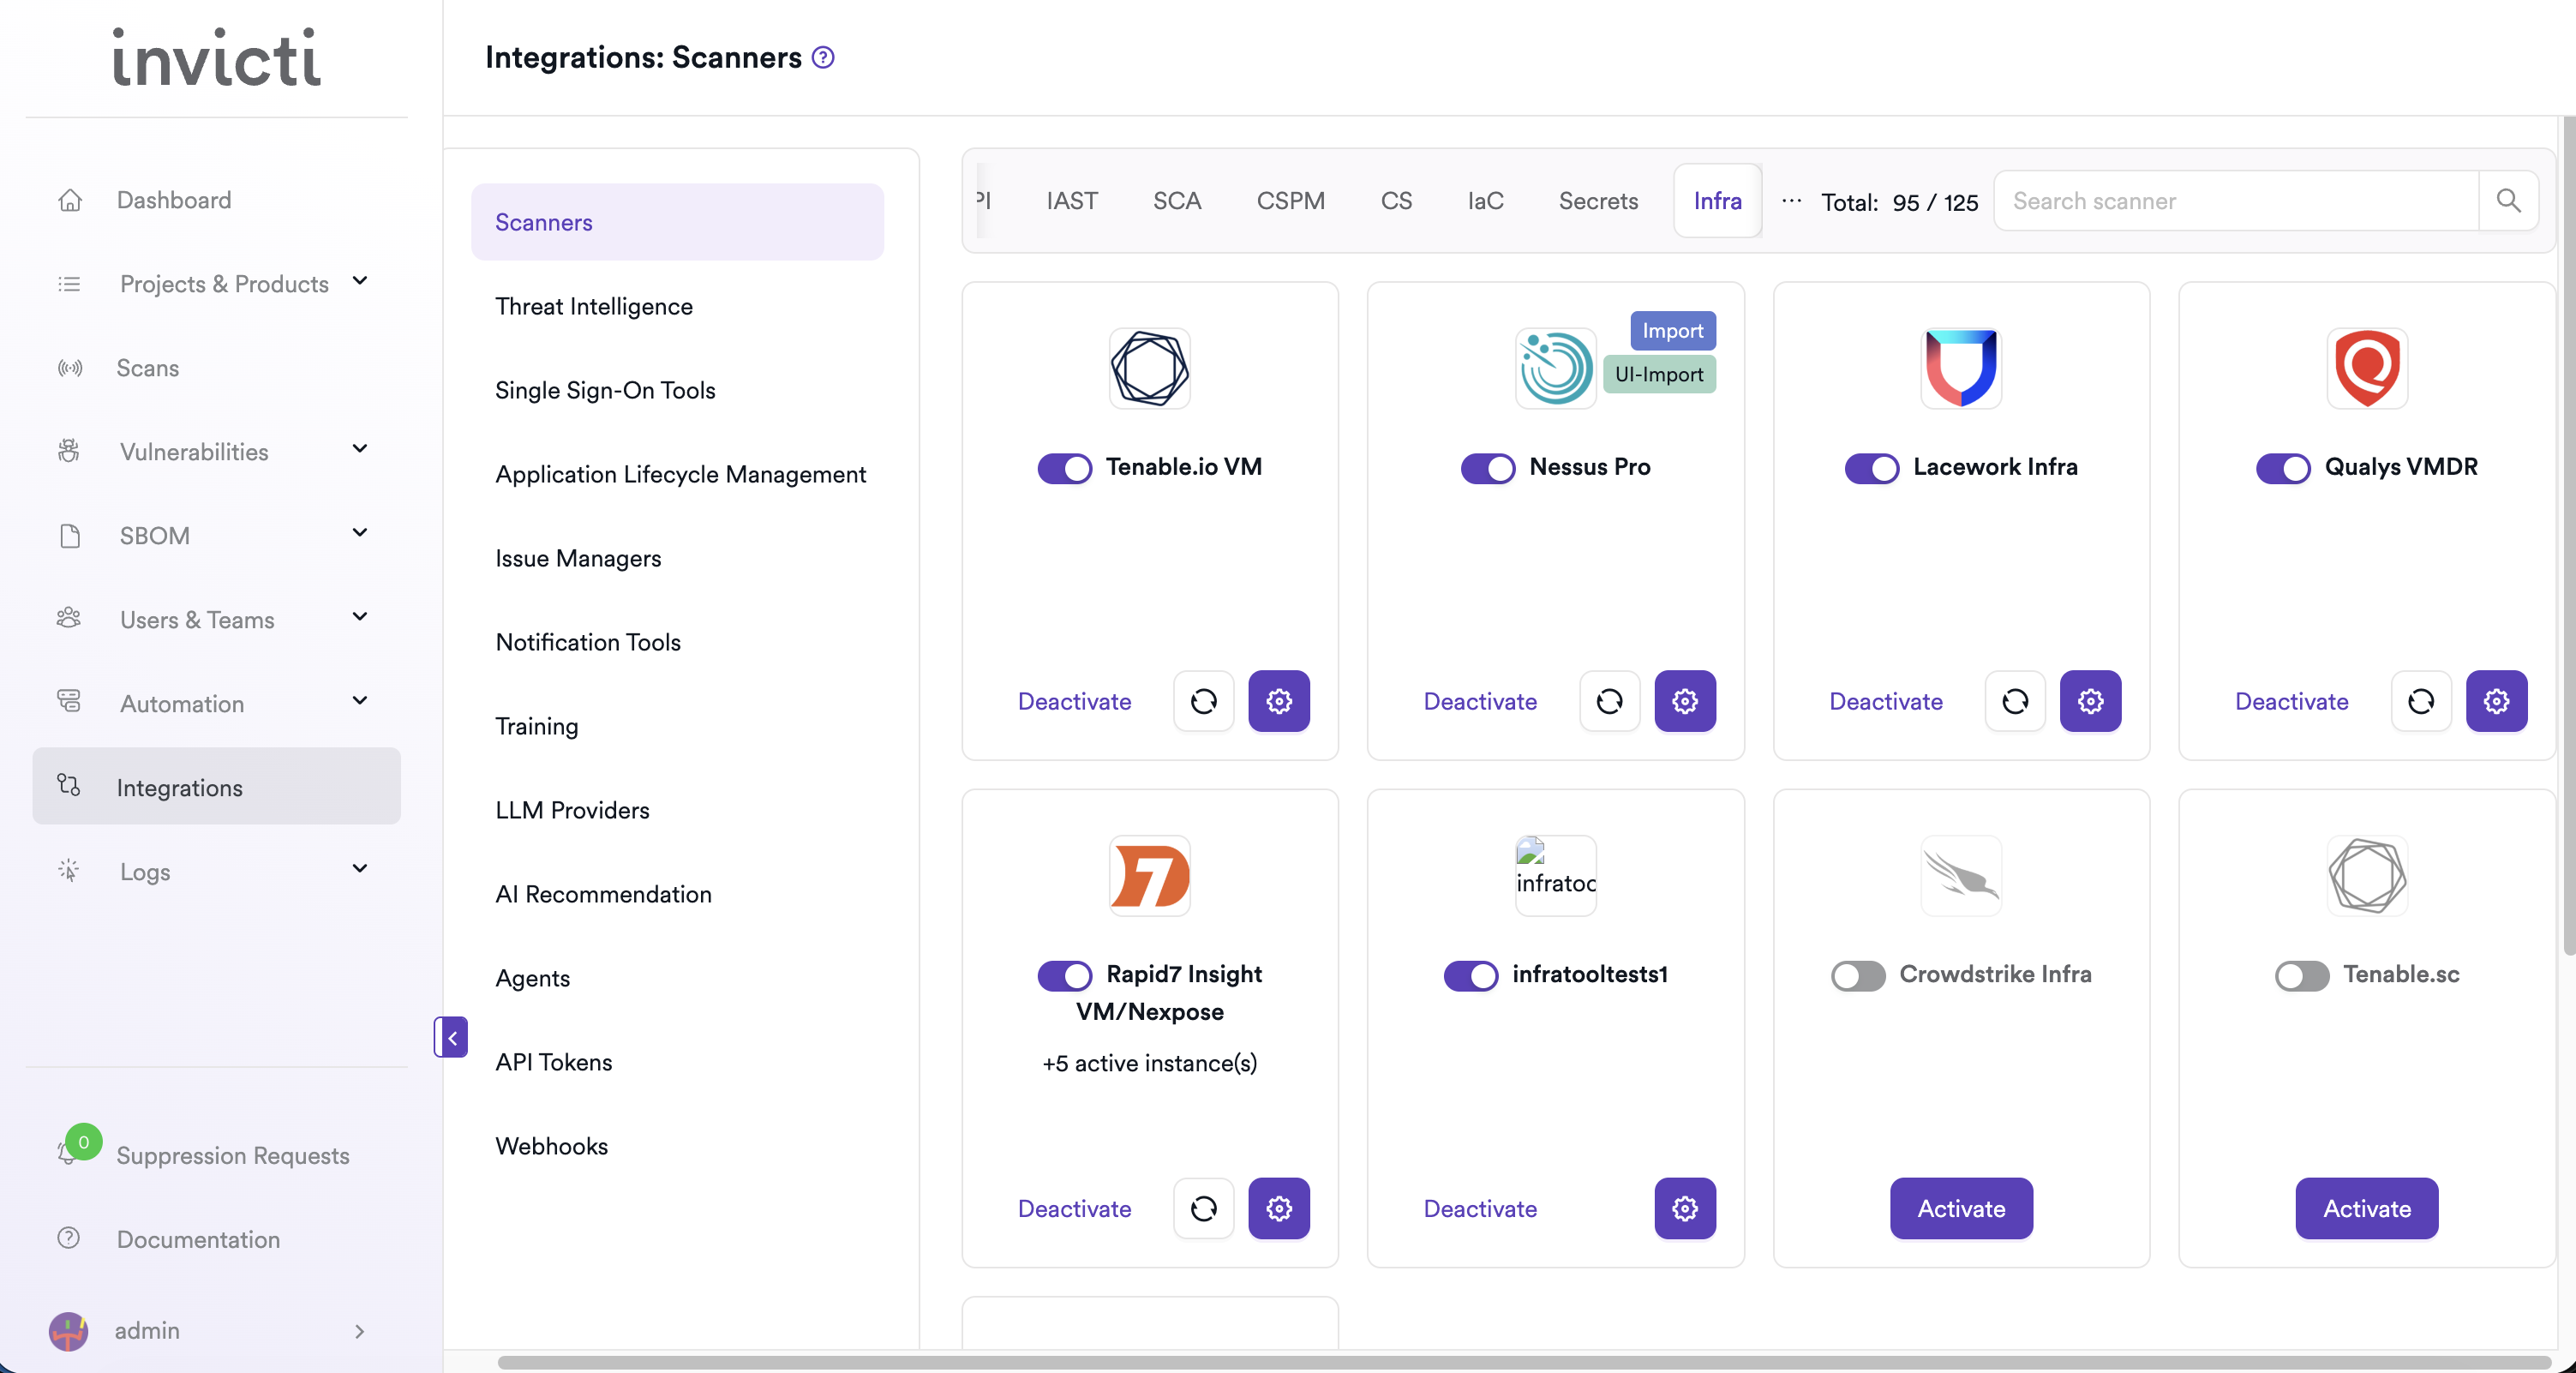
Step 3: Find and activate Rapid7 Insight VM / Nexpose
Scroll through the list of Infra scanners to find Rapid7 Insight VM/Nexpose.
- If Rapid7 Insight VM/Nexpose is not activated, click Activate to enable the integration.
Step 4: Configure connection settings
Click the gear icon on the Rapid7 Insight VM/Nexpose card to open the settings panel. Fill in the required fields:
| Field | Description | Required |
|---|---|---|
| Instance | select Default or a named instance; choose "Add New Instance" to configure a new server | No |
| Instance Name | a label for this instance (shown when adding a new instance) | Yes (if new instance) |
| Username | Rapid7 account username | Yes |
| Password | Rapid7 account password | Yes |
| URL | base URL of your InsightVM or Nexpose instance | Yes |
| Insecure | skip TLS certificate verification (use only for self-signed certificates) | No |
Advanced settings
Click Advanced Settings to configure team-level access options:
| Field | Description |
|---|---|
| Allow Team Leads to scan this instance | permit team lead users to use this Rapid7 instance for their scans |
| Allow Team Leads to create new instances | permit team lead users to add their own Rapid7 instance credentials |
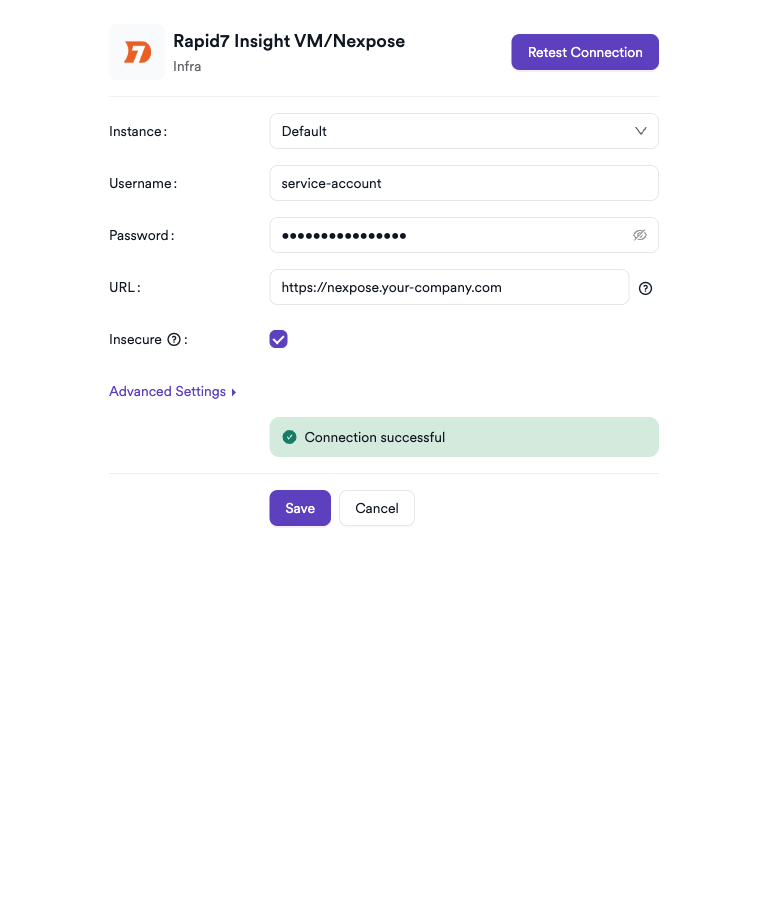
Step 5: Test the connection
Click Test Connection. A green Connection successful message confirms that Invicti AppSec can authenticate with the Rapid7 API.
Summary
| Step | Action |
|---|---|
| 1 | Navigate to Integrations from the sidebar |
| 2 | Select the Infra tab |
| 3 | Activate Rapid7 Insight VM / Nexpose |
| 4 | Enter Username, Password, and URL |
| 5 | Test the connection |
Create a scan
Navigate to project scanners
- Open a project in Invicti AppSec.
- Go to Settings > Scanners.
- Click Add Scanner.
Add Rapid7 Insight VM / Nexpose scanner
- Select Infra as the scanner type.
- Choose Rapid7 Insight VM/Nexpose from the scanner list.
- Click Add to open the scan configuration drawer.
Scan configuration fields
| Field | Description | Required |
|---|---|---|
| Profile Name | a name to identify this scan configuration | Yes |
| Instance | select Default or a specific named InsightVM / Nexpose instance | No |
| Bind to | select the Rapid7 site to bind to | Yes |
| Meta Data | additional metadata to tag the scan | Yes |
| Scan Tag | free-text tag to identify or group scans | No |
| Start Scan | toggle to trigger a new Rapid7 scan on the next run | No |
| Engines | select a scan engine (shown when Start Scan is enabled) | Yes (if Start Scan on) |
| Templates | select a scan template (shown when Start Scan is enabled) | Yes (if Start Scan on) |
| Severity+ | increase severity of imported findings by one level | No |
| Severity- | decrease severity of imported findings by one level | No |
When Start Scan is enabled, additional fields appear to select the Scan Engine and Scan Template for the new scan. Severity+ and Severity- are mutually exclusive — only one can be enabled at a time.
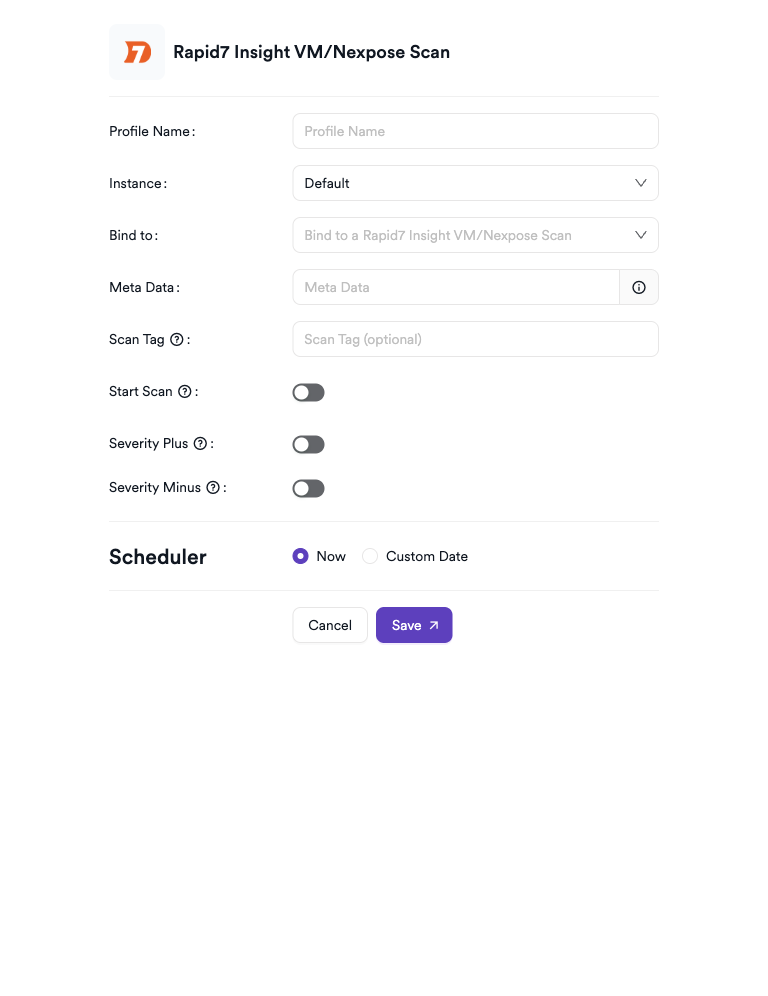
Scheduler
Enable the Scheduler toggle to automatically run Rapid7 scans on a recurring schedule.
Webhook (optional)
Add a webhook URL to receive scan completion notifications.
KDT command
kdt scan -p <project_name> -t rapid7infra -b -
Troubleshooting
Connection fails
| Issue | Resolution |
|---|---|
| Invalid username or password | verify the credentials in the Rapid7 console. Ensure the account hasn't been locked. |
| URL unreachable | confirm the InsightVM or Nexpose URL is reachable from the Invicti AppSec server. Check firewall and port access (default: 3780). |
| TLS certificate error | if using a self-signed certificate, enable the Insecure option in the connection settings. |
| Instance not connecting | verify the URL and credentials for the specific instance match what is configured in InsightVM / Nexpose. |
Scan issues
| Issue | Resolution |
|---|---|
| No sites available in Bind to dropdown | ensure at least one site is configured in Rapid7 and the account has access to it. |
| Personal token required warning | team lead users must create a personal Rapid7 instance under their profile before they can run scans. |
| Start Scan does not trigger | verify the selected scan engine is online and the scan template is compatible with the target site. |
| Scan shows no findings | the bound site may have no active vulnerabilities, or the last scan may not have completed. Check the Rapid7 console. |
Best practices
- Use a dedicated service account for Invicti AppSec with the minimum required permissions rather than reusing personal credentials.
- Use Advanced Settings to allow team leads to create their own Rapid7 instances when working with multiple sites that belong to different teams.
- Bind each Invicti AppSec project to the Rapid7 site that covers the corresponding production assets.
- When enabling Start Scan, choose a lightweight scan template to minimize impact on your Rapid7 infrastructure.
Limitations
- Rapid7 InsightVM / Nexpose in Invicti AppSec imports site-level vulnerability findings — not asset-level details.
- Only sites accessible via the provided credentials are available for selection.
- On-premises Nexpose instances require network connectivity from the Invicti AppSec server to the Nexpose host.
- Cloud-based InsightVM REST API requires the account to have the appropriate platform access.
Need help?
Invicti Support team is ready to provide you with technical help. Go to Help Center