Amazon API gateway
Deployment: Invicti Platform on-demand
Package: Ultimate
Bundle: API Security
This feature is available with Invicti API Security Standalone or Bundle.
Integrating Amazon API Gateway with Invicti Platform allows you to fetch Swagger2 and OpenAPI3 specification files from Amazon API Gateway and provide them as inputs to DAST scanners. The imported specification files are used to build an inventory of API endpoints that can be scanned for vulnerabilities.
This document explains how to set up an integration between Invicti Platform and Amazon API Gateway.
Prerequisites
Create an IAM role for accessing your API with the following permissions:
- sts:AssumeRole
- sts:GetAccessKeyInfo
- sts:GetCallerIdentity
- Apigateway:GET
This integration has three steps. Before following these steps, ensure you have configured AWS according to the prerequisites listed in the preceding section.
Only Swagger2 and OpenAPI3 specification files are imported. This integration uses the AWS Identity and Access Management (IAM) authentication mechanism. This method controls API access using AWS IAM roles and policies.
Step 1: Update your IAM role permissions
To enable Invicti Platform to successfully fetch your Swagger2 and OpenAPI3 specification files from Amazon API Gateway, you need to add a trusted policy to the IAM role that Invicti uses. Follow the steps below to update your IAM role with the necessary permissions.
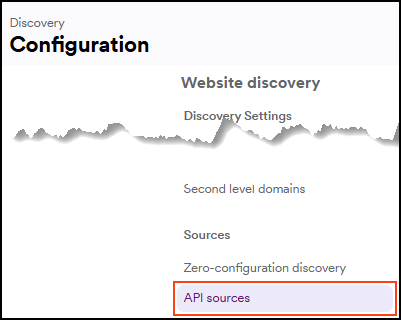
- Select Discovery > Configuration from the left-side menu.
- Further down, select API sources.
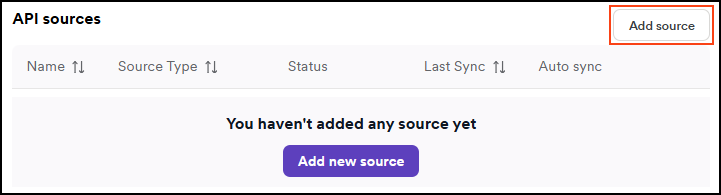
- Select Add source.
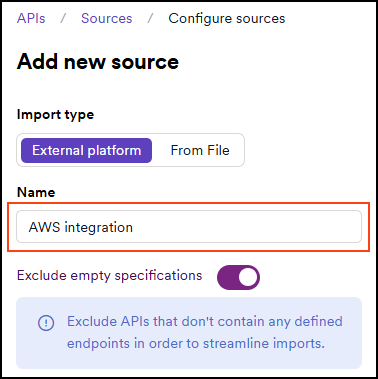
- Leave the Import type as External platform.
- Enter a name for the source configuration. This helps you identify it later in your list of API sources.
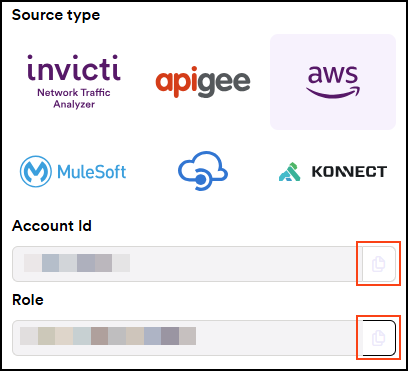
- Select AWS as the Source type.

- In a new browser tab or window, log in to the AWS IAM Console.
- Navigate to IAM > Roles.
- Select the role that Invicti uses.
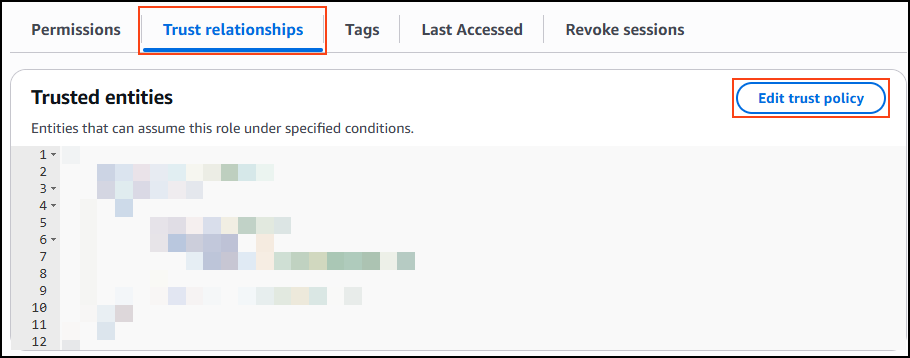
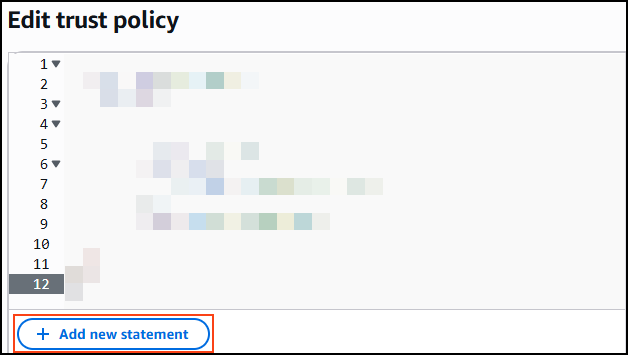
- Select the Trust relationships tab, then click Edit trust policy.
- Select Add new statement.
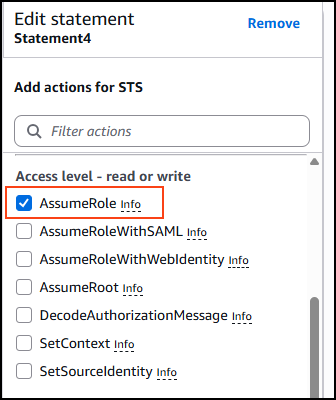
- In the Access level - read or write section, ensure the AssumeRole is selected.
- In the Add principal section, click Add and use the Principal type drop-down to select IAM Roles.
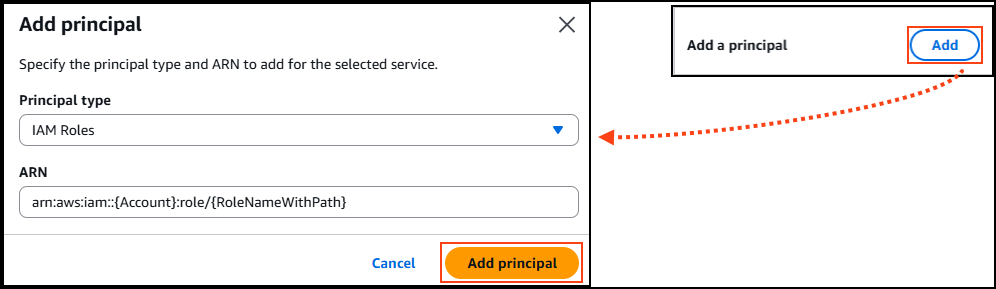
In the ARN field, replace the following placeholders:
{Account}: replace with the Account ID value from Invicti{RoleNameWithPath}: replace with value from the Role field from Invicti Navigate to the Invicti Platform browser tab, and copy the Account ID and the Role.
- Select and copy the whole ARN field string for use in the next section below.
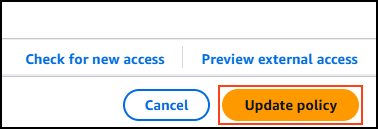
- Click Add principal.
- Click Update policy in the bottom right-hand corner.
Your IAM role now has the necessary permissions to configure the Amazon API Gateway import in Invicti. To do so, follow the instructions in the next section of this document.
Step 2: Configure the Amazon API Gateway import in Invicti
After adding the necessary permissions to your IAM role, you are now ready to complete the API integration setup in Invicti Platform. Follow the steps below to configure your Amazon API Gateway import in Invicti to establish a read-only connection.
- The last step in Invicti that was performed prior to navigating to AWS was selecting AWS as the Source type. Continue from there.
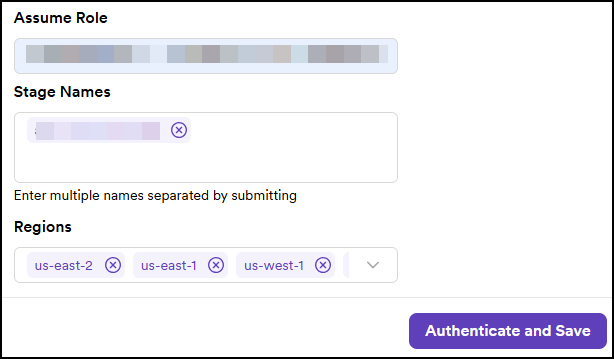
- Scroll down to the Assume role field and paste the string that you copied from the ARN field in the AWS IAM Console (
arn:aws:iam::<ACCOUNT_ID>:role/<ROLE>). - In the Stage names field, enter all the stage names for your APIs. Press Enter after each to add them. Stage Names are configured in Amazon API Gateway when you deploy an API.
If you do not provide every stage name where your APIs are deployed, Invicti cannot fetch your Swagger2 and Open API3 spec files from Amazon API Gateway. Similarly, if no stage name is provided, your APIs are not fully deployed, and therefore, Invicti cannot see them.
- In the Regions field, use the drop-down to select all the regions where your AWS sources are located.
- Click Authenticate and Save.
Your Amazon API Gateway integration is now displayed on the Discovery > Configuration > Sources page.
Step 3: Synchronize the API import
- On the Discovery > Configuration > Sources page in Invicti, click the sync icon to start importing your API specification files from Amazon API Gateway into your Invicti API Inventory.

- When the sync is complete, your API specification files are displayed on the Inventory > API catalog page in Invicti. From this page, you can link your API specification files to targets so they can be scanned for vulnerabilities. For more information, refer to Link discovered APIs to targets.
Amazon API Gateway is now integrated with Invicti Platform. After the initial synchronization, the integration automatically syncs your API specifications every 24 hours.
To synchronize API specifications on demand, click the sync icon on the Discovery > Configuration > Sources page. To turn off automatic synchronization, click the toggle in the Auto Sync column.
Need help?
Invicti Support team is ready to provide you with technical help. Go to Help Center