Deployment: Invicti Platform on-demand, Invicti Platform on-premises
Dynamic token configuration
Some APIs protect their endpoints using Bearer token authentication. To access a protected endpoint, the scanner first sends a login request to a dedicated endpoint. The API returns a token value, which the scanner then includes in an Authorization: Bearer <token> header on every subsequent request. If the token expires during the scan, Invicti fetches a new one automatically.
Dynamic token configuration automates this entire flow. This document explains how to configure it in target settings in Invicti Platform.
Configure dynamic token authentication
To set up dynamic token configuration, open the target settings for the target you want to configure:
- Select Inventory > Targets from the left-side menu.
- Locate the target, click the three-dot menu (⋮), then select Edit target.
- Select Authentication from the menu.
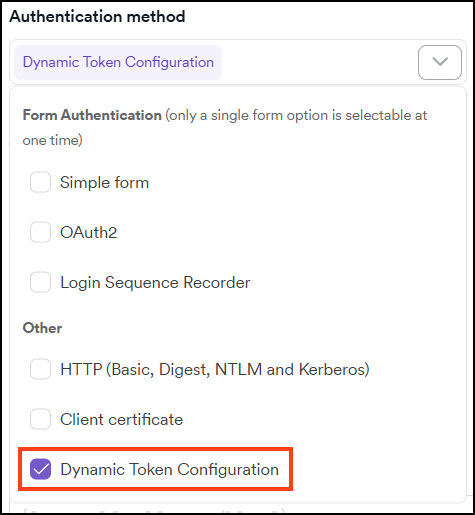
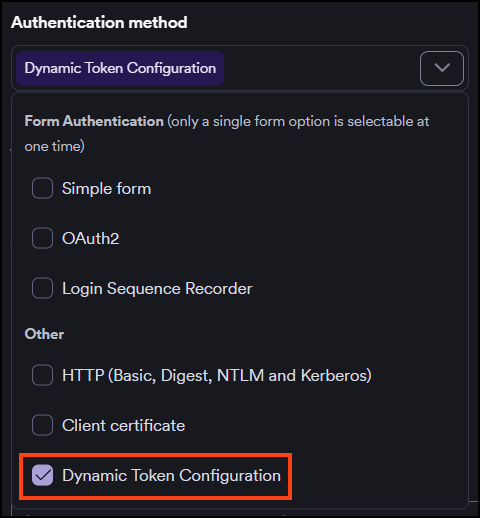
Step 1: Select dynamic token configuration
In the Authentication method dropdown, select Dynamic token configuration under Other.
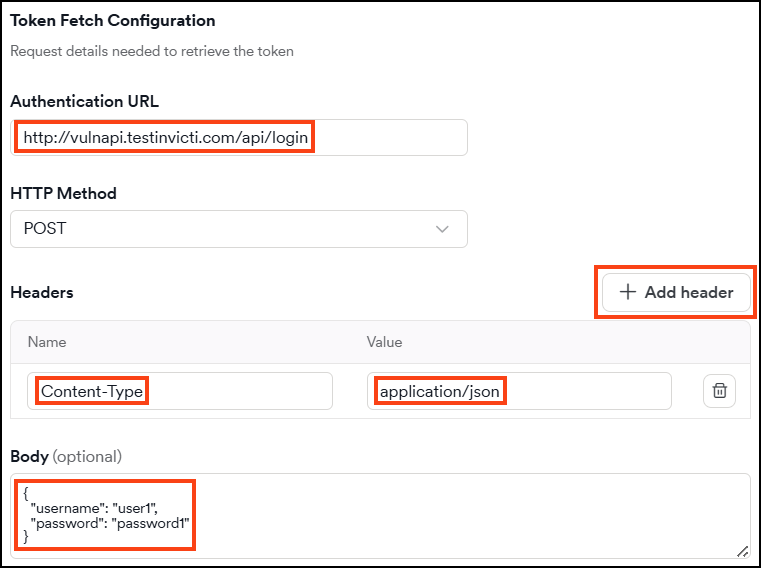
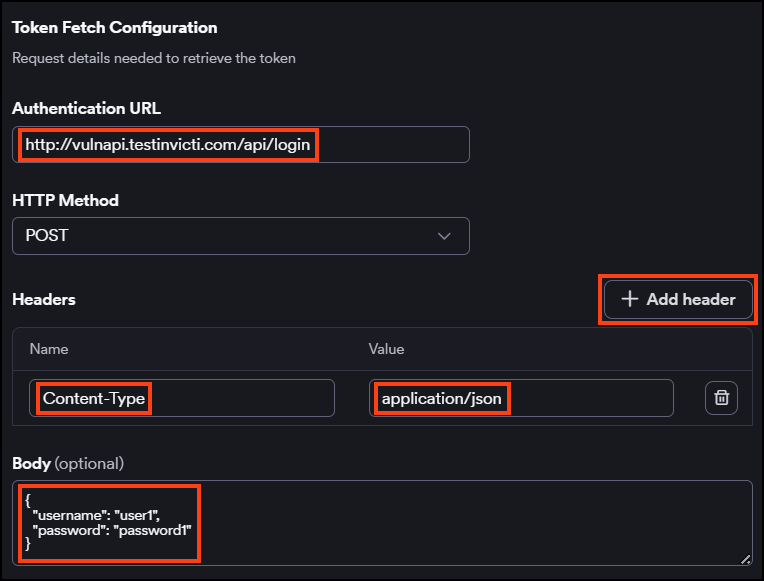
Step 2: Configure the token fetch request
Configure the request that Invicti sends to obtain a token. These settings should match the request you would send manually to your token endpoint.
- In Authentication URL, enter the URL of the endpoint that issues tokens.
- In HTTP method, select the method required by the endpoint. The default is POST.
- To add request headers, click + Add header and enter a Name and Value for each header.
- If the endpoint requires a request body, enter it in the Body field.
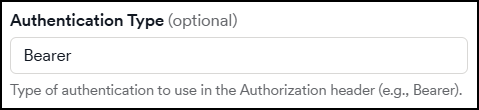
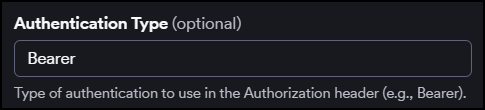
Step 3: Configure the authentication type
The Authentication type field is pre-filled with Bearer, which produces a header in the format Authorization: Bearer <token_value>. Change this value only if your API requires a different authentication type.
This field is optional.
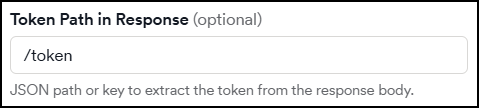
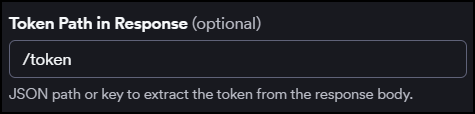
Step 4: Identify the token in the response
In Token path in response, enter the JSON path or key that points to the token value in the response body. For example, if the token endpoint returns {"token": "one"}, enter /token.
This field is optional.
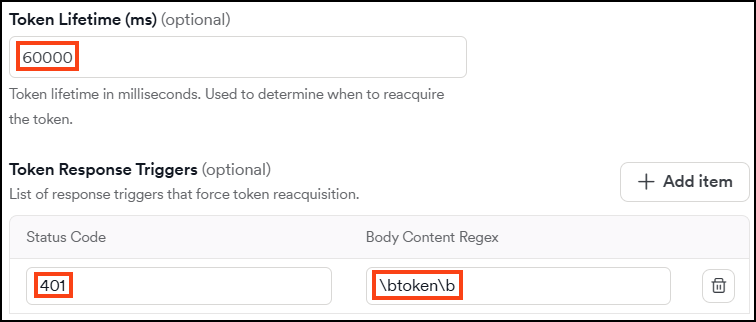
Step 5: Set up token expiry detection
Token expiry detection tells Invicti when to fetch a new token during a scan. You can configure one or both mechanisms independently.
Token lifetime
In Token lifetime (ms), enter the token's validity period in milliseconds. When this period elapses, Invicti automatically fetches a new token before continuing the scan.
This field is optional.
Token response triggers
Token response triggers define response-based conditions that indicate an expired token. When a response matches a trigger, Invicti fetches a new token and retries the request automatically.
To add a trigger, click + Add item and configure:
- Status code - the HTTP status code that signals an expired token (for example,
401). - Body content regex - a regex pattern to match against the response body (for example,
token). Invicti applies word boundaries to the pattern automatically.
Both conditions in a trigger must match for the trigger to fire. You can define multiple triggers.
Click Save target configuration to finish the setup and scan at another time or Save and scan to finish the setup and scan immediately.
For a code-based alternative that gives you full control over the token flow, refer to the Authentication scripts document.
Troubleshooting
If dynamic token configuration isn't working as expected, use the sections below to identify and resolve the issue.
Token fetch fails
If Invicti can't obtain a token before the scan starts, check the following:
- Authentication URL - Verify the URL is correct, reachable from the scanner, and contains no spaces. If you're using an internal endpoint, make sure the internal agent can reach it.
- HTTP method - Confirm the endpoint expects the method you selected (POST is the default, but some endpoints require GET).
- Headers - If the endpoint requires a
Content-Typeheader (for example,application/json), make sure it's added under Headers. - Body - If the endpoint requires a request body, verify the format matches what the endpoint expects (for example, a JSON payload or form-encoded data).
Scan returns 401 errors throughout
If the scan consistently receives 401 responses, the token isn't being applied correctly. Check:
- Token path in response - Confirm the path matches the structure of the response body. For example, if the response is
{"auth": {"token": "abc"}}, the correct path is/auth/token, not/token. - Authentication type - The default value
BearerproducesAuthorization: Bearer <token>. If your API expects a different format (for example,Token), update the Authentication type field accordingly.
Token expires mid-scan and isn't refreshed
If the scan fails after some requests due to expired tokens, the expiry detection settings may not be triggering. Check:
- Token lifetime - If you've set a token lifetime, confirm the value is in milliseconds. For example, a 5-minute token requires
300000, not300. - Token response triggers - Make sure the Status code matches what the API actually returns for an expired token (typically
401, but some APIs return403). If you've added a Body content regex, confirm the pattern matches the exact response body text. - Both conditions in a trigger must match simultaneously. If only one applies, split them into separate triggers.
Token trigger fires incorrectly on valid responses
If Invicti keeps re-fetching tokens during normal scan activity, your trigger conditions may be too broad. Narrow the Body content regex pattern to match only expired-token responses, or remove the body condition and rely solely on the status code.
Need help?
Invicti Support team is ready to provide you with technical help. Go to Help Center