Deployment: Invicti Platform on-demand
Install an autoscaling agent using K8s
Invicti Platform allows you to use autoscaling agents to scan targets within your internal environment that aren't publicly accessible from the internet. This is also useful when you prefer not to trustlist Invicti cloud agents.
The autoscaling agent automatically scales scanner instances on your Kubernetes cluster, enabling multiple scans to run concurrently. The total number of concurrent scans depends on available cluster resources. Scaling is managed using KEDA (Kubernetes Event-driven Autoscaling), which dynamically adjusts scanner capacity based on scan queue demand.
This document explains how to install the Invicti autoscaling agent in your Kubernetes cluster. For other installation methods, refer to:
- Install an internal agent using Docker
- Install an internal agent with proxy settings - Use this if your internal agents require a proxy to connect to platform-ca.invicti.com, platform-eu.invicti.com, or platform.invicti.com, as these parameters must be specified when installing the internal agent.
- Install an internal agent on Windows
For information about using Login Sequence Recordings with the autoscaling agent, refer to How LSR works with autoscaling.
When the site is internal, and you prefer using internal agents for the scan, you can't create a new Login Sequence Record (LSR) or Business Logic Record directly on the scanner pod. However, you can import them. For further information about recording and downloading an LSR, refer to the Standalone login sequence recorder overview.
How autoscaling works
The autoscaling agent uses a queue-based architecture to dynamically scale scanner pods based on demand. Understanding this flow helps you plan resource allocation and troubleshoot issues.
flowchart LR
    A[Invicti Platform] -->|poll| B[Agent Pod]
    B -->|enqueue job| C[Internal Queue<br/>ElasticMQ]
    C -->|monitor depth| D[KEDA]
    D -->|spawn| E[Scanner Pod 1]
    D -->|spawn| F[Scanner Pod 2]
    D -->|spawn| G[Scanner Pod N]
    E -->|results| A
    F -->|results| A
    G -->|results| A
The flow works as follows:
- Agent pod (single replica) registers with the Invicti Platform and polls for scan jobs.
- When jobs arrive, the agent writes them to an internal message queue (ElasticMQ, deployed as part of the Helm chart).
- KEDA monitors the queue depth and creates scanner pods to match the demand.
- Each scanner pod picks up one job, executes the scan, reports results back to the platform, and terminates.
- When the queue is empty, KEDA scales down to zero scanner pods - no idle resource consumption.
Key components deployed by the Helm chart:
| Component | Type | Purpose |
|---|---|---|
| Agent | Deployment (1 replica) | Polls platform, enqueues jobs |
| ElasticMQ | Sub-chart | SQS-compatible internal message queue |
| KEDA | Sub-chart | Monitors queue, scales scanner pods |
| Scanner | ScaledJob (0 to N) | Executes scans, scales automatically |
Prerequisites
Kubernetes environment
- A running Kubernetes cluster (version 1.23 or later - required by the bundled KEDA sub-chart)
- Helm 3.8+ installed and configured
- kubectl installed and configured to access your cluster
- Cluster admin privileges to install the agent and KEDA components
Helm v4 isn't fully supported. If you're using Helm v4, only version 4.1.1 is supported. Don't use any later Helm v4 releases (such as v4.1.2 or v4.1.3).
Helm v4.1.2+ enforces strict schema validation that rejects the KEDA sub-chart's per-component resource structure (resources.operator, resources.webhooks, resources.metricServer) with an error like field not declared in schema. Use Helm 3.8+ or Helm 4.1.1 to avoid this.
Cluster resource requirements
Each scanner pod requires the following resources:
| Resource | Per scanner pod | Default configuration |
|---|---|---|
| CPU | 2 cores | requests: 2000m, limits: 2000m |
| Memory | 6 GB | requests: 6Gi, limits: 6Gi |
The agent pod itself is lightweight and requires minimal resources (250m CPU, 256Mi memory).
Since resource requests equal limits (Guaranteed QoS), each scanner pod receives exactly the resources specified - no bursting, no overcommit. Use the following table to plan node capacity:
| Concurrent scans | CPU required | Memory required |
|---|---|---|
| 5 | 10 cores | 30 GB |
| 10 | 20 cores | 60 GB |
| 15 | 30 cores | 90 GB |
| 20 | 40 cores | 120 GB |
| 30 | 60 cores | 180 GB |
These numbers are for scanner pods only. Add capacity for the agent pod, ElasticMQ, KEDA, and any other workloads running on the same cluster.
Infrastructure requirements
- Load Balancer: Not required. The agent communicates outbound only - it requires no inbound connections.
- Storage Class / Persistent Volumes: Not required. All storage uses ephemeral
emptyDirvolumes. Scan results are uploaded via S3 presigned URLs. - Network: Outbound HTTPS access from the cluster to the Invicti Platform and container registries.
Access requirements
- Invicti Platform Administrator role
- Access to create namespaces and deploy Helm charts in your Kubernetes cluster
Trustlisting requirements
Your Kubernetes cluster must have outbound network access to the Invicti Platform and to the container registries used by the Helm chart.
Invicti Platform domains - trustlist these depending on your region:
- Trustlist requirements for the CA region
- Trustlist requirements for the EU region
- Trustlist requirements for the US region
- Consequences of scanning without trustlisting
Container registries - the chart pulls images from the following registries. Trustlist them all, or configure a private mirror if your environment restricts external registry access:
| Registry | Used by | Authentication |
|---|---|---|
registry.invicti.com | Scanner image | Required - license key (auto-configured by the Helm chart) |
docker.io (Docker Hub) | Agent, ElasticMQ queue, pre-install hook (bitnami/kubectl) | None (public) |
ghcr.io (GitHub Container Registry) | KEDA operator, metrics apiserver, admission webhooks | None (public) |
If your cluster can only pull from a private mirror registry, mirror the required images and override their references in values-override.yaml. Contact Invicti Support for guidance on mirroring the scanner image from registry.invicti.com.
Example override:
# Agent (from Docker Hub)
agent:
  image: your-registry.example.com/invicti/internal-agent

# Scanner (from registry.invicti.com)
scanner:
  image: your-registry.example.com/dast/onprem-scanner:prod-us-scalable-agent

# ElasticMQ (from Docker Hub)
elasticmq:
  image:
    repository: your-registry.example.com/softwaremill/elasticmq-native
    tag: "1.7.1"

# KEDA components (from ghcr.io) - override via KEDA sub-chart values
keda:
  image:
    keda:
      registry: your-registry.example.com
    metricsApiServer:
      registry: your-registry.example.com
    webhooks:
      registry: your-registry.example.com
Steps to install an autoscaling agent on your Kubernetes cluster
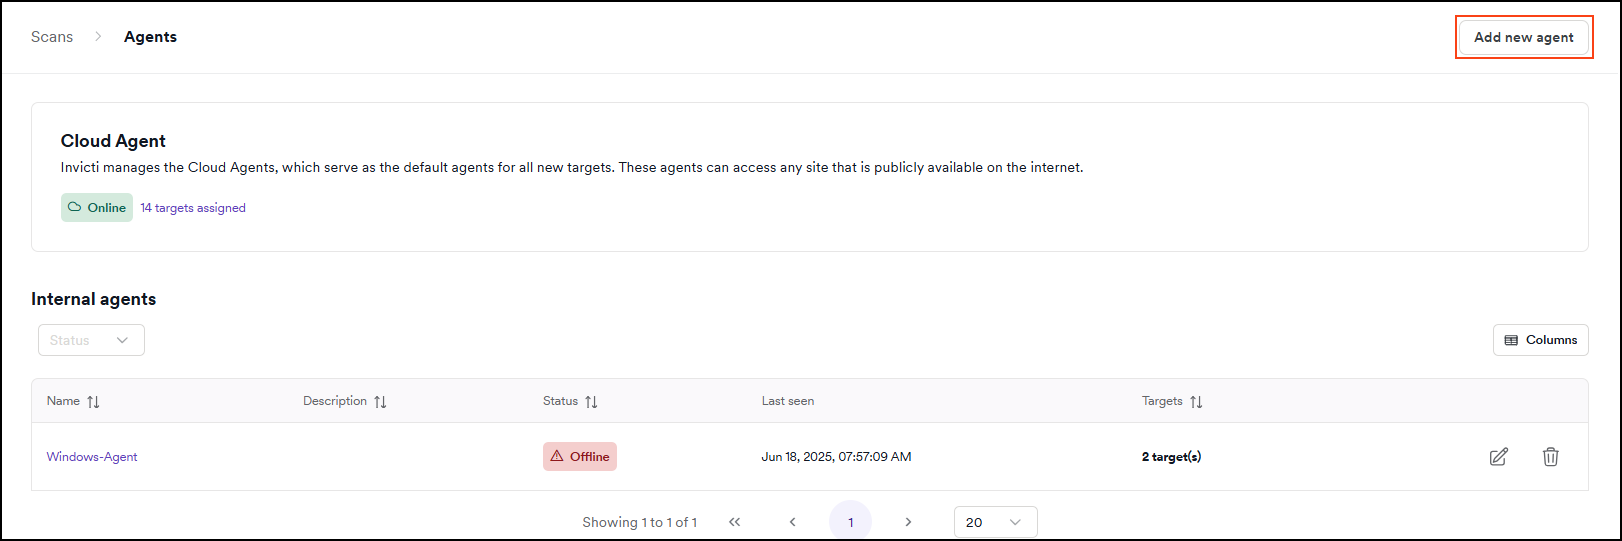
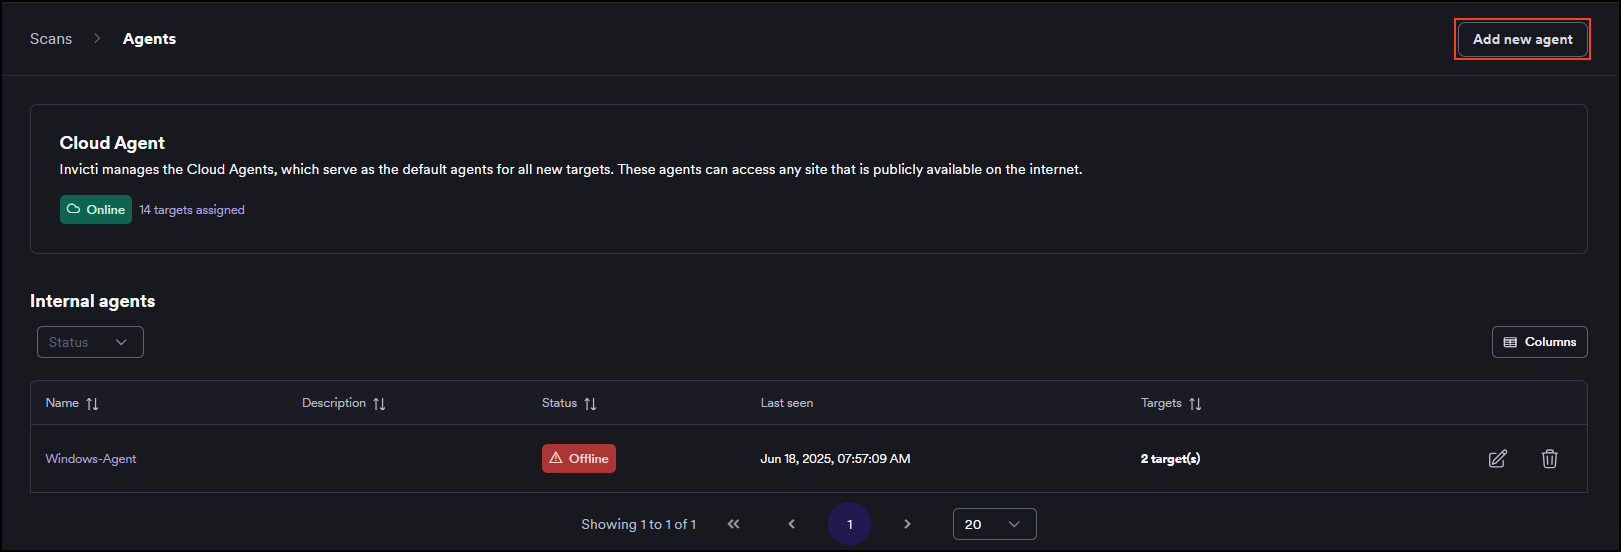
- Select Scans > Agents from the left-side menu.
- Click Add new agent.
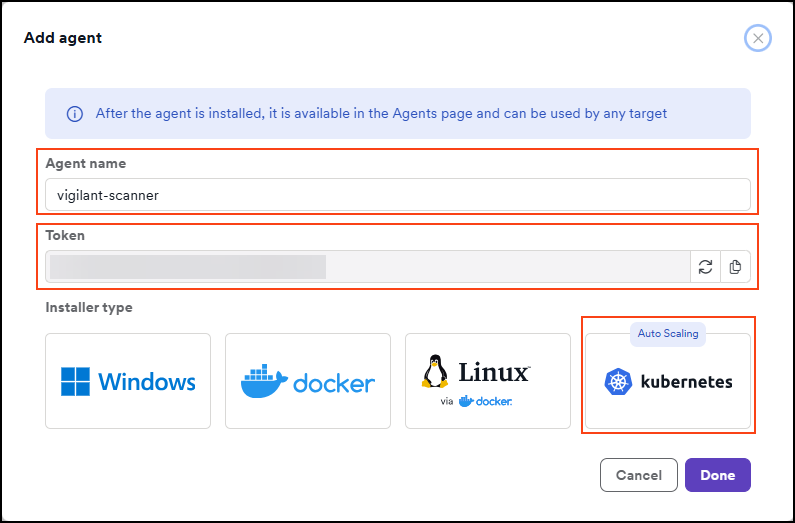
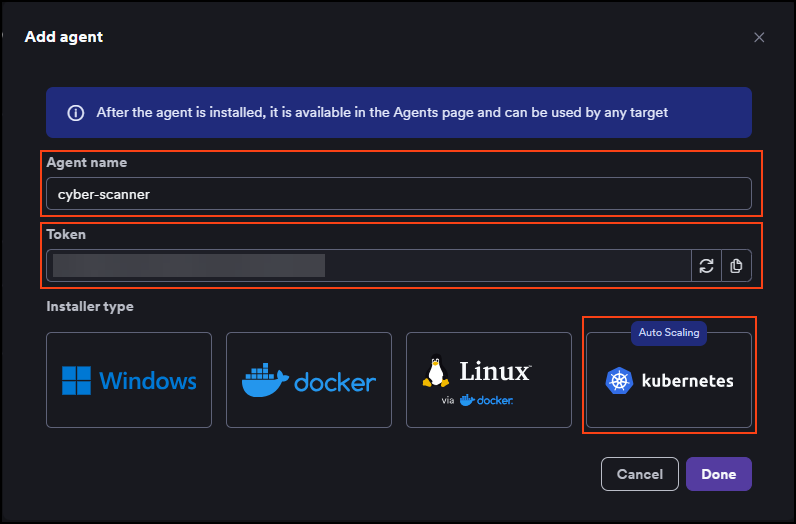
- Enter a name for the agent and click the Kubernetes tile. The token that's displayed here is then used in the installation command. The agent name must not contain any whitespace characters or special characters.
-
Follow the on-screen instructions to run two commands - one to log in to the Invicti registry and one to install or update the scalable internal agent in your Kubernetes cluster.
-
Click Done when complete.
-
Your agent is now installed. You can view it in Invicti by going to the Scans > Agents page.
You can now assign targets to the installed agent and start scanning your targets.
Configure scaling parameters
After installation, you can customize the scaling behavior by overriding Helm chart values. Create a values-override.yaml file and apply it during install or upgrade.
Scaling thresholds
The autoscaling agent uses horizontal scaling - KEDA adjusts the number of scanner pods based on queue depth. Each message in the queue corresponds to one scan job.
scanner:
  # How often KEDA checks the queue for new jobs (seconds)
  pollingInterval: 10

  # Minimum scanner pods (0 = scale to zero when idle)
  minReplicaCount: 0

  # Maximum concurrent scanner pods
  # This is the primary control to limit resource consumption
  maxReplicaCount: 15

  # Number of queue messages per scanner pod
  queueLengthPerJob: "1"
Apply the override using the same helm upgrade --install pattern shown in the in-platform instructions. Add -f values-override.yaml to merge your overrides with the required values:
helm upgrade scalable-internal-agent \
  oci://registry.invicti.com/invicti-platform-helm-charts/scalable-internal-agent \
  -n invicti --install --create-namespace \
  -f values-override.yaml \
  --set global.imageRegistryUsername="<your-email>" \
  --set global.imageRegistryPassword="<license-key>" \
  --set agent.name="<agent-name>" \
  --set agent.url="platform.invicti.com" \
  --set agent.token="<registration-token>"
The same command works for both initial installation and subsequent updates - --install creates the release if it doesn't exist, and updates it otherwise.
The chart doesn't configure dynamic vertical autoscaling (Vertical Pod Autoscaler) out of the box because the scan engine has a known, predictable resource profile that doesn't benefit from runtime adjustment. You can change the per-pod resource allocation statically in values-override.yaml, or add your own VPA if your environment requires it, but it isn't recommended.
Resource overrides
If your environment has different resource constraints, you can override the default scanner pod resources:
scanner:
  resources:
    requests:
      cpu: "2000m"
      memory: "6Gi"
    limits:
      cpu: "2000m"
      memory: "6Gi"
Setting requests equal to limits ensures Guaranteed QoS class. This prevents Kubernetes from overcommitting resources and provides predictable performance. Changing this is not recommended.
Full configuration reference
| Parameter | Default | Description |
|---|---|---|
agent.name | "" | Agent display name (required) |
agent.token | "" | Registration token from the platform (required) |
agent.url | "" | Invicti Platform URL (required) |
global.imageRegistryPassword | "" | Invicti license key for pulling container images (required) |
scanner.maxReplicaCount | 50 | Maximum number of concurrent scanner pods |
scanner.minReplicaCount | 0 | Minimum scanner pods (0 enables scale-to-zero) |
scanner.pollingInterval | 10 | How often KEDA checks the queue (seconds) |
scanner.queueLengthPerJob | "1" | Queue messages per scanner pod |
scanner.activationQueueLength | "0" | Queue depth to activate scaling (0 = activate on first message) |
scanner.backoffLimit | 1 | Retry count for failed scanner jobs |
scanner.resources.requests.cpu | "2000m" | CPU request per scanner pod |
scanner.resources.requests.memory | "6Gi" | Memory request per scanner pod |
scanner.resources.limits.cpu | "2000m" | CPU limit per scanner pod |
scanner.resources.limits.memory | "6Gi" | Memory limit per scanner pod |
scanner.nodeSelector | {} | Node selector for scanner pods |
scanner.tolerations | [] | Tolerations for scanner pods |
agent.nodeSelector | {} | Node selector for the agent pod |
agent.tolerations | [] | Tolerations for the agent pod |
agent.resources.requests.cpu | "250m" | CPU request for the agent pod |
agent.resources.requests.memory | "256Mi" | Memory request for the agent pod |
agent.resources.limits.cpu | "500m" | CPU limit for the agent pod |
agent.resources.limits.memory | "512Mi" | Memory limit for the agent pod |
agent.podSecurityContext | {runAsNonRoot: true, seccompProfile: RuntimeDefault} | Pod security context for the agent. OpenShift auto-fills runAsUser/fsGroup. |
agent.securityContext | {allowPrivilegeEscalation: false, readOnlyRootFilesystem: true, runAsNonRoot: true, drop ALL} | Container security context for the agent |
scanner.podSecurityContext | {runAsNonRoot: true, seccompProfile: RuntimeDefault} | Pod security context for scanner pods. OpenShift auto-fills runAsUser/fsGroup. |
scanner.securityContext | {allowPrivilegeEscalation: false, runAsNonRoot: true, drop ALL} | Container security context for scanner pods |
elasticmq.podSecurityContext | {runAsNonRoot: true, seccompProfile: RuntimeDefault} | Pod security context for ElasticMQ. OpenShift auto-fills runAsUser/fsGroup. |
elasticmq.securityContext | {allowPrivilegeEscalation: false, runAsNonRoot: true, drop ALL} | Container security context for ElasticMQ |
Isolate scanner workloads with dedicated nodes
If you run business applications on the same cluster, we recommend isolating scanner pods on dedicated worker nodes. This prevents scans from consuming resources needed by other workloads.
Step 1: Label and taint your dedicated nodes
Label the nodes so scanner pods can target them, and apply a taint so only scanner pods are scheduled there:
# Label the dedicated nodes
kubectl label nodes <node-name> workload-type=invicti-scanner

# Taint the nodes to prevent other workloads from scheduling
kubectl taint nodes <node-name> invicti-scanner=true:NoSchedule
Step 2: Configure the Helm chart
Add nodeSelector and tolerations to your values override:
agent:
  nodeSelector:
    workload-type: invicti-scanner
  tolerations:
    - key: "invicti-scanner"
      operator: "Exists"
      effect: "NoSchedule"

scanner:
  maxReplicaCount: 15
  nodeSelector:
    workload-type: invicti-scanner
  tolerations:
    - key: "invicti-scanner"
      operator: "Exists"
      effect: "NoSchedule"
With this configuration:
- Scanner and agent pods run only on nodes labeled
workload-type=invicti-scanner. - The taint prevents Kubernetes from scheduling other workloads on those nodes.
- Business applications are fully isolated from scan resource consumption.
For 15 concurrent scans, you need at least 30 CPU cores and 90 GB memory across your dedicated nodes. Example AWS instance types:
| Instance type | vCPU | Memory | Concurrent scans |
|---|---|---|---|
| m5.2xlarge | 8 | 32 GB | 3-4 |
| m5.4xlarge | 16 | 64 GB | 7-8 |
| m5.8xlarge | 32 | 128 GB | 15-16 |
Account for system overhead (~10-15%) when calculating capacity.
Deploy in a cluster with KEDA already installed
By default, this chart installs KEDA as a dependency. If your cluster already has KEDA running (managed by another Helm release or by your platform team), the installation will fail with a conflict on cluster-scoped KEDA resources such as ClusterRole/keda-operator.
To skip the bundled KEDA installation, set global.keda.install=false:
helm upgrade scalable-internal-agent oci://registry.invicti.com/invicti-platform-helm-charts/scalable-internal-agent \
  -n invicti --install --create-namespace \
  --set global.imageRegistryUsername=USERNAME \
  --set global.imageRegistryPassword=LICENSEKEY \
  --set agent.name=AGENTNAME \
  --set agent.url=PLATFORMURL \
  --set agent.token=AGENTTOKEN \
  --set scanner.image="registry.invicti.com/dast/onprem-scanner:prod-us-scalable-agent" \
  --set global.keda.install=false
When global.keda.install is set to false, KEDA must already be installed and running in your cluster. The Scalable Internal Agent requires KEDA to manage the ScaledJob that drives scanner auto-scaling.
Deploy on OpenShift / AWS ROSA
The autoscaling agent is compatible with OpenShift and AWS ROSA (Red Hat OpenShift Service on AWS) and works out of the box with the default restricted-v2 Security Context Constraint (SCC). No custom SCC or elevated privileges are required.
restricted-v2 is the default SCC starting with OpenShift 4.12. If you're running an older OpenShift version that uses the legacy restricted SCC (v1), the chart still works but the assigned UID/fsGroup ranges and seccomp defaults may differ.
Security context
The Helm chart ships with a minimal security context that OpenShift can complete automatically:
agent:
  podSecurityContext:
    runAsNonRoot: true
    seccompProfile:
      type: RuntimeDefault
  securityContext:
    allowPrivilegeEscalation: false
    readOnlyRootFilesystem: true
    runAsNonRoot: true
    capabilities:
      drop:
        - ALL
How this works on OpenShift: The restricted-v2 SCC automatically assigns runAsUser, fsGroup, and seLinuxOptions from the UID range that OpenShift allocates to your project. Each project gets a different range - the one shown here is an example only:
openshift.io/sa.scc.uid-range: 1001060000/10000
Your namespace might see something like 1000680000/10000 or any other range. The chart intentionally does not set runAsUser or fsGroup, so OpenShift fills them in from whatever range applies to your project. Hardcoded values like fsGroup: 0 or runAsUser: 1001 would be rejected by the SCC.
On plain Kubernetes clusters without SCC auto-assignment, the agent container runs as UID 1001 with the Root Group Pattern (GID 0). For the emptyDir volume mounts to be writable, set fsGroup: 0 in your values override:
agent:
  podSecurityContext:
    runAsNonRoot: true
    runAsUser: 1001
    fsGroup: 0
    seccompProfile:
      type: RuntimeDefault

elasticmq:
  podSecurityContext:
    runAsNonRoot: true
    runAsUser: 1001
    fsGroup: 0
OpenShift users should not set these values - OpenShift manages them via SCC.
Writable directories
The agent and scanner pods require write access to the following directories. These are mounted as emptyDir volumes automatically by the Helm chart - no persistent volumes or storage classes are required:
| Pod | Mount path | Purpose |
|---|---|---|
| Agent | /home/invicti | Configuration files, engine binaries, logs |
| Agent | /tmp | Temporary files (engine extraction, agent runtime) |
| Scanner | /tmp | Engine working directory during scan execution |
How LSR works with autoscaling
When using autoscaling agents, you can't record a new Login Sequence Recording (LSR) or Business Logic Recording directly on the scanner pod. However, you can import previously recorded LSR files, and they work fully with autoscaling.
How imported LSR files are delivered to scanner pods
LSR files are delivered securely through the scan job payload - no shared storage or volume mounts are needed:
- You record an LSR using the Standalone login sequence recorder and import it to the target configuration on the Invicti Platform.
- The platform stores the LSR file securely in cloud storage (S3).
- When a scan starts, the platform includes a time-limited presigned URL for the LSR file in the scan job description.
- The agent forwards the job (including the LSR URL) to the internal queue.
- The scanner pod downloads the LSR file from the presigned URL, uses it for authenticated scanning, and deletes the file when it terminates.
LSR files don't require a shared volume, NFS mount, or any persistent storage on the cluster. Each scanner pod downloads its own copy of the LSR file at scan time via a secure, time-limited URL.
Known limitations
The autoscaling agent has the following known limitations.
Cluster restart behavior
If your Kubernetes cluster is fully shut down and restarted (common in non-production or cost-optimized environments), the platform registers the restarted cluster as a new scalable agent. The previous agent remains in the UI as offline, and any targets assigned to it won't scan until you re-assign them to the new online agent at Scans > Agents.
Recommendations: Re-assign targets after each restart, or keep at least one node running to avoid repeated agent entries. Invicti is working on stable agent identities across restarts and automatic cleanup of superseded entries.
Frequently asked questions
How many concurrent scans can I run?
The number of concurrent scans is controlled by two factors:
scanner.maxReplicaCountin the Helm chart values (default: 50)- Available cluster resources - each scanner pod needs 2 CPU cores and 6 GB memory
For example, if you have 32 CPU cores and 128 GB memory available on dedicated nodes, you can run approximately 15 concurrent scans (limited by CPU: 32 / 2 = 16, with overhead).
Will scanning impact my other workloads?
Scanner pods use Guaranteed QoS (requests equal limits), so they don't burst beyond their allocated resources. However, if scanner pods and business workloads compete for the same node resources, scheduling conflicts can occur.
Recommendation: Use dedicated nodes with nodeSelector and tolerations to fully isolate scanner workloads. See Isolate scanner workloads with dedicated nodes.
What happens when there are no scans to run?
With minReplicaCount: 0 (the default), KEDA scales scanner pods down to zero when the queue is empty. Only the lightweight agent pod (~250m CPU, 256Mi memory) and infrastructure components (ElasticMQ, KEDA) remain running.
Why is my pod rejected with "fsGroup: Invalid value: 0 is not an allowed group"?
This error means you set fsGroup: 0 in your values override, but your OpenShift project restricts fsGroup to a specific UID range. The chart's default values leave fsGroup unset so OpenShift can assign it automatically.
Fix: Remove any fsGroup: 0 or runAsUser: <value> entries from your values override on OpenShift. Let the SCC assign them.
If you're on vanilla Kubernetes (not OpenShift), see the Vanilla Kubernetes note in Security context.
Why are my scans slow (7-12+ hours)?
Scan duration depends on the target application (number of pages, forms, JavaScript complexity), not the agent or cluster performance. The autoscaling agent and cloud agents use the same scan engine - there's no performance difference in the scanning logic itself.
If scans are slow, consider:
- Scan profile optimization: Use targeted scan profiles instead of full scans for large applications.
- Concurrent scanning: Instead of scanning all pages in one long scan, split targets and run multiple scans in parallel - this is exactly what autoscaling enables.
- Network latency: Ensure scanner pods have low-latency network access to the target applications. If pods and targets are in the same cluster or VPC, latency is minimal.
What happens if a scanner pod fails during a scan?
The Helm chart configures backoffLimit: 1 by default, which means Kubernetes retries a failed scanner job once. If the retry also fails, the job is marked as failed and the scan status is updated on the platform.
The failed pod doesn't block other scans - KEDA continues to scale independently for each queue message.
What happens if the agent pod crashes?
The agent pod is a Kubernetes Deployment with 1 replica, so Kubernetes automatically restarts it. During the brief downtime:
- Running scans continue - scanner pods execute independently and report results directly to the platform.
- New scans queue up on the platform and the agent pod picks them up once it recovers and resumes polling.
No scan data is lost. The agent is a coordinator, not a data path.
How do I migrate from a single Docker/Windows agent to autoscaling?
The autoscaling agent is a separate installation - it doesn't replace or upgrade your existing agent. To migrate:
- Install the autoscaling agent on your Kubernetes cluster using the steps in this guide.
- In the Invicti Platform, go to Scans > Agents and confirm the new autoscaling agent appears as online.
- Re-assign your targets from the old agent to the new autoscaling agent.
- Run a test scan to verify the new agent works correctly.
- Once confirmed, decommission the old agent (stop the Docker container or Windows service, then delete the agent entry in the platform).
Both agents can run simultaneously during the migration period.
Need help?
Invicti Support team is ready to provide you with technical help. Go to Help Center