Deployment: Invicti Platform on-demand, Invicti Platform on-premises
Package: Invicti API Security Standalone or Bundle
NTA with Istio Mesh Service
This document explains how to install and configure the Invicti Network Traffic Analyzer (NTA) with Istio Service Mesh in your Kubernetes cluster to capture both HTTP and HTTPS traffic and reconstruct OpenAPI3 specification files.
Prerequisites
- A Kubernetes cluster
- Helm command-line tool installed (version 3+)
- kubectl configured for your cluster (for example, using Get-AksHciCredential)
- A Kubernetes namespace created for Invicti NTA
- Istio Service Mesh 1.16 or later installed and running in your cluster. The chart validates this at install time and fails immediately if the required Istio API is not present.
- Kubernetes 1.23 or later. Istio 1.16 requires Kubernetes 1.23 as its minimum. Versions below 1.23 are not supported.
Istio 1.16 uses the stable Kubernetes API versions (policy/v1 for PodDisruptionBudget, autoscaling/v2 for HorizontalPodAutoscaler). This is why Istio 1.16 is the required baseline: older Istio versions (for example, 1.12) still reference API versions that were removed in Kubernetes 1.25 and 1.26, causing helm install to fail outright on any modern cluster.
- OCI registry egress: All pods in the namespaces you instrument must be able to reach the Invicti image registry (
registry.invicti.com, or your configured mirror) so that the Istio sidecar can fetch the WASM module at startup. If your cluster enforces default-deny egress NetworkPolicies, add an explicit allow rule for that registry before installing.
Minimum system requirements
- 1 GB RAM
- 2-core 64-bit CPU
- 2 GB available HDD
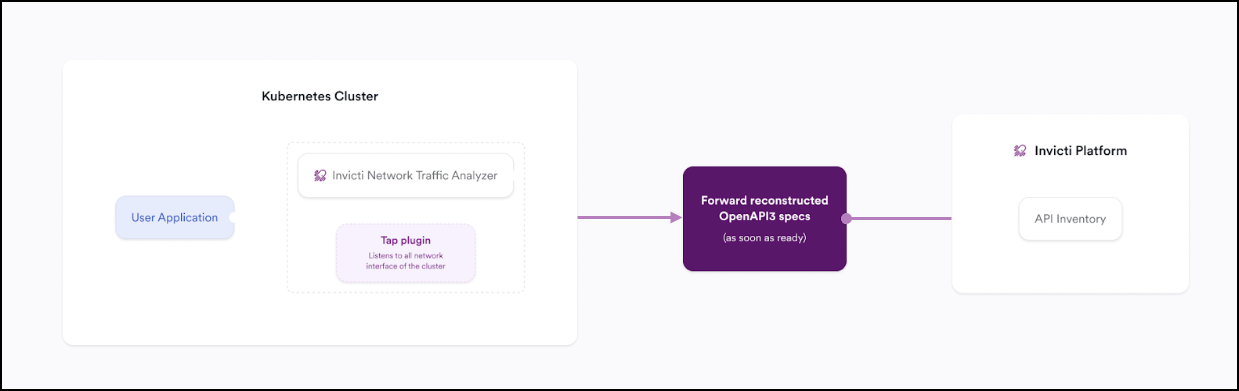
Overview
There are two ways to capture Kubernetes traffic with the Invicti NTA:
- Integrating with Istio Service Mesh (captures both HTTP & HTTPS traffic): This method is described in this document and leverages the Istio Envoy proxy with WASM filters to inspect encrypted (HTTPS) and unencrypted (HTTP) traffic. This document focuses on configuring Invicti NTA for this integration.
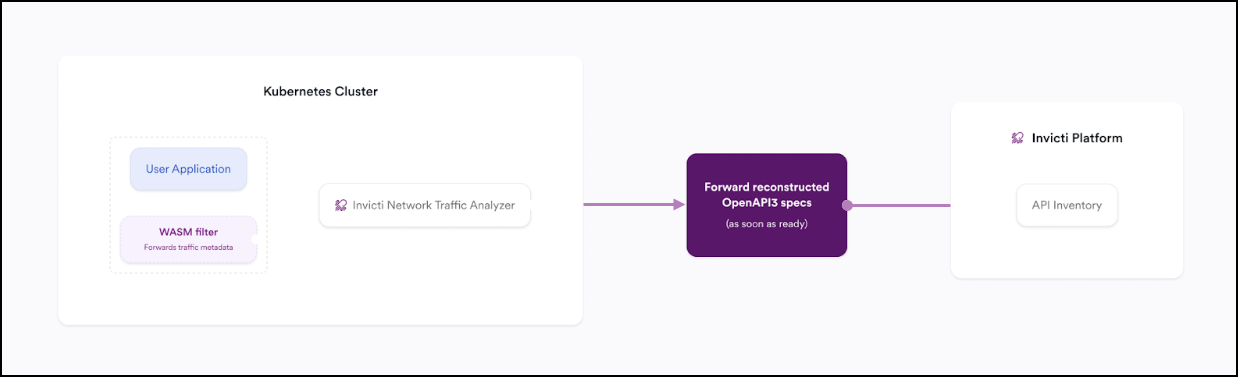
- Integrating with a Kubernetes namespace interface natively (captures HTTP traffic only): This method uses the Tap Plugin to monitor unencrypted traffic within a Kubernetes namespace. It does not support HTTPS traffic unless combined with Istio. Details for this setup are covered in the NTA with Tap Plugin documentation.
Installation steps
The Invicti NTA Helm chart includes:
- Reconstructor - Processes captured traffic and generates OpenAPI3 specification files.
- WasmPlugin (Istio WASM filter) - A declarative Istio
WasmPluginresource deployed per instrumented namespace. It configures each Envoy sidecar in that namespace to intercept and forward HTTP and HTTPS traffic to the Reconstructor. No separate pod, binary, or manual workload patching is required.
Step 1: Retrieve the registration token
- Select Discovery from the left-side menu.
- Under API configuration, select API sources.
- Click Add source.
- Leave the Import type as External platform.
- Enter a name for the source configuration. This helps you identify it later in your list of API sources.
- Select Invicti Network Traffic Analyzer as the Source type.
- Click Generate token.
- Click the copy icon next to the newly generated registration token.
- Click Save at the bottom of the page. Do not skip this step.
Step 2: Authenticate with the Invicti Registry
- Launch the Helm command-line tool that was set up during the prerequisites.
- Then run the following command:
helm registry login registry.invicti.com
Username: your Invicti Platform email
Password: your valid Invicti Platform license key
Step 3: Label target namespace
Before deploying, label each application namespace you intend to instrument to enable Istio sidecar injection. Run this command once per namespace:
kubectl label namespace <application-namespace> istio-injection=enabled
<application-namespace> is the namespace where your application workloads run — not the namespace where Invicti NTA itself is installed. If you plan to instrument multiple namespaces, repeat this command for each one.
Applying istio-injection=enabled to a namespace causes Istio to inject an Envoy sidecar into every pod in that namespace, not only your application pods. Depending on your cluster's PeerAuthentication policy, this enforces mutual TLS (mTLS) for all inbound connections to those pods.
Any service running in the labeled namespace — including shared infrastructure such as message brokers, databases, or caches — may become unreachable to clients in namespaces that do not have Istio injection enabled. DNS resolution and TCP connection still succeed, but the protocol handshake fails silently because the Istio sidecar expects mTLS while the client sends plaintext. Affected clients typically report connection timeouts or unexpected connection closures rather than a clear TLS error.
Label only the namespaces that contain the application workloads you want to instrument. Consult your cluster administrator before labeling namespaces that contain shared infrastructure services.
Step 4: Prepare and deploy the Invicti Helm chart
You can omit the --version parameter entirely to automatically pull the latest chart version. To install a specific version, use --version X.X.X (for example, --version 26.7.0). Note that Helm does not support --version latest syntax.
Choose the installation variant that matches your environment.
On-premises clusters
Run the following command to install Invicti NTA on an on-premises Kubernetes cluster:
helm install invicti-api-discovery \
  oci://registry.invicti.com/invicti-api-discovery \
  --version 26.7.0 \
  -n default \
  --set imageRegistryUsername=email-address \
  --set imageRegistryPassword=password \
  --set reconstructor.JWT_TOKEN="registration-token" \
  --set reconstructor.persistentVolume.nodeName=node-name \
  --set trafficSource.envoyWasm.enabled=true \
  --set trafficSource.envoyWasm.namespaces[0]="your-namespace"
default: The Kubernetes namespace where Invicti NTA is installed.email-address: Your Invicti Platform email address.password: Your valid Invicti Platform license key.registration-token: The registration token from Step 1.8. Keep it enclosed in double quotes.node-name: The exact hostname of the node that will hold the reconstructor data volume. Runkubectl get nodes -o wideto find the name. The installation fails immediately if this value is omitted.your-namespace: The application namespace to instrument. Requiresistio-injection=enabled(see Step 3).
Cloud clusters (EKS, GKE, AKS)
Cloud environments use dynamic storage provisioning instead of a node-local volume. Run the following command:
helm install invicti-api-discovery \
  oci://registry.invicti.com/invicti-api-discovery \
  --version 26.7.0 \
  -n default \
  --set imageRegistryUsername=email-address \
  --set imageRegistryPassword=password \
  --set reconstructor.JWT_TOKEN="registration-token" \
  --set reconstructor.persistentVolume.useStaticHostPathPV=false \
  --set reconstructor.persistentVolume.storageClassName=storage-class \
  --set trafficSource.envoyWasm.enabled=true \
  --set trafficSource.envoyWasm.namespaces[0]="your-namespace"
-
default,email-address,password,registration-token,your-namespace: Same as the on-premises variant above. -
storage-class: A StorageClass that usesvolumeBindingMode: WaitForFirstConsumer. This ensures the volume is provisioned in the same availability zone as the scheduled pod. Recommended values by provider:- EKS:
gp3(requires AWS EBS CSI driver 1.13+) - GKE:
standard-rwoorpremium-rwo - AKS:
managed-csi
Do not leave this empty — the cluster default StorageClass typically uses
Immediatebinding and may place the volume in the wrong availability zone. - EKS:
Specifying multiple namespaces
You can instrument more than one application namespace by adding additional namespaces entries. You can also pass a single namespace as a plain string — both formats are accepted:
# Single namespace — string format (still accepted)
--set trafficSource.envoyWasm.namespaces="your-namespace"

# Multiple namespaces — indexed list format
--set trafficSource.envoyWasm.namespaces[0]="namespace-one" \
--set trafficSource.envoyWasm.namespaces[1]="namespace-two"
Each listed namespace must have istio-injection=enabled applied as shown in Step 3.
Using an enterprise registry mirror
If your organization routes image pulls through an internal registry (Artifactory, Amazon ECR, Harbor, or similar), add the following flags to your install command to redirect all component images to your mirror:
--set global.imageRegistry=your.internal.registry.com \
--set imageRegistryUsername=username \
--set imageRegistryPassword=password
With secretRefresher.enabled=true (the default), the chart automatically creates the registry pull secret in the release namespace and in every wasm namespace listed in trafficSource.envoyWasm.namespaces. No manual secret creation is required.
secretRefresher.enabled=falseIf you manage registry credentials yourself (for example, through IRSA, Workload Identity, or a platform-managed secret), the chart does not create pull secrets for you. In addition to providing your own secret in the release namespace, you must also create it in every wasm namespace manually:
kubectl create secret docker-registry invicti-docker-config-secret \
  -n your-namespace \
  --docker-server=your.internal.registry.com \
  --docker-username=username \
  --docker-password=password
Repeat this command for every namespace listed in trafficSource.envoyWasm.namespaces.
If you need to use a different secret name, pass it via:
--set trafficSource.envoyWasm.wasmPlugin.imagePullSecretName=your-secret-name
The default is the value of imagePullSecrets (invicti-docker-config-secret).
Using a pre-existing pull secret
If your cluster already provisions registry credentials (for example, through IRSA, Workload Identity, or a platform-managed pull secret), you can disable the Invicti-managed secret and point the chart at your own. Add the following flags to your install command:
--set secretRefresher.enabled=false \
--set imagePullSecrets=your-existing-secret-name
When secretRefresher.enabled=false, the chart does not create pull secrets in any namespace. The WasmPlugin pull secret must exist in every namespace listed in trafficSource.envoyWasm.namespaces — not only the release namespace. Ensure your secret provisioning mechanism (IRSA, External Secrets Operator, Vault Agent, and so on) covers all instrumented namespaces before installing.
Step 5: Verify the installation (optional)
To ensure that the installation was successful and the components are running properly:
- Check that the reconstructor pod is running in the release namespace (the namespace where Invicti NTA is installed, for example
default):
kubectl get pods -n <release-namespace>
- Confirm that all pods are not in
CrashLoopBackOfforErrorstates. If any pods are not running properly, investigate their logs with:
kubectl logs <pod-name> -n <release-namespace>
Copy and paste the pod-name from the kubectl get pods -n <release-namespace> output.
- Confirm the WASM filter is deployed in each instrumented application namespace:
kubectl get wasmplugin -n <application-namespace>
You should see one WasmPlugin resource per instrumented namespace. If the resource is absent, confirm that istio-injection=enabled is set on the namespace and that Istio 1.16+ is installed.
If everything looks good, your Invicti NTA with Istio Service Mesh is now successfully capturing and analyzing traffic in your Kubernetes cluster.
Update or reinstall Invicti NTA with Istio
If you are upgrading from a chart version that predates this release, read this section before running the upgrade command.
What changes automatically: A pre-upgrade job runs before the new chart is applied. It removes resources from the legacy WASM integration (EnvoyFilter, ConfigMap, and sidecar volume annotations on workloads in every instrumented namespace). This cleanup is required for the new architecture to function correctly.
This migration cannot be reversed with helm rollback. The legacy resources are permanently deleted during the upgrade. Back up your cluster state before proceeding — for example, using a Velero snapshot or by saving the output of helm get manifest <release> from the old version.
Use --reset-then-reuse-values instead of --reuse-values when running the upgrade. The --reuse-values flag carries over the old release's resolved values, which causes the new chart to fail because keys added in this version (such as useStaticHostPathPV, wasmPlugin.*, and migration) are missing. The --reset-then-reuse-values flag merges your previous overrides with the new chart defaults correctly.
- Retrieve the latest registration token and password as outlined in the standard Invicti token generation procedure.
- Log in to the Invicti registry as in Step 2 preceding.
- Prepare and run the update command for your environment.
On-premises clusters:
helm upgrade --install invicti-api-discovery \
  oci://registry.invicti.com/invicti-api-discovery \
  --version 26.7.0 \
  --reset-then-reuse-values \
  -n default \
  --set trafficSource.envoyWasm.enabled=true \
  --set imageRegistryUsername=email-address \
  --set imageRegistryPassword=password \
  --set reconstructor.JWT_TOKEN="registration-token" \
  --set reconstructor.persistentVolume.nodeName=node-name \
  --set trafficSource.envoyWasm.namespaces[0]="your-namespace"
Cloud clusters (EKS, GKE, AKS):
helm upgrade --install invicti-api-discovery \
  oci://registry.invicti.com/invicti-api-discovery \
  --version 26.7.0 \
  --reset-then-reuse-values \
  -n default \
  --set trafficSource.envoyWasm.enabled=true \
  --set imageRegistryUsername=email-address \
  --set imageRegistryPassword=password \
  --set reconstructor.JWT_TOKEN="registration-token" \
  --set reconstructor.persistentVolume.useStaticHostPathPV=false \
  --set reconstructor.persistentVolume.storageClassName=storage-class \
  --set trafficSource.envoyWasm.namespaces[0]="your-namespace"
You can omit the --version parameter entirely to automatically pull the latest chart version. To install a specific version, use --version X.X.X (for example, --version 26.7.0). Note that Helm does not support --version latest syntax.
Frequently asked questions
Can the Reconstructor run more than one replica for high availability?
No. The Reconstructor holds all learned API specification state in memory and persists it to a single ReadWriteOnce PersistentVolume. Running more than one replica would cause split telemetry state, competing file writes, and conflicting spec uploads to APIHub. This is an architectural constraint, not a configuration limit.
The following mechanisms are provided instead to maximize single-replica availability:
- PodDisruptionBudget (enabled by default): blocks voluntary pod eviction during node drains and cluster upgrades until the pod is healthy and ready.
- Health probes: a startup probe guards the initial state reload from disk; a liveness probe restarts the pod if it becomes unresponsive; a readiness probe removes the pod from service endpoints if the APIHub connection is lost.
- Recreate rollout strategy: ensures the old pod is fully stopped before a new one starts, preventing two instances from writing to the same volume simultaneously.
reconstructor.stateSaveIntervalSeconds(default: 300 seconds): periodically flushes in-memory state to disk, bounding worst-case data loss on an ungraceful kill to the configured interval rather than the entire pod uptime.
What happens to application traffic if the WASM filter fails or the Reconstructor is unavailable?
Application traffic is never blocked. The WASM filter is deployed with failStrategy: FAIL_OPEN, which means if the filter encounters an error or cannot reach the Reconstructor, it silently passes traffic through without modification. Your application continues to serve requests normally.
Traffic capture stops during the outage, and any telemetry generated in that window is lost. The Reconstructor will resume learning from new traffic once it recovers. No manual intervention is required to restore normal traffic flow.
What happens when the Reconstructor pod restarts or is rescheduled?
On a graceful restart (for example, a rolling upgrade or voluntary eviction):
- The Reconstructor saves its full in-memory state to the PersistentVolume before shutting down.
- The new pod starts and the startup probe waits for the state file to be loaded from disk before marking the pod ready. Kubernetes will not fire the liveness probe during this window.
- Traffic capture resumes automatically once the pod is ready.
On an ungraceful kill (OOM, SIGKILL, or hardware fault), state since the last periodic save is lost. The interval is controlled by reconstructor.stateSaveIntervalSeconds (default: every 5 minutes). The Reconstructor rebuilds the lost portion from new incoming traffic.
The PodDisruptionBudget (maxUnavailable: 0) prevents voluntary evictions from causing unplanned downtime during node maintenance.
What happens to captured data if the PersistentVolume is lost?
The behavior depends on your storage mode:
On-premises (useStaticHostPathPV: true, the default): The PersistentVolume is backed by a directory on a specific node (reconstructor.persistentVolume.nodeName). If that node becomes permanently unavailable, the volume and its data are lost. The Reconstructor pod will remain in Pending state until the node recovers or the nodeName value is updated to a new node.
Cloud (useStaticHostPathPV: false): The PersistentVolume is managed by the cloud provider's storage backend (EBS, Persistent Disk, Azure Disk). If a node fails, the volume detaches from the failed node and re-attaches to the replacement pod's node. Data is preserved across node failures.
In both cases, reclaimPolicy: Retain (the default) ensures that a helm uninstall does not delete the underlying volume or its data. Set reclaimPolicy: Delete only for ephemeral test installations where a full teardown is intended.
If the volume data is permanently lost, the Reconstructor starts fresh and rebuilds its API specification from new incoming traffic.
What is the expected behavior during an Availability Zone failover?
On-premises (hostPath PV): The PersistentVolume is pinned to a specific node via reconstructor.persistentVolume.nodeName. If that node fails, the Reconstructor pod cannot be rescheduled to another node because the volume is not portable. The pod remains in Pending state until the original node recovers.
Cloud (useStaticHostPathPV: false): The cloud provider's block storage volume detaches from the failed node and re-attaches to the replacement pod's node. For this to work correctly, the StorageClass must use volumeBindingMode: WaitForFirstConsumer. This delays provisioning until the pod is scheduled, ensuring the volume is created in the same Availability Zone as the pod.
Do not leave storageClassName empty in cloud mode. The cluster default StorageClass typically uses Immediate binding and provisions the volume in a fixed Availability Zone — if the pod is later scheduled to a node in a different zone, the volume cannot attach and the pod will fail to start.
After a failed or partial installation, there are leftover Kubernetes resources in my cluster. How do I clean up?
Run helm uninstall to remove all chart-managed resources from the release namespace:
helm uninstall invicti-api-discovery -n <release-namespace>
Legacy resources from pre-WasmPlugin chart versions: If you previously installed a chart version that used EnvoyFilters, some resources may remain in instrumented namespaces after uninstall: EnvoyFilter/trace-filter, EnvoyFilter/<release>-trace-clusters, ConfigMap/invicti-wasm-filter-cm, and sidecar.istio.io/userVolume and sidecar.istio.io/userVolumeMount annotations on workloads. These are automatically removed by the pre-upgrade migration job when you upgrade to the current version. To remove them manually:
kubectl delete envoyfilter -n <application-namespace> trace-filter --ignore-not-found
kubectl delete envoyfilter -n <application-namespace> <release-name>-trace-clusters --ignore-not-found
kubectl delete cm -n <application-namespace> invicti-wasm-filter-cm --ignore-not-found
To remove the sidecar annotations from a specific workload:
kubectl patch deployment <deployment-name> -n <application-namespace> \
  -p '{"spec":{"template":{"metadata":{"annotations":{"sidecar.istio.io/userVolume":null,"sidecar.istio.io/userVolumeMount":null}}}}}'
PersistentVolume: By default, reclaimPolicy: Retain keeps the volume after uninstall. To delete it manually:
kubectl delete pvc <release-name>-reconstructor-pvc -n <release-namespace>
kubectl delete pv <release-name>-reconstructor-pv
My cluster uses a canary or multi-revision Istio upgrade. Does NTA work with this?
Yes. When target namespaces use istio.io/rev=<revision> labels instead of istio-injection=enabled (which is the standard pattern for canary or multi-revision Istio upgrades), set trafficSource.envoyWasm.wasmPlugin.istioRevision to match the revision label:
--set trafficSource.envoyWasm.wasmPlugin.istioRevision=1-20
This adds a matching istio.io/rev label to the WasmPlugin resource so the correct Istio control plane picks it up. Leave this value empty (the default) if your namespaces use the standard istio-injection=enabled label.
How do I restrict instrumentation to specific workloads instead of all pods in a namespace?
By default, the WasmPlugin attaches to every Envoy sidecar in the instrumented namespace — including all current and future workloads. This gives the broadest API coverage with no per-workload configuration.
To restrict instrumentation to specific workloads, use trafficSource.envoyWasm.wasmPlugin.selector with pod label selectors:
--set trafficSource.envoyWasm.wasmPlugin.selector.app=payment-api
Or in a values file:
trafficSource:
  envoyWasm:
    wasmPlugin:
      selector:
        app: payment-api
        environment: production
Only pods whose labels match all specified key-value pairs will be instrumented. Pods that do not match pass traffic through normally without any filter attached.
How do I use an internal container registry mirror instead of registry.invicti.com?
Set global.imageRegistry to redirect all component image pulls to your internal mirror:
--set global.imageRegistry=your.internal.registry.com
The WASM module is fetched by the Istio sidecar agent directly — it uses a separate pull path from the pod images and requires a pull secret in each instrumented namespace. When secretRefresher.enabled=true (the default), the chart creates this secret automatically in every wasm namespace. See the Using an enterprise registry mirror section for the full setup procedure, including behavior when secretRefresher.enabled=false.
The Reconstructor pod rescheduled to a different node and I lost captured data. What went wrong?
This is expected behavior for on-premises installations using useStaticHostPathPV: true (the default). The hostPath PersistentVolume is backed by a directory on a specific node and is bound to that node via reconstructor.persistentVolume.nodeName. If the pod is scheduled to any other node, it cannot access the volume and will fail to start.
To confirm the current binding:
kubectl get pv <release-name>-reconstructor-pv -o jsonpath='{.spec.nodeAffinity}'
If you need the Reconstructor to be portable across nodes — for example, in a cloud environment or if your on-premises nodes rotate — switch to dynamic provisioning:
--set reconstructor.persistentVolume.useStaticHostPathPV=false \
--set reconstructor.persistentVolume.storageClassName=<your-waitforfirstconsumer-class>
See the Cloud clusters section for recommended StorageClass values per cloud provider.
Troubleshooting
For common issues including authorization failures, retry behavior, and resolution steps, refer to NTA troubleshooting.
Need help?
Invicti Support team is ready to provide you with technical help. Go to Help Center