Launch a scan using API
Deployment: Invicti Platform on-demand, Invicti Platform on-premises
This is part 3 of 4 in the API scanning workflows series. Previous: Configure | Next: Review and report
This document explains how to launch scans, monitor their progress in real-time, and retrieve essential scan session information using the Invicti Platform API.
Prerequisites
Before following this document, ensure you have completed:
- Get started - API key and testing tools
- Configure - Target creation and configuration
Step 1: Launch an instant scan
Start a scan on your configured target using the DAST API. You need the target_id and profile_id from the Configure workflow.
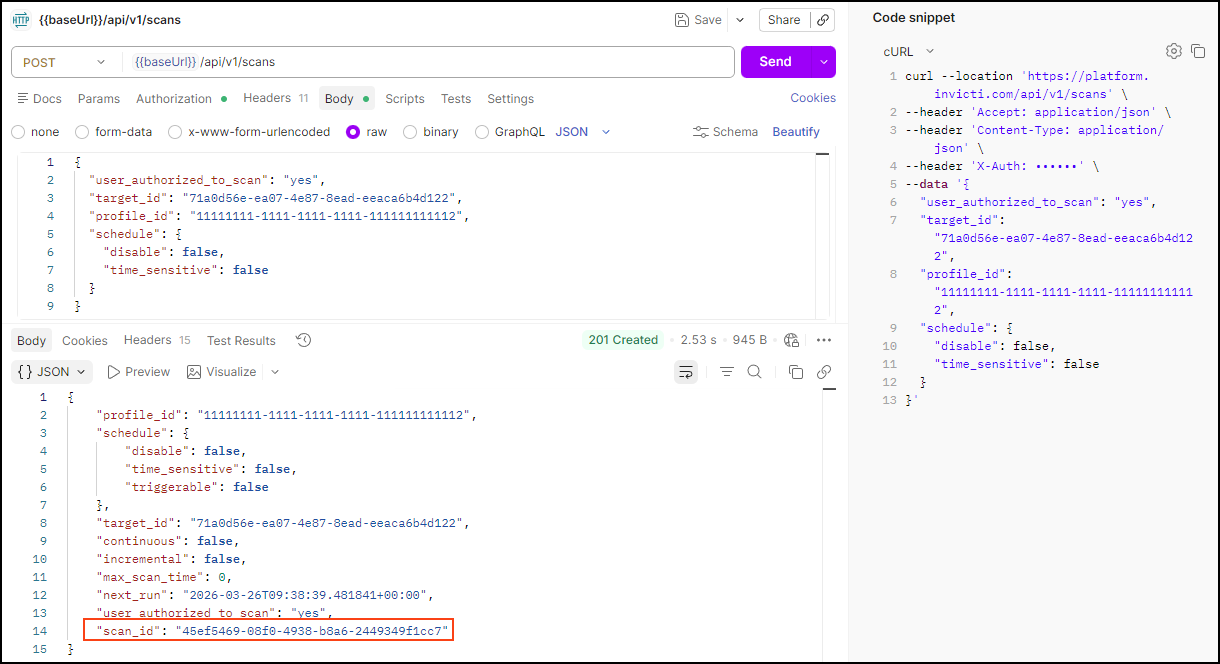
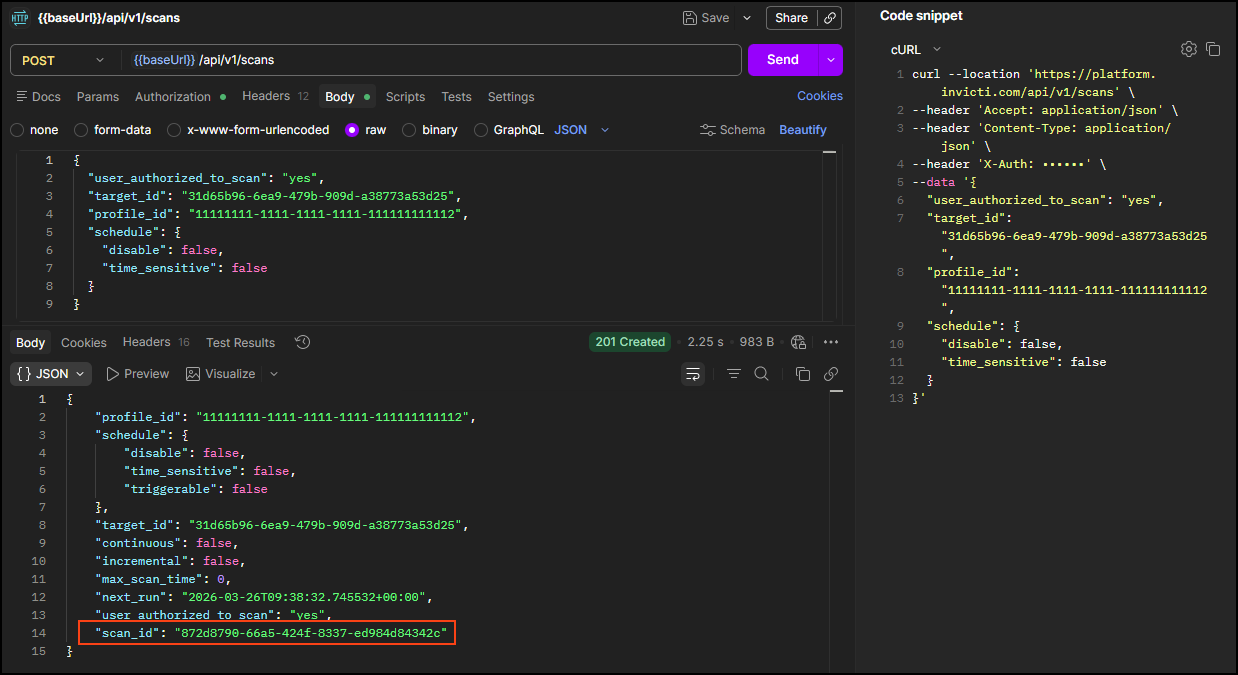
Run this request to launch a scan
Using the Invicti DAST API, start a scan using your target_id and profile_id from the Configure workflow.
POST <base-url>/api/v1/scans
Headers:
  accept: application/json
  content-type: application/json
  X-Auth: <your-api-token>
Body:
{
  "user_authorized_to_scan": "yes",
  "target_id": "<your-target-id>",
  "profile_id": "<your-profile-id>",
  "schedule": {
    "disable": false,
    "time_sensitive": false
  }
}
Replace the following values before sending the request:
| Placeholder | Required | Description | Example |
|---|---|---|---|
<base-url> | Yes | Your regional platform URL. Refer to Platform URLs | https://platform.invicti.com |
<your-api-token> | Yes | Your API key from User settings | a1b2c3d4-e5f6-... |
<your-target-id> | Yes | The target ID from the Configure workflow | 2df49409-... |
<your-profile-id> | Yes | The profile UUID from the Configure workflow | 11111111-... |
Expected response: HTTP 201 with scan details including scan_id. The scan ID is included in both the response body and the Location header. Save it for monitoring steps.
{
  "profile_id": "11111111-1111-1111-1111-111111111112",
  "schedule": {
    "disable": false,
    "time_sensitive": false,
    "triggerable": false
  },
  "target_id": "2df49409-ee21-4080-9640-eb46f4610054",
  "continuous": false,
  "incremental": false,
  "max_scan_time": 0,
  "next_run": "2026-03-17T12:50:16.974280+00:00",
  "user_authorized_to_scan": "yes",
  "scan_id": "cda0f3cf-5a2d-41eb-a9fb-5fa661167fd9"
}
Important: The scan_id is essential for monitoring progress and retrieving results. Store this value for use in subsequent steps.
Step 2: Monitor scan progress and get scan session ID
Run this request to monitor scan progress and retrieve scan session information
After launching the scan, poll the scan status using this request until it reaches completed. Once completed, the same response contains the scan_session_id you need for results analysis.
Polling recommendation: Check status every 5–10 minutes for active scans. Some scans can take hours or days, so polling too frequently adds unnecessary API load. If you want to eliminate polling entirely, configure a webhook in Invicti Platform to notify your system when the scan status changes.
GET <base-url>/api/v1/scans/<your-scan-id>
Headers:
  accept: application/json
  X-Auth: <your-api-token>
| Placeholder | Required | Description | Example |
|---|---|---|---|
<base-url> | Yes | Your regional platform URL. Refer to Platform URLs | https://platform.invicti.com |
<your-api-token> | Yes | Your API key from User settings | a1b2c3d4-e5f6-... |
<your-scan-id> | Yes | The scan ID from Step 1 | cda0f3cf-... |
Expected response: HTTP 200 with scan details including status.
Once the status is completed, the response includes the scan_session_id in the current_session object:
{
  "scans": [
    {
      "current_session": {
        "end_date": "2026-03-17T13:15:42.123456+00:00",
        "progress": 100,
        "scan_session_id": "d54012e4-9a9e-4b18-8cd7-f48bb7206225",
        "severity_counts": {
          "critical": 2,
          "high": 5,
          "low": 3,
          "medium": 4
        },
        "start_date": "2026-03-17T12:50:22.855566+00:00",
        "status": "completed"
      },
      "scan_id": "cda0f3cf-5a2d-41eb-a9fb-5fa661167fd9"
    }
  ]
}
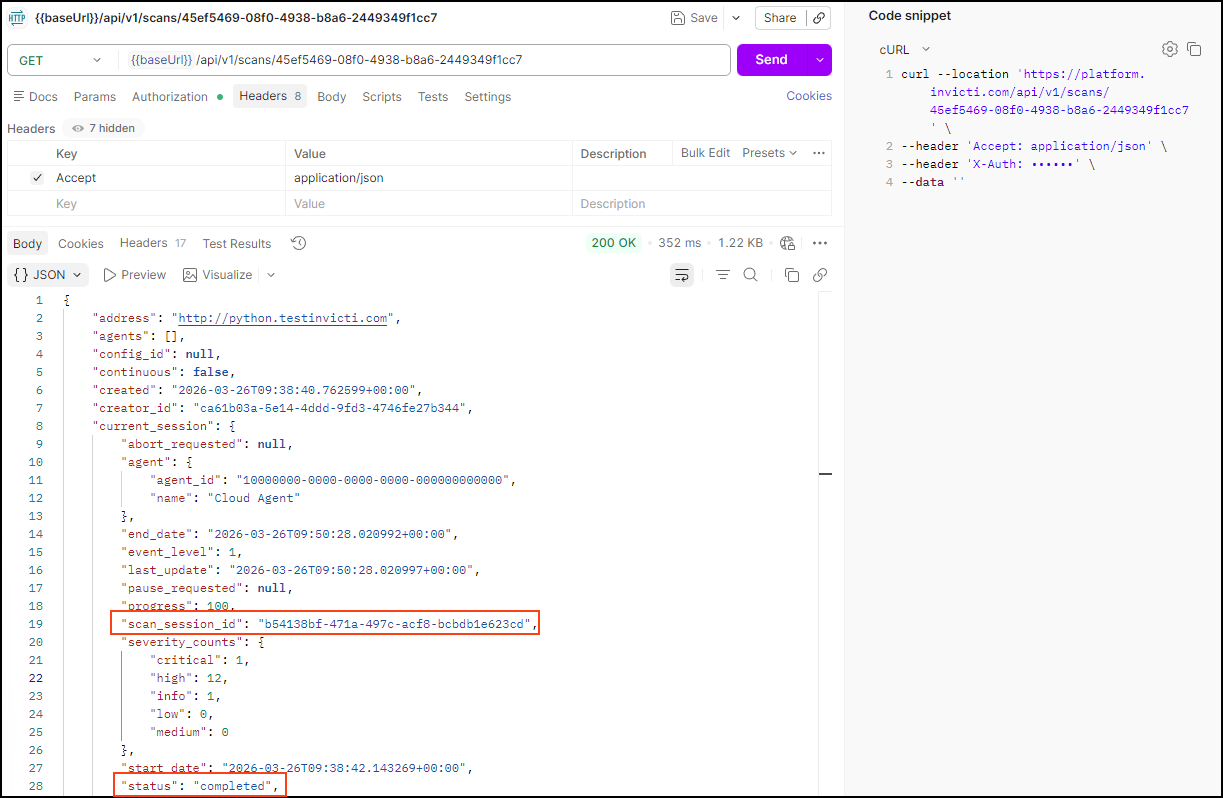
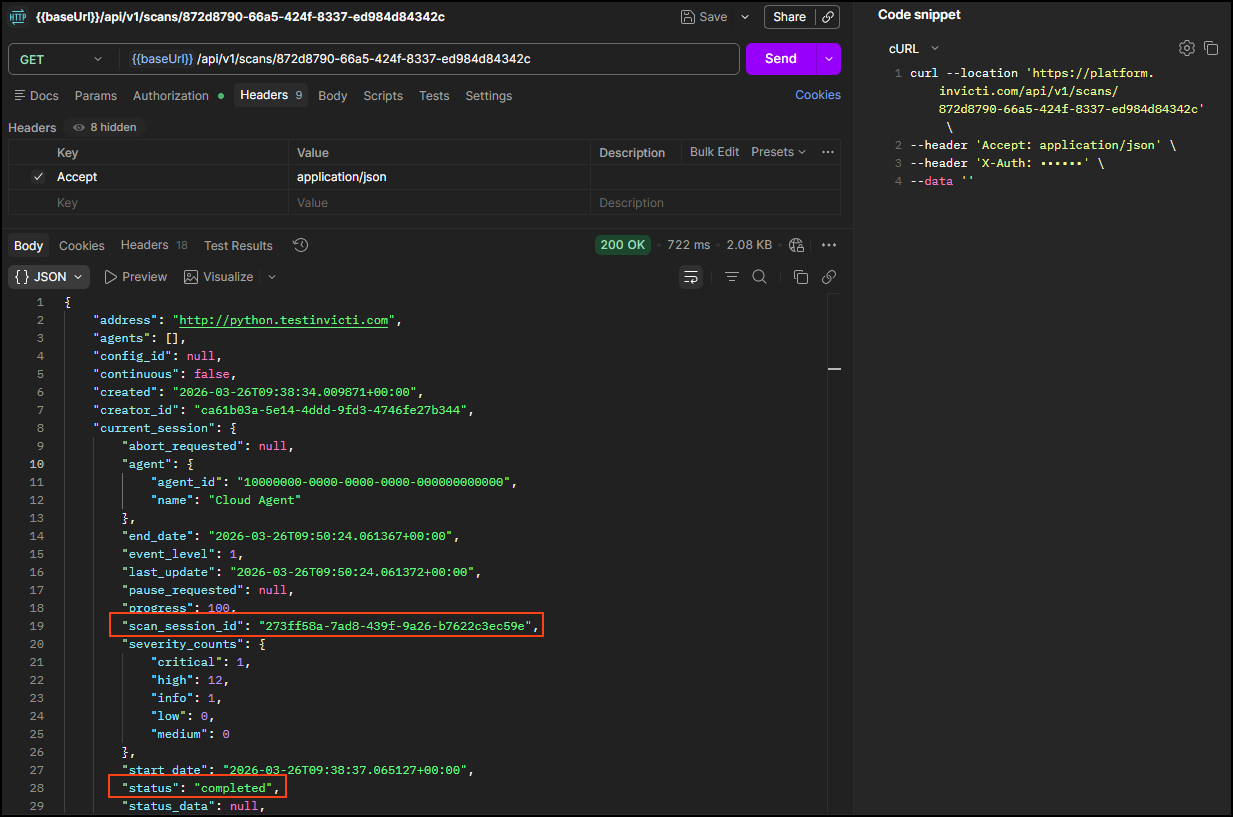
Key information from the completed response
| Field | Description | Use in next steps |
|---|---|---|
scan_session_id | Unique identifier for this scan execution | Required for results retrieval |
severity_counts | Summary of vulnerabilities by severity level | Quick assessment of scan findings |
progress | Scan completion percentage (100 = complete) | Confirm scan finished |
status | Final scan status | Verify successful completion |
start_date / end_date | Scan timing information | Performance tracking |
Summary
You have successfully executed and monitored a scan:
✅ Scan launched - Target scanning initiated using DAST API
✅ Progress monitored - Real-time status tracking until completion, with scan_session_id retrieved from the completed response
Key outputs for next steps
- scan_id:
cda0f3cf-5a2d-41eb-a9fb-5fa661167fd9(example) - scan_session_id:
d54012e4-9a9e-4b18-8cd7-f48bb7206225(example) - Vulnerability summary: Available in
severity_countsobject
Next steps
With your scan completed and session information available, you can now analyze results:
→ Continue to Review and report
Complete workflow series
- Overview
- Part 1: Get started
- Part 2: Configure
- Part 3: Launch ← You are here
- Part 4: Review and report
Need help?
Invicti Support team is ready to provide you with technical help. Go to Help Center