Deployment: Invicti Platform on-premises
Installation
This is part 2 of 4 in the Windows on-premises installation series.
Previous: Prerequisites | Next: Trustlist configuration
This document explains how to install Invicti Platform on-premises using the Windows installer. The installer deploys a custom WSL2 distribution containing k3s and all necessary container images, enabling offline installation without an internet connection.
The installation registers a custom WSL2 distro, deploys the Invicti Platform Helm chart inside it, and configures port forwarding to allow access from the Windows host.
Invicti Platform on Windows supports Windows 11 and Windows Server 2022 or later.
Before starting, complete all steps in Prerequisites.
Why this matters
The Windows installer automates the full platform deployment: it registers a WSL2 distribution, sets up a k3s cluster, configures networking, and deploys Invicti Platform via Helm - all in a single run. Understanding the installation flow helps you provide the right configuration upfront, since you can't change most settings after installation without rerunning the installer.
Required files
The platform package is distributed as a single ZIP archive (invicti-platform-x64.zip) that contains both files needed for installation:
| File | Description |
|---|---|
| Installer executable | Platform installer for Windows |
| WSL2 distribution tarball | k3s distribution with container images for offline installation |
Download the package
Download the package from the Invicti on-premises download page. Fill in your details and license key to proceed with the download.
Your license key is available in Settings > License > License key.
Extract the ZIP to a directory without spaces in its path (for example, C:\InvictiSetup\). Both files must be in the same folder before you run the installer.
Run the installer
-
Right-click the installer
.exeand select Run as administrator. -
License information screen: Enter your license details:
- Email address: Your contact email for the Invicti Platform installation
- License key: The license key provided by Invicti
noteYour license key is available in Settings > License > License key. If you don't have one, contact Invicti Support.
You can't change settings after installationTo change the hostname, Proxy, SMTP, TLS certificate, or database settings after installation, you must rerun the installer. Review these options carefully before proceeding.
-
Platform settings screen: Configure the platform settings:
- Application hostname: The hostname used to access the platform. Defaults to
invicti.local. - WSL distribution file: Path to the WSL2 distribution tarball. Defaults to the tarball in the same folder as the
.exe. - Data volume path (optional): Path where
invicti-data.vhdx(a virtual disk file) is stored, containing scan history, configuration, and user data. Defaults toC:\Program Files\Invicti\Platform\data\. If you use a custom path, record it - you must provide the same path if you reinstall to retain your data.
- Application hostname: The hostname used to access the platform. Defaults to
-
Proxy configuration screen: Configure an HTTP proxy if outbound traffic in your environment must route through a proxy server. Select Use outbound proxy and fill in the fields, or leave it disabled if no proxy is required.
Show proxy configuration fields
Field Description Default Use outbound proxy Enable proxy routing for outbound HTTP and HTTPS traffic Disabled HTTP Proxy Proxy server URL for HTTP traffic.
For unauthenticated proxy:http://host:port.
For Basic Auth:http://username:password@host:port- HTTPS Proxy Proxy server URL for HTTPS traffic.
For unauthenticated proxy:http://host:port.
For Basic Auth:http://username:password@host:port- No Proxy Comma-separated list of hosts and suffixes excluded from proxying .svc.cluster.local,svc.cluster.local,localhost,127.0.0.1warningExternal database connections and SMTP configurations do not follow the HTTP proxy settings.
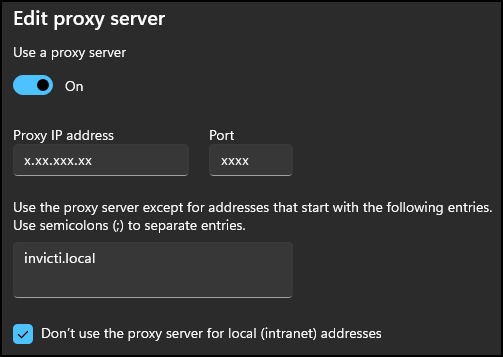
Using proxy with the defaultinvicti.localhostnameIf you enable the proxy and keep the default
invicti.localhostname, addinvicti.localto your Windows proxy bypass list. In Windows Settings > Network & Internet > Proxy, enable Use a proxy server and enter your proxy address and port.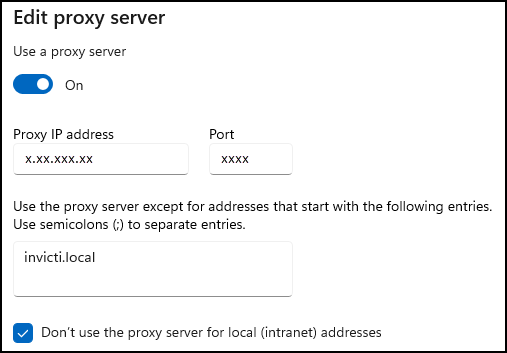
-
Email configuration screen: Configure SMTP to enable email notifications for scan alerts, user invitations, and password resets. Select Enable email notifications and fill in the fields, or leave it disabled to skip.
Show email configuration fields
Field Description Default SMTP host Hostname or IP address of your SMTP server - Port SMTP port 587Use SSL/TLS Enable SSL/TLS for the SMTP connection Enabled Username SMTP username - Password SMTP password - From email The sender address for outgoing emails - Display name The display name shown on outgoing emails Invicti Platform -
TLS certificate screen: Select Use custom TLS certificate and provide your certificate files. If disabled, the installer generates a self-signed certificate automatically. Self-signed certificates cause browser security warnings and are only suitable for testing.
Show TLS certificate fields
Field Description Full chain certificate (PEM) Path to your full chain certificate file in PEM format Private key (PEM) Path to your private key file in PEM format -
Database configuration screen: Select Use custom external database and provide your database connection details. If disabled, the installer deploys a built-in PostgreSQL database.
infoPostgreSQL 16 or later is required.
Show database configuration fields
Field Description Default Database host Hostname or IP address of your PostgreSQL server - Port PostgreSQL port 5432Username PostgreSQL username postgresPassword PostgreSQL password - Click Install to start the installation.
-
The installer runs the following steps automatically:
Show installation steps
Step Description 1 Installer checks prerequisites (WSL2, Hyper-V, disk space) 2 Installer checks for existing installations 3 Installer creates the invictiservice account4 Installer validates the WSL distribution file 5 Installer checks for an existing WSL distribution 6 Installer registers the WSL distribution and installs to C:\Program Files\Invicti\Platform\WSL7 Installer creates and attaches a VHDX for persistent data storage 8 Installer starts the k3s cluster 9 Installer starts WSL keepalive 10 Installer generates Helm values configuration 11 Installer waits for k3s cluster to be ready (may take up to 30 minutes) 12 Installer deploys Invicti Platform via Helm 13 Installer configures network port forwarding and firewall rules 14 Installer configures the hosts file with the invicti.localentry15 Installer installs and starts the Invicti WSL ServiceWindows service -
A WSL window opens automatically during installation - this is expected. Don't close it. The installer displays progress throughout. You can close the WSL window when done.
-
When the installation finishes, the Completing Invicti Platform setup screen appears. Select Open Invicti Platform Control Center to open the Control Center immediately after finishing, then click Finish.
Post-installation verification
Verify that all platform services are running before proceeding to trustlist configuration and registration.
The Invicti Platform Control Center (http://localhost:8088/) is a local dashboard that shows the health and status of all Invicti Platform services running in the WSL2 environment.
Once all services are shown as running, you can proceed to access the main platform at https://invicti.local (or your configured hostname).
Before you can register, configure the trustlist. → Trustlist configuration
Access the platform and register
Navigate to https://invicti.local (or the hostname configured during installation) in a browser.
If you need to confirm your configured platform address, you can find it in the Control Center:
- Upper right corner: Shows as
App: invicti.local(or your configured hostname) - About page (left navigation): Shows as
Hostname: invicti.local(or your configured hostname)
If you didn't provide a custom TLS certificate during installation, the installer generates a self-signed certificate. Your browser shows a security warning with the message:
"Your connection is not private"
Attackers might be trying to steal your information from invicti.local (for example, passwords, messages or credit cards).
Error code: net::ERR_CERT_AUTHORITY_INVALID
Click Advanced to see additional details, then click Proceed to invicti.local (unsafe) to continue to the platform.
This warning is expected and safe to bypass for your on-premises installation since you control the server and certificate. To avoid this warning in production environments, provide a valid TLS certificate during installation or reconfigure it afterwards.
On first access, the platform displays a registration form. Fill in the fields and click Complete registration.
Show registration fields
| Field | Description |
|---|---|
| Company name | Your organization's name |
| First name | Your first name |
| Last name | Your last name |
| Work email | Your work email address |
| Password | Choose a password for your account |
| Confirm password | Re-enter your password |
| Country | Your country |
Registration requires the platform to reach Invicti's licensing servers. Make sure you've completed Trustlist configuration before attempting to register.
Next steps
With installation complete and the platform running, you're ready to configure network access:
→ Continue to Trustlist configuration
Complete Windows installation series
- Part 1: Prerequisites
- Part 2: Installation ← You are here
- Part 3: Trustlist configuration
- Part 4: Update or uninstall
Troubleshooting
Installation logs
If the installer fails at any step, review the log files at C:\ProgramData\Invicti\Platform\:
install.logfor installation errorswsl-service.logfor runtime service errors.
DNS resolution
If invicti.local gives a DNS_PROBE_FINISHED_NXDOMAIN error, the hostname isn't resolving. Add the hosts file entry:
Add-Content C:\Windows\System32\drivers\etc\hosts "127.0.0.1 invicti.local"
Confirm it was added:
Get-Content C:\Windows\System32\drivers\etc\hosts | Select-String "invicti"
Collecting diagnostic information for support
If you need to contact Invicti Support about an installation issue, run the diagnostics tool from an elevated console to generate a support bundle:
& "C:\Program Files\Invicti\Platform\bin\Invicti.UP.Wsl.Diagnostics.exe" report
This produces a ZIP file in C:\ProgramData\Invicti\Platform\logs\ containing platform logs and a full diagnostic report. Attach this file when opening a support ticket.
Need help?
Invicti Support team is ready to provide you with technical help. Go to Help Center