Package: Invicti AppSec Core (on-demand)
Add webapp target
Register a web application or API as a target in Invicti AppSec Core so you can scan it for security vulnerabilities, assign team ownership, and track risk over time. This document explains how to add and configure a new webapp target.
Why this matters
A target is the starting point for everything in Invicti AppSec Core. Until you register a URL as a target, you can't run scans, track vulnerabilities, or assign ownership to a team. Getting the configuration right at this stage - especially the URL and protocol - saves you from having to delete and recreate the target later, since those values can't be changed after creation.
Prerequisites
Before adding a new target, ensure you have:
- The correct access rights to Invicti AppSec (add permission for projects/targets)
- An Invicti AppSec Core license
- The full URL of the application or API you want to scan
- Authorization to scan the target (see Authorized target scanning policy)
- An existing team to assign as the target owner
Steps to add a target
To create a new target:
- Select Inventory > Targets from the left-side menu.
- Click Add new target in the upper right corner of the targets list.
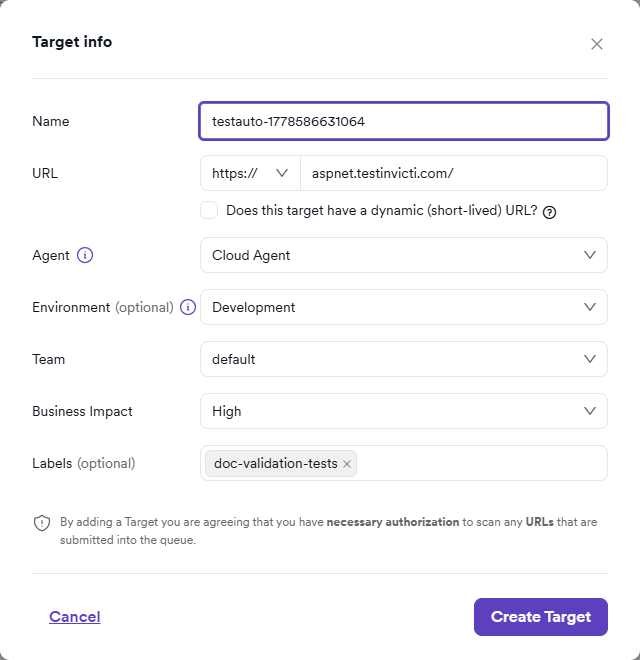
- Complete the Target info form with the required information:
- Name (required): enter a unique, descriptive name for the target (minimum 1 character, no spaces)
- URL (required): select the protocol (
httpsorhttp) and enter the target domain or host (for example,example.com). You can't change the URL and protocol after creation - Environment (optional): select the environment the target belongs to (for example, Development, Staging, or Production)
- Team (required): select the team responsible for this target's security
- Business Impact (optional): set the target's business impact level or choose Calculate automatically to let Invicti AppSec determine it based on risk data:
- Critical: mission-critical applications requiring immediate attention for security issues
- High: important applications with significant business impact
- Medium: standard applications with moderate business impact
- Low: less critical applications with minimal business impact
- Labels (optional): add custom labels to help categorize and filter the target; you can create new labels inline
- Click Create Target. The target dashboard opens - it's initially empty. Configure settings or launch your first scan from there.
Use https whenever possible. You can't change the protocol after creation, so choose the correct one before saving.
To register multiple URLs as targets in a single pass, do it from Website discovery instead. See Create assets from website discovery.
Verify your new target
Once you create your target, verify the configuration:
- Check that the target appears in your targets list
- Confirm the team assignment is correct
- Review Business Impact settings
- Run an initial scan to validate connectivity and scanner configuration
Only scan targets you are explicitly authorized to test. Unauthorized scanning may violate applicable laws and terms of service. For safe practice environments, use the Invicti test websites.
Troubleshooting
The "Add new target" button isn't visible
You need add permission for targets in Invicti AppSec Core to create new targets. Contact your Admin to check and update your role permissions.
Can't find the target after creating it
Check whether a team filter is active on the targets list - only members of the team you assigned the target to can see it. If you're in the correct team and still can't see it, try clearing all filters and searching by target name.
"Failed to create dast target" error appears on submit
This error appears when the URL you entered isn't valid. Make sure you're entering only the domain or host after selecting the protocol - for example, example.com not /admin or https://example.com/admin. Remove any paths, query strings, or fragments from the URL field.
Target dashboard shows no results
The dashboard is empty until you run a scan. Launch your first scan to start collecting vulnerabilities and risk data. For a quick start, refer to the Instant scan document.
Need help?
Invicti Support team is ready to provide you with technical help. Go to Help Center