Deploy Invicti Shark for Java - Tomcat (Windows/Linux/Docker)
Invicti Shark makes use of the Invicti IAST Bridge. For more information, refer to the Configuring Invicti IAST Bridge document.
- The Invicti Shark agent for Java requires Tomcat (8.5+) and Java (8+).
- The Invicti Shark agent needs to be deployed to your web application. This guide shows you how to deploy Invicti Shark to a Java web application.
The following installation instructions are for the newer version of the Java IAST sensor. If you are running the older, aspectjweaver-based Java sensor, you need to remove the old sensor before proceeding with installing the newer version of the Java sensor. Instructions on how to determine if you are using the older version of the Java sensor and how to remove it can be found at the end of this document.
Deploy Invicti Shark into your web server
- Download the Java Invicti Shark agent
Shark (IAST and SCA).jarfrom the Invicti UI. The Java Invicti Shark download file includes the Invicti Shark Token, which is unique by default for each target website URL. Unless the Token has been changed to be the same for all target websites, you need to download the Java Invicti Shark agent for each target website separately. You also need to adjust your Invicti Shark password to use a single Shark agent for the entire web server. - Save the downloaded Java Invicti Shark agent to a location on your web server (for example
C:\JAVA_InvictiSharkor/usr/share/JAVA_InvictiShark). - Configure Tomcat to load the Java Invicti Shark agent.
- Windows
- Linux
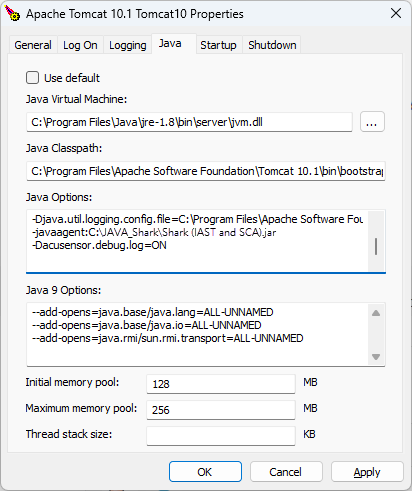
This can be done from the Apache Tomcat Configuration > Java > Java Options. Add 2 parameters into the Apache Tomcat Configuration > Java Options section:
-javaagent:C:\JAVA_Shark\Shark (IAST and SCA).jar(mandatory; adjust the path depending on where you saved theShark (IAST and SCA).jarfile)-Dacusensor.debug.log=ON(optional; enables debug logging and should only be used for troubleshooting)
This can be done from /usr/share/tomcat9/bin/setenv.sh in the JAVA_OPTS="$JAVA_OPTS -javaagent:/usr/share/java/Shark (IAST and SCA).jar -Dacusensor.debug.log=ON"
- Restart the Tomcat service.
The parameter -Dacusensor.debug.log=ON is optional, and can be omitted. If this parameter is retained, this outputs the Shark logging as additional lines in the Tomcat logs starting with [Invicti-debug].
Turn off and remove Invicti Shark for Java
To remove and turn off the sensor from your website, you need to revert the changes done during the deployment of the Agent:
- Stop the Tomcat service.
- Remove the Invicti Java Shark
Shark (IAST and SCA).jarfrom the folder where it was saved. - Reconfigure Tomcat so that it doesn't load the javaagent by removing the
-javaagentand-Dshark.debug.logparameters.
- Windows
- Linux
- This can be done from the Apache Tomcat Configuration > Java > Java Options section.
- This can be done from
/usr/share/tomcat9/bin/setenv.shby removing the lineJAVA_OPTS="$JAVA_OPTS -javaagent:/usr/share/java/Shark (IAST and SCA).jar -Dacusensor.debug.log=ON"
- Restart the Tomcat service.
Although the Invicti Shark agent is secured with a strong password, it's recommended that the Shark client files are uninstalled and removed from the web application if they're no longer in use.
Turn off and remove older versions of Shark for Java
Older versions of Shark for Java made use of aspectjweaver to provide the IAST capability. You can confirm if you're using the aspectjweaver-based Java sensor from the Apache Tomcat Configuration > Java > Java Options section. If the -javaagent option is loading aspectjweaver.jar, then you need to remove the older Shark for Java using the following instructions:
- Remove Invicti Java Shark
Shark (IAST and SCA).jarfile from the folder where it was deployed. - Remove
aspectjweaver.jarfrom the folder where it was copied to. - Reconfigure Tomcat with Load Time Weaving turned off, as follows:
- Remove the
-javaagentand-Dshark.debug.logparameters in the Apache Tomcat Configuration > Java > Java Options section. - Restart the Tomcat service.
- Remove the
Need help?
Invicti Support team is ready to provide you with technical help. Go to Help Center