Deployment: Invicti Platform on-demand, Invicti Platform on-premises
Microsoft Teams notifications via webhook and Power Automate
Use this setup to send Invicti vulnerability and scan notifications to a Microsoft Teams channel when your organization can't authorize the native Microsoft Teams OAuth app. This can happen due to Privileged Identity Management (PIM), restricted admin consent, or similar tenant policies.
This document explains how to set up that flow using Invicti's Webhook integration and a Power Automate workflow as a bridge. If your organization can authorize the OAuth app, use the native Microsoft Teams integration instead - it's simpler.
Why this matters
Without this setup, teams whose OAuth flow is blocked typically fall back to email digests or manual checks in Invicti. That delays response to critical findings, especially when Teams is the daily working surface for the security and development handoff.
How it works
Invicti's Webhook integration sends a POST request to a Power Automate workflow trigger URL. The workflow extracts the payload and posts the message to a Teams channel:
Invicti (Webhook integration) -> POST -> Power Automate workflow -> Teams channel
Prerequisites
To set up this integration, you need:
- Access to Power Automate at
https://make.powerautomate.com. - A Microsoft Teams team and channel where notifications should be posted.
- Access to Invicti Platform with permissions to create integrations and automations.
- Your organization's Power Platform policies must allow SAS-authenticated workflow triggers.
If your Power Platform admin has disabled SAS-authenticated workflow triggers at the tenant level, this approach can't work. Custom headers and API keys can't bypass the policy. Your options are:
- Ask your Power Platform admin to enable SAS-authenticated workflow triggers.
- Use the native Microsoft Teams integration instead - it handles OAuth token refresh automatically.
Step 1: Create the Power Automate workflow
You can create the workflow from Microsoft Teams or directly in Power Automate. Both paths lead to the same workflow.
From Microsoft Teams
- Open Microsoft Teams and go to the channel where you want to receive notifications.
- Open the channel's More options (⋯) > Workflows.
- At the bottom right, select Workflows home.
- At the top right, select Build from scratch > Build in Power Automate.
- Search for the trigger When a Teams webhook request is received and select it.
- Click + New step.
From Power Automate directly
- Go to
https://make.powerautomate.com. - Select Create > Instant cloud flow.
- Select the trigger When a Teams webhook request is received.
- When the trigger creation dialog asks for a Team and Channel, pick the ones you want the workflow to live in - you'll set the actual post destination in the next step.
Step 2: Configure the trigger authentication
The trigger supports three authentication modes, but only Anyone works with Invicti's Webhook integration.
- In the trigger settings, set Who can trigger the flow? to Anyone. The SAS signature embedded in the trigger URL acts as the authentication - no extra headers or API keys are needed.
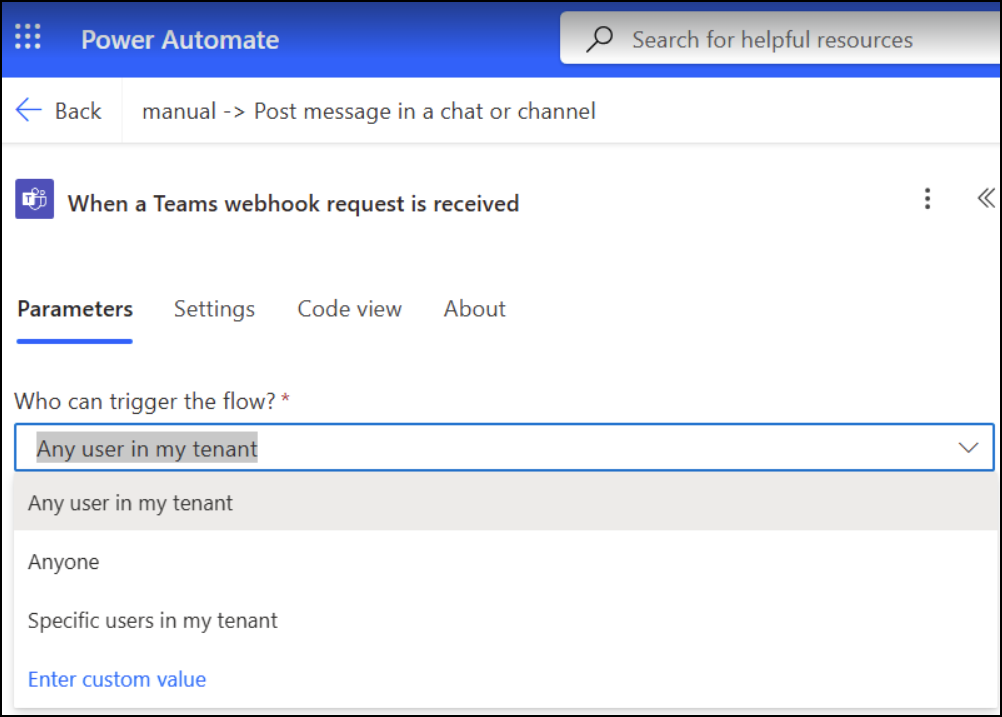
Why the other two modes don't work
| Trigger mode | Authentication | SAS in URL? | Works with Invicti Webhook? | Notes |
|---|---|---|---|---|
| Anyone | SAS signature in the URL (&sig= parameter) | Yes | Yes - if SAS is allowed at the tenant level | Simplest setup. No extra headers needed. |
| Custom value | SAS + api-key header | Yes | No - the api-key doesn't replace SAS | The custom value is an extra check on top of SAS, not a replacement. Stripping &sig= and sending only the api-key header returns DirectApiAuthorizationRequired. |
| Any user in my tenant | Azure AD OAuth Bearer token | No | No - tokens expire every ~60 minutes | Uses pure OAuth. Invicti's Webhook integration only supports static headers and can't refresh tokens automatically. |
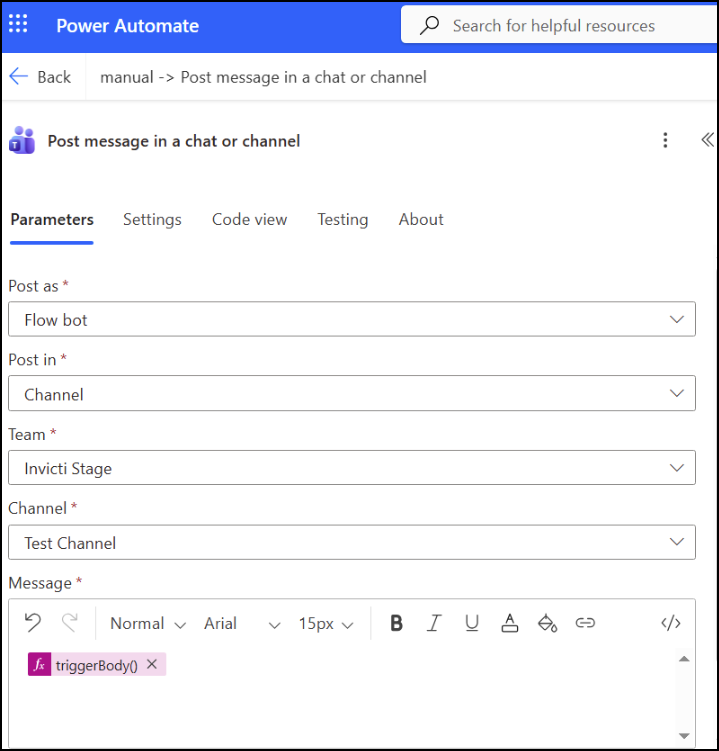
Step 3: Configure the Post message action
-
After the trigger, add (or verify) the action Post message in a chat or channel for Microsoft Teams.
-
Configure the fields:
- Post as: Flow bot
- Post in: Channel
- Team: select your team
- Channel: select your channel
- Message: click the code view (
</>) icon and enter the following expression:
@{triggerBody()?['text']}This dynamically inserts the
textfield from the incoming webhook payload into the Teams message.

Step 4: Save and copy the trigger URL
- Click Save.
- Go back to the trigger step and copy the HTTP URL. This is your workflow trigger URL.
The URL looks like:
https://default<id>.<region>.environment.api.powerplatform.com:443/powerautomate/automations/direct/workflows/.../invoke?api-version=1&sp=...&sv=1.0&sig=...
Save this URL - you'll need it when you configure the Invicti Webhook integration.
Anyone with the full trigger URL (including the &sig= parameter) can trigger the workflow and post to your Teams channel. Store it like a credential and don't share it in tickets, chats, or unsecured documents.
Step 5: Test the workflow with Postman (optional)
Before configuring Invicti, verify the workflow works end-to-end by sending a test request with Postman or any HTTP client.
| Setting | Value |
|---|---|
| Method | POST |
| URL | Your workflow trigger URL (including the &sig= parameter) |
| Auth | No Auth |
| Headers | Content-Type: application/json |
| Body (raw JSON) | {"text": "Test message from Postman"} |
You should get a 202 Accepted response, and the message should appear in your Teams channel within a few seconds.
If the test fails, see Troubleshooting below before continuing.
Step 6: Configure the Invicti Webhook integration
-
Log in to Invicti Platform.
-
Select Integrations from the left-side menu.
-
Switch to the Browse integrations tab.
-
Under Team communication, find the Webhook tile and click Configure.
-
Under Webhook details, fill in:
- Integration name: for example,
MS Teams notifications. - Webhook URL: paste your Power Automate workflow trigger URL (including the
&sig=parameter).
- Integration name: for example,
-
Under Authorization details, set Authentication type to None. The SAS signature in the URL is the authentication - no extra credentials are needed.
-
Under Webhook request details, set:
- HTTP method: POST
- Parameters encoding: Json
-
Under Webhook request data > Custom data fields, add one field that builds the Teams message:
Key Value textYour message, composed from Invicti placeholder fields The
textkey here is what the workflow expects: it's the field referenced by@{triggerBody()?['text']}in the workflow's Post message action.Example value for the
textfield:{Severity} - {Vulnerability} found on {Affected URL}
Use the placeholder dropdown in the Invicti UI to insert available fields instead of typing them manually. The {placeholder} values are replaced with actual vulnerability or scan data when a notification is triggered. For the full list of supported fields and how field substitution differs between team-communicator and issue-tracker contexts, refer to Payload customization in the Webhook integration document.
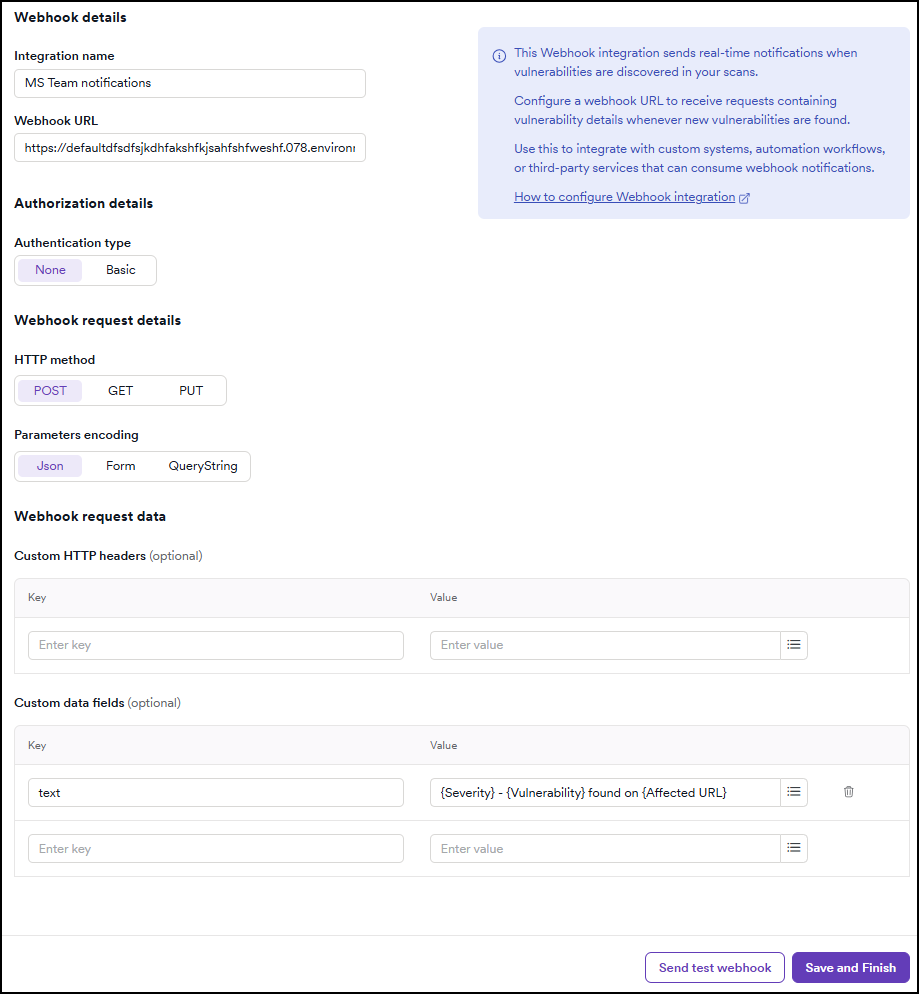

-
Click Send test webhook. A test message should appear in your Teams channel.
-
Click Save and finish.
Step 7: Configure notifications
This section provides basic instructions on how to create automations that use the Webhook integration. For more detailed instructions on how to create an automation, refer to the new automation document.
Send a Teams message on scan completion
Click to expand step-by-step instructions
-
Select Automations from the left-side menu.
-
Populate these fields:
- Name: send a Teams message on scan completion.
- Description: sends a Teams message to the
Security Reportschannel when a scan is completed.
-
Add an event of Scan completed.
-
Add an action of Send to communicator and select your MS Teams notifications webhook integration.
Send a Teams message on scan failure
Click to expand step-by-step instructions
-
Select Automations from the left-side menu.
-
Populate these fields:
- Name: send a Teams message on scan failure.
- Description: sends a Teams message to the
Security Alertschannel when a scan fails.
-
Add an event of Scan failed.
-
Add an action of Send to communicator and select your MS Teams notifications webhook integration.
Configuration summary
| Component | Configuration |
|---|---|
| Power Automate trigger | Anyone - SAS signature in the URL handles authentication |
| Invicti Webhook authentication type | None |
| Invicti custom headers | Not needed |
| Invicti custom data fields | text: message composed from Invicti placeholder fields |
| Security | SAS signature embedded in the trigger URL - treat the URL as a secret |
| Organization requirement | SAS-authenticated triggers must be allowed at the Power Platform tenant level |
Troubleshooting
Postman or Invicti returns 202 Accepted but no message appears in Teams
The trigger fired but the Post message action failed. In Power Automate, go to My flows, open your workflow, and check the Run history for the specific run. The failed step shows the error - common causes are a deleted channel, a missing Flow bot permission, or an invalid Team or Channel selection.
The endpoint returns DirectApiAuthorizationRequired
The SAS signature is missing or invalid. Make sure the Webhook URL in Invicti is the full trigger URL including the &sig= parameter. If you copied the URL by hand, re-copy it from the trigger step in Power Automate.
The endpoint returns DirectApiInvalidAuthorizationScheme
SAS-authenticated workflow triggers are disabled at your Power Platform tenant level. This is a tenant policy and can't be bypassed with custom headers or API keys. Ask your Power Platform admin to enable SAS-authenticated triggers, or use the native Microsoft Teams integration instead.
The test webhook works but real automation notifications don't
The integration is connected but no automation is sending events through it. Verify that you've created an automation in Invicti (see Step 7) with the correct event, scope, and action, and that the action points to your MS Teams notifications webhook integration.
The message appears in Teams but placeholders show as literal text (for example, {Severity})
The placeholder name doesn't match a supported field for the event context, so Invicti leaves it as literal text. Use the placeholder dropdown in the Invicti Custom data fields form instead of typing field names manually. Remember that vulnerability fields only substitute on Vulnerability found events, and scan fields only substitute on scan-related events. Refer to Payload customization for the full mapping.
Need help?
Invicti Support team is ready to provide you with technical help. Go to Help Center