Deployment: Invicti Platform on-demand, Invicti Platform on-premises
Record a login sequence
Recording a login sequence (a .lsr file) for a target may be necessary for scanning web applications with elaborate login mechanisms, such as form-based password-protected areas. A login sequence has three main parts:
- Record login actions
- Record restrictions
- Detect a user session
This document explains how to create a login sequence for a target using the built-in Invicti Platform Login Sequence Recorder (LSR). The in-product LSR works for any target type, including targets that use an internal scanning agent. If you encounter any LSR issues, refer to the Session detection and LSR advanced troubleshooting documents. If a scan shows the login sequence is invalid alert, refer to the Login sequence is invalid document.
Why this matters
Many web applications hide their real attack surface behind a login - form-based sign-ins, anti-CSRF tokens, or LocalStorage-based sessions. Without a working login, the scanner only reaches the public pages and misses the authenticated parts of the application. A recorded login sequence lets Invicti authenticate the way a real user does and stay logged in throughout the scan, so vulnerabilities behind authentication get the same coverage as the rest of the target.
Step 1: Record a login sequence
- Select Inventory > Targets from the left-side menu.
- Click on the relevant target in your list of targets to access the Edit target page.
- Select Authentication from the left-side menu.
- In the Authentication method, select Login sequence recorder.
- Here, you can either use a pre-recorded sequence or record a new sequence.
- To upload a pre-recorded sequence, click Upload sequence, select an .lsr file from your computer and confirm. Click Save target configuration to confirm.
- To record a new sequence, click the New sequence button.
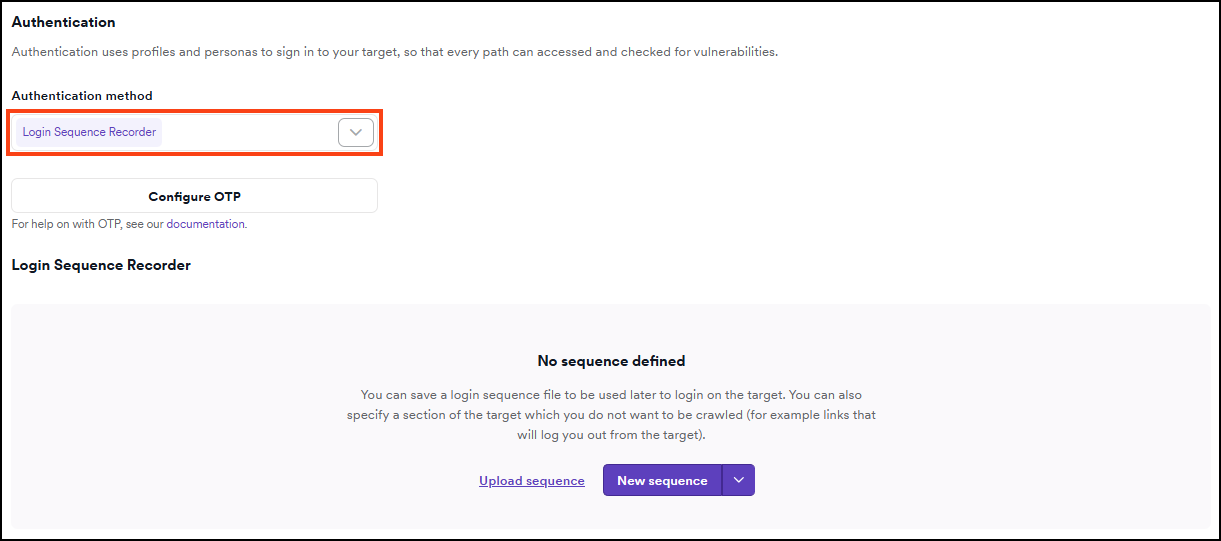
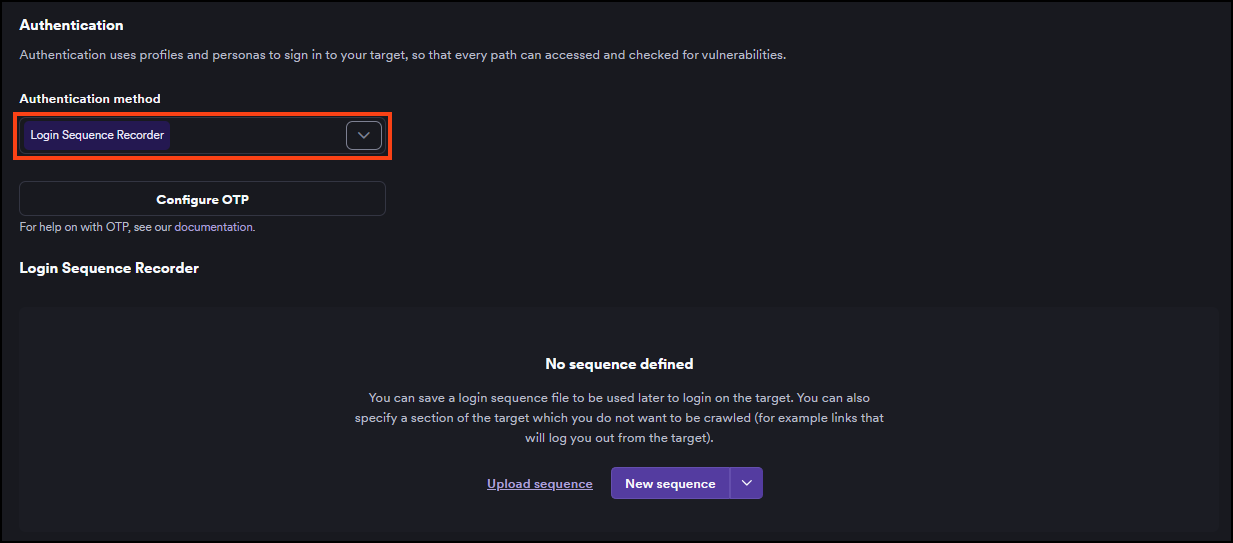
For targets that use an internal scanning agent, the LSR window can take up to about 30 seconds to open. The agent picks up the recording job on its next polling cycle. The default polling interval is 30 seconds, set by poll_frequency in the agent's agent.yaml configuration file. To open the recorder more quickly, lower the value - for example, poll_frequency: 10s - then restart the internal agent service for the change to take effect.
The agent.yaml file sits in the agent's installation directory - the folder you created when installing the agent (for example, C:\InvictiAgent).
- The LSR window opens and automatically navigates to the target URL.
- Within the LSR window, navigate to the login page and perform a successful login. Remember to use correct and valid credentials.
- With each action recorded, the panel on the right populates with login actions. Since the LSR records actions and not HTTP requests, it also works with web applications that use anti-CSRF tokens.
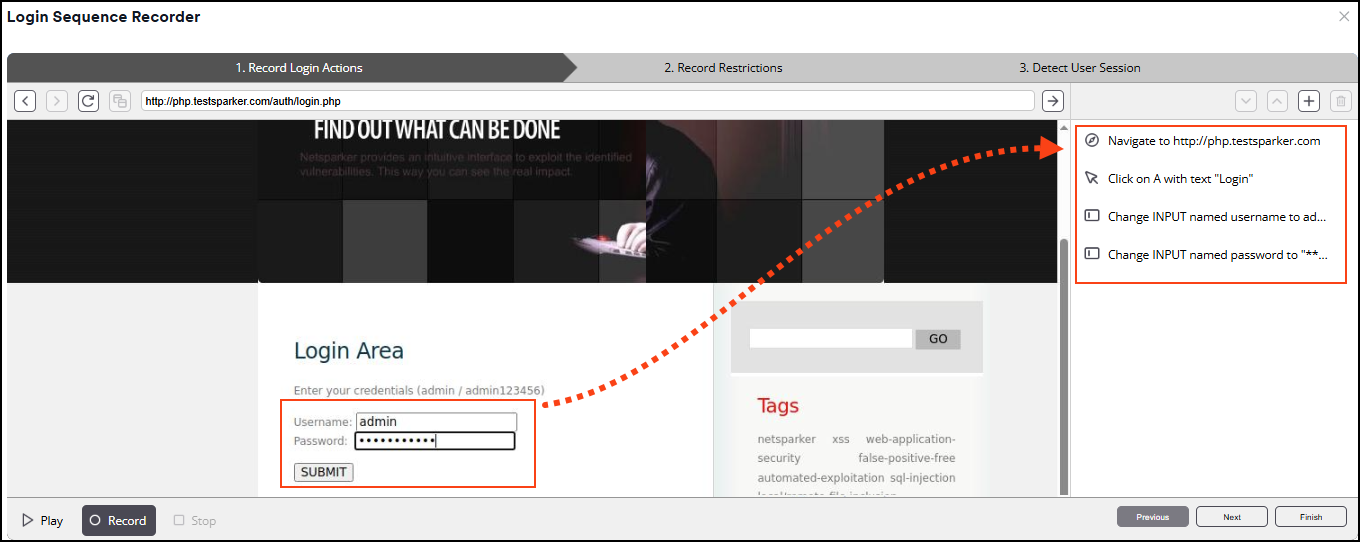
- Once logged in, you can replay the actions to ensure that the login sequence is valid and logging in successfully. To do this, click Play at the bottom left of the LSR window.
- Clicking on a specific action in the right-hand panel reveals its Action properties, where you can modify the target, timeout, or value.
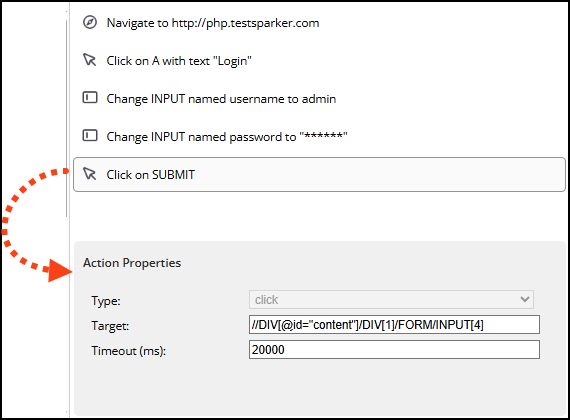
The LSR also supports a manual intervention step that pauses the scan at the start and requires you to complete a manual action - for example, solving a CAPTCHA - before the scan proceeds. For logins that the recorded actions can't capture on their own, you can add a script action that runs custom JavaScript during the login.
Manual intervention step
Targets with a manual intervention step in the login sequence support only instant scans - scheduled, recurring, and PCI ASV scans aren't supported.
When recording a login sequence, you can add a manual intervention step at any point in the Login actions panel:
- In the Login actions panel, click + to open the action type dropdown.
- Select manual from the list.
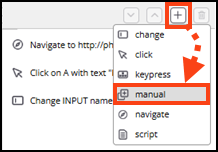
The LSR adds a Manual intervention step to the actions list. The Action properties panel shows Type: manual.
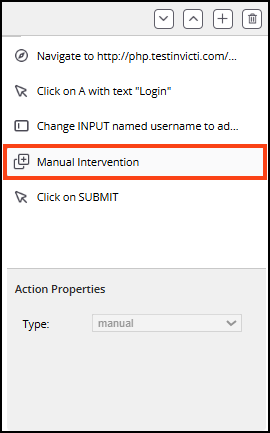
- Continue recording the remaining login actions and complete the login sequence as usual.
For information on how to scan this target, refer to the Instant scan document.
Script action
In addition to the recorded actions, the LSR supports a script action that runs custom JavaScript in the context of the loaded page during login playback. Use a script action when the standard recorded actions can't capture the login on their own - for example, when the page builds fields dynamically, the login relies on logic the recorder can't replay, or you need to interact with an element inside an iframe.
A script action runs whatever JavaScript you enter in the context of the page during login. Only add code you've written or reviewed yourself, and test the sequence with Play before you save it.
To add a script action:
- In the Login actions panel, click + to open the action type dropdown.
- Select script from the list.
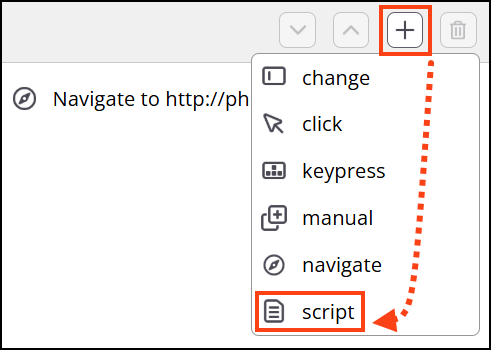
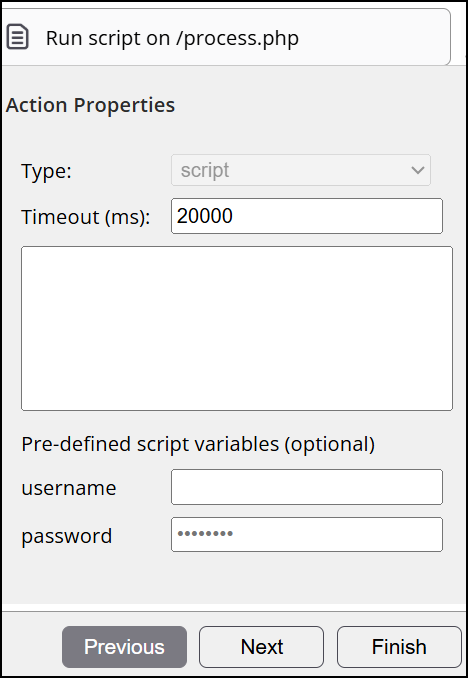
- In the Action properties panel, enter your JavaScript in the script field. You can also set the Timeout (ms) for the action and, optionally, supply a username and password under Pre-defined script variables.
- Continue recording the remaining login actions and complete the login sequence as usual.
The LSR runs each script action in the page context at the point where it appears in the Login actions panel, so place every script action where you need it to run in the sequence. Like any other action, you can reorder it or adjust its Timeout (ms) in the Action properties panel.
Use the username and password fields under Pre-defined script variables to pass credentials to the invicti.auth.login() helper instead of hardcoding them in the script. The password field is masked.
Script helper methods
A script action runs as an asynchronous function, so you can use await in your code. The username and password you set under Pre-defined script variables are available as the variables username and password (and otp when one-time passwords are configured), so you don't have to hardcode credentials.
The recorder exposes a set of built-in helper methods under the invicti.auth namespace for common login tasks. Most methods accept an optional delay (in milliseconds) before they run.
For example, to wait for the login form to appear and then submit the pre-defined credentials:
await invicti.auth.waitForSelector('#login-form');
invicti.auth.login(username, password);
The most useful helper methods are:
| Method | Description |
|---|---|
invicti.auth.click(el, delay) | Simulates a click on the element. el is an element reference or its id. |
invicti.auth.clickByQuery(query, delay) | Finds an element with a CSS selector and clicks it. |
invicti.auth.setInputValue(el, value, delay) | Sets the value of an input element. el is an element reference or its id. |
invicti.auth.setValueByQuery(query, value, delay) | Finds an input element with a CSS selector and sets its value. |
invicti.auth.login(username, password, delay) | Finds the login form and submits it. Call it with no credentials to use the values from Pre-defined script variables. |
invicti.auth.executeInFrame(frameEl, code, delay) | Runs the supplied code inside the given frame element. |
invicti.auth.waitForSelector(query) | Waits (up to 20 seconds) for an element matching the CSS selector to appear - useful for dynamic or single-page applications. |
invicti.auth.log(message) | Writes a message to the log to help you debug the script. |
To use stored credentials in a login sequence instead of plain-text values, refer to the Login sequence with secrets document.
Continue with step 2: Record restrictions.
Step 2: Record restrictions
Restrictions instruct the crawler and scanner not to follow specific links during a scan. Typically, you may want to restrict logout links or other links that might destroy a valid session to ensure that the scanner doesn't get logged out during the scan. The LSR also supports restrictions on HTTP methods commonly used in RESTful web services such as PATCH, PUT, and DELETE in addition to the standard GET and POST requests. If the link you're restricting contains a nonce or a one-time token, you may use wildcards (*) to restrict links with changing values.
- Click Next to begin recording restrictions.
- Click any buttons or links on your web page that you don't want Invicti to click when it's crawling and scanning the website.
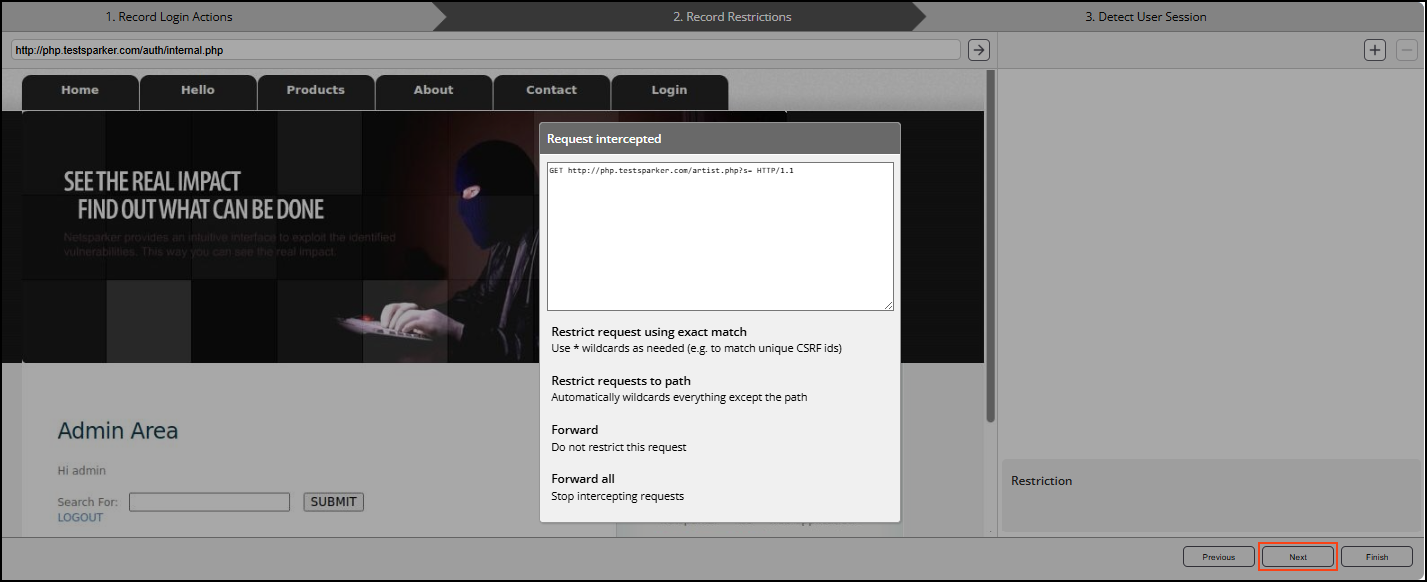
- Upon clicking a button or link, a dialog pops up asking if you want Invicti to:
- Restrict request using exact match (or by using wildcards)
- Forward requests that match this request (Don't restrict this request)
- Forward all requests, meaning that there are no restrictions (Stop intercepting requests)
Make your selection. In this example, there's no need to modify the restriction, so select the first option - restrict request using exact match.
- The LSR records the restriction and shows it in the panel on the right. You can add as many restrictions as you need.
- Click Next to proceed to the valid session detection phase.
- When you've finished recording restrictions, continue with step 3: Detect the user session.
Step 3: Detect the user session
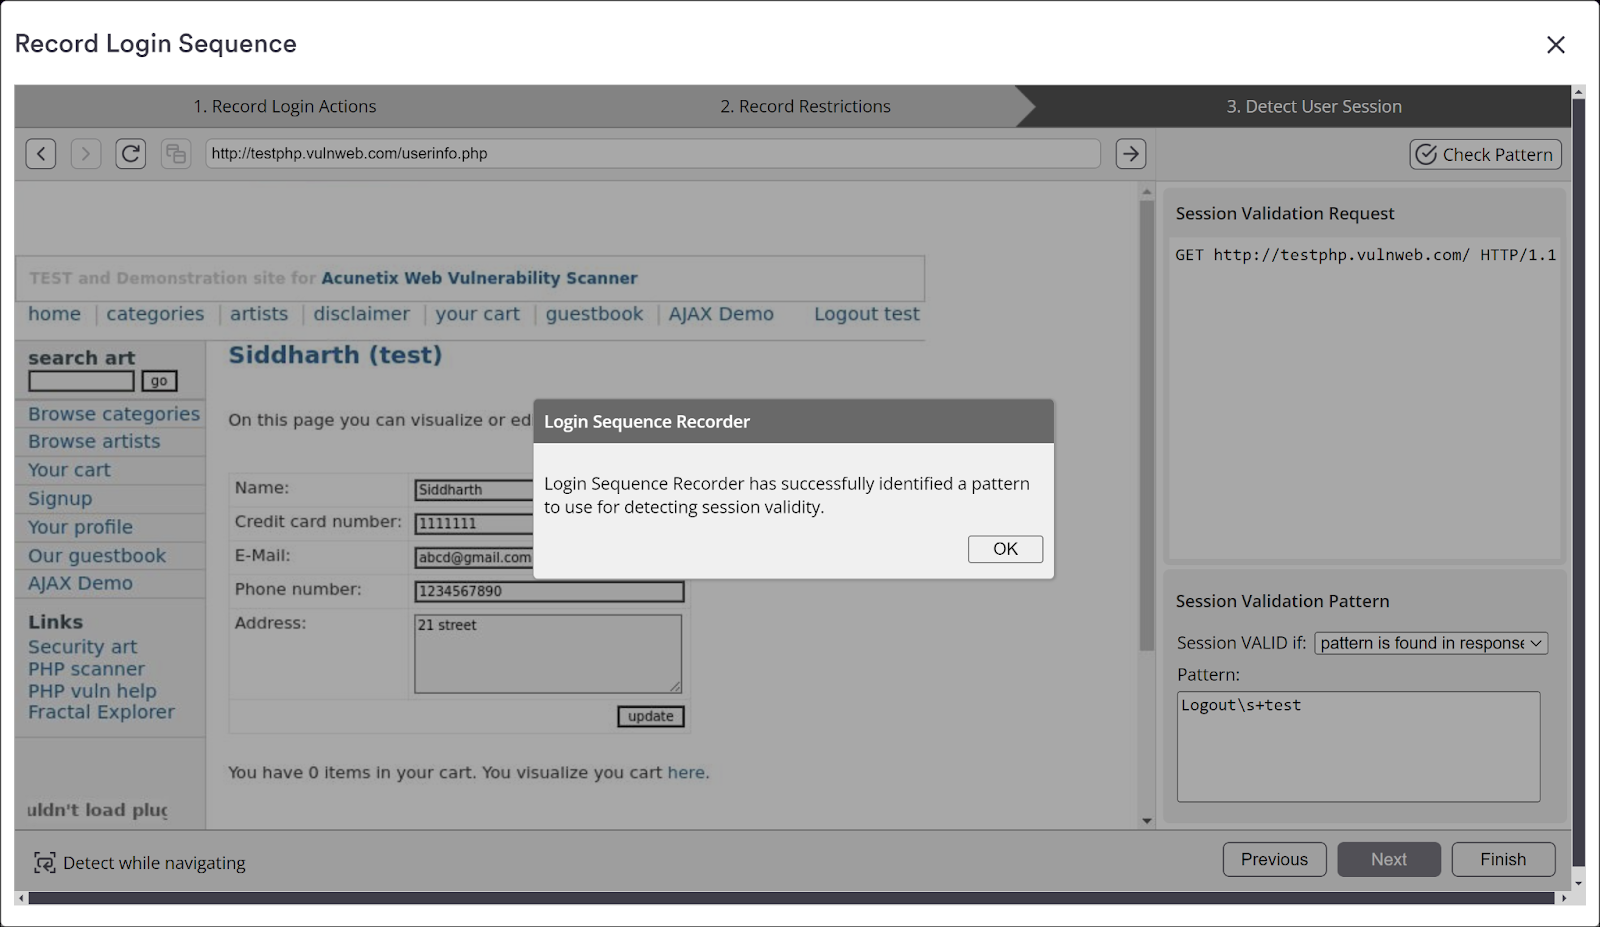
In the final step, the LSR tries to identify a valid session automatically. The session pattern is required, so that the scanner knows the difference between an invalid (logged out) and a valid (logged in) session. If the scanner can determine that the session has been invalidated, it can replay the login sequence and validate the session again.
The LSR detects the user session by comparing the logged-in and logged-out states of the web application. There may be cases where the LSR can't identify a difference automatically. In such cases, you need to either configure it by navigating to pages and letting the LSR identify the pattern, or configure it manually. In addition to authentication mechanisms that rely on cookies, the LSR also supports authentication mechanisms that rely on HTML5 LocalStorage.
To identify a valid authentication session while navigating:
- Browse to authenticated areas of the website that return a different response depending on whether the user is logged in or logged out.
- For example, a response from the website contains the text 'Logout' if the user is logged in. If it's not found in the response, the user isn't logged in.
Continue with step 4: Complete the sequence.
Step 4: Complete the sequence
- Once you've configured restrictions as well as a user session pattern, click Finish.
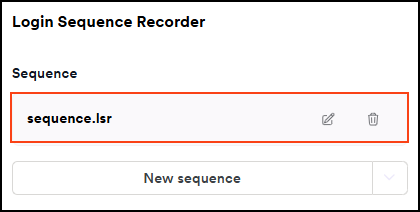
- You're returned to the Edit target page, and the LSR automatically attaches the login sequence you just created to the target.
Steps to manually configure a user session pattern
If Invicti is unable to identify a user session pattern, you have to configure one manually. The important point is that the responses sent by the web server differ between those of a logged-in user and those of a user who is NOT logged in. Identify a reliable difference the scanner can use to verify that it's logged into the site.
Once you've identified and configured the session pattern, you can verify it by clicking Check pattern at the top of the right-hand side panel.
There are three options for session pattern validation:
Option 1: Validate by visual/text pattern on a web page
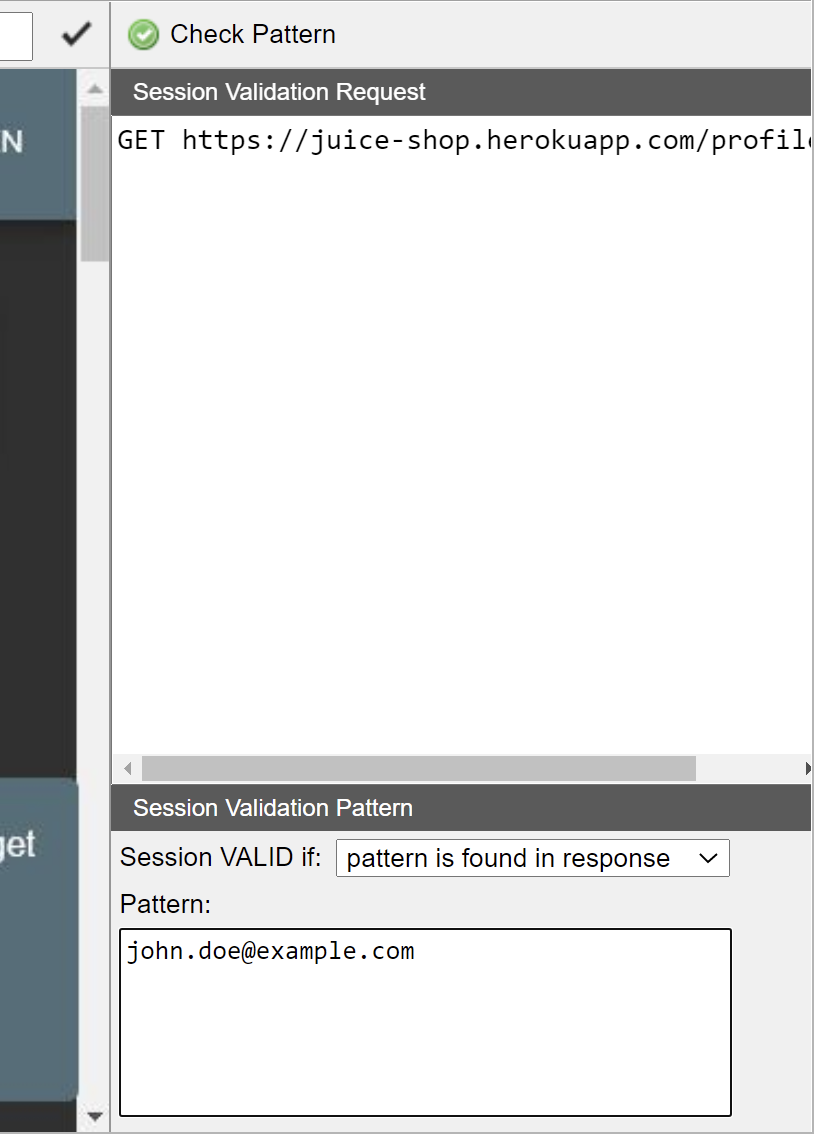
- Identify a visual difference on one of the web pages. Some web pages show, for example, a "Your Basket" link, only to logged-in users, or perhaps the page displays the name of the logged-in user. In such cases, you can instruct the LSR which page to go to by typing in the Session validation request text area:
GET https://juice-shop.herokuapp.com/profile HTTP/1.1 - Then set the drop-down labeled "Session VALID if:" to pattern is found in response, and enter the logged-in specific text or user name to the Pattern field.
Option 2: Validate by HTTP response header
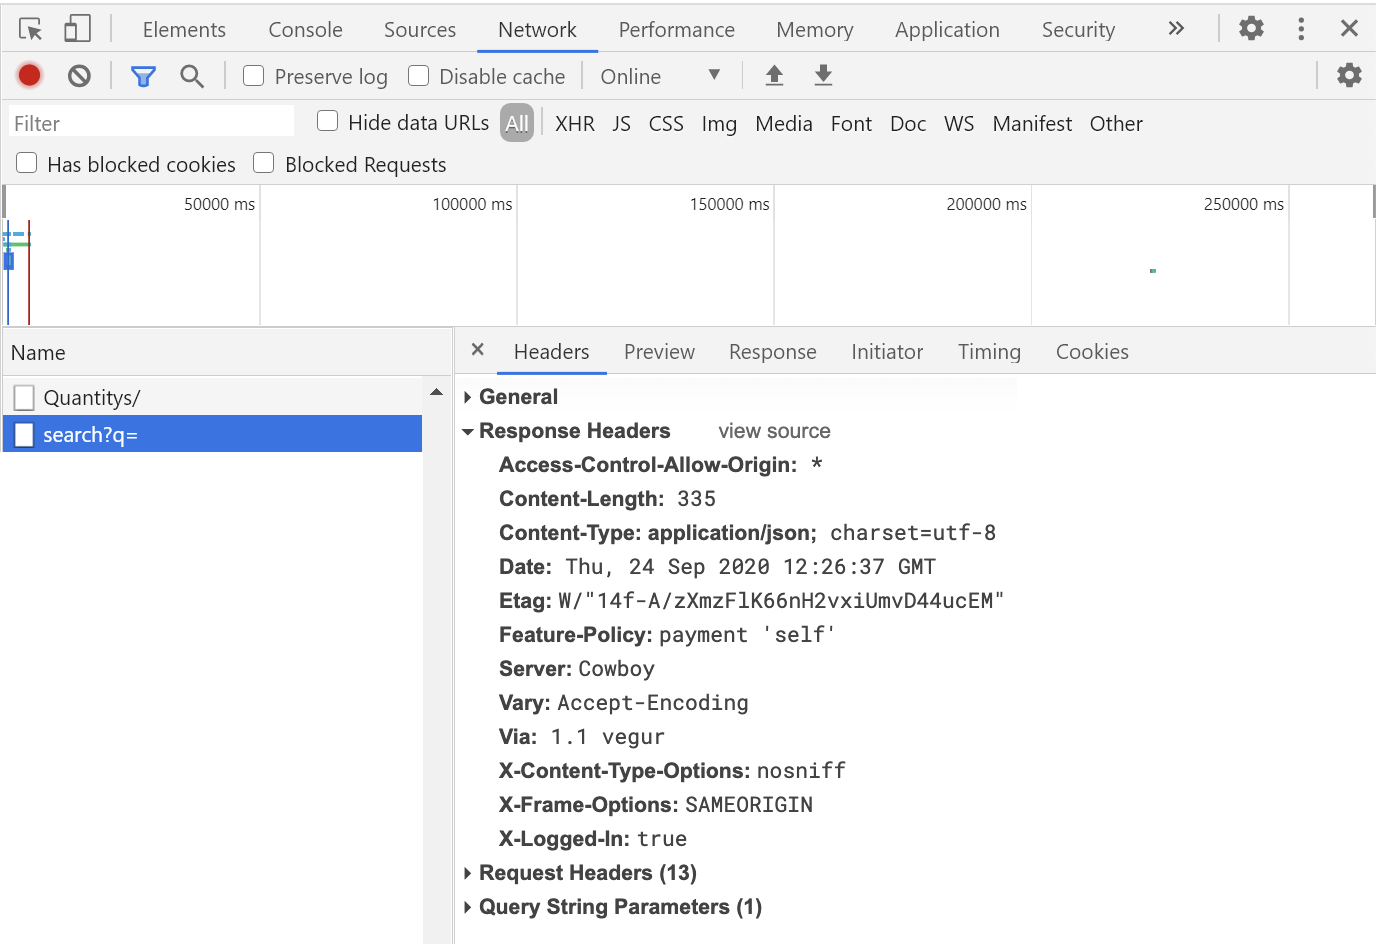
- Identify a difference in the HTTP Response Headers in the logged-in web pages compared to the not-logged-in version. You can check this with Google Chrome, for example, by using the "Inspect" feature. The Network tab shows a "Response Headers" section that could include a header such as
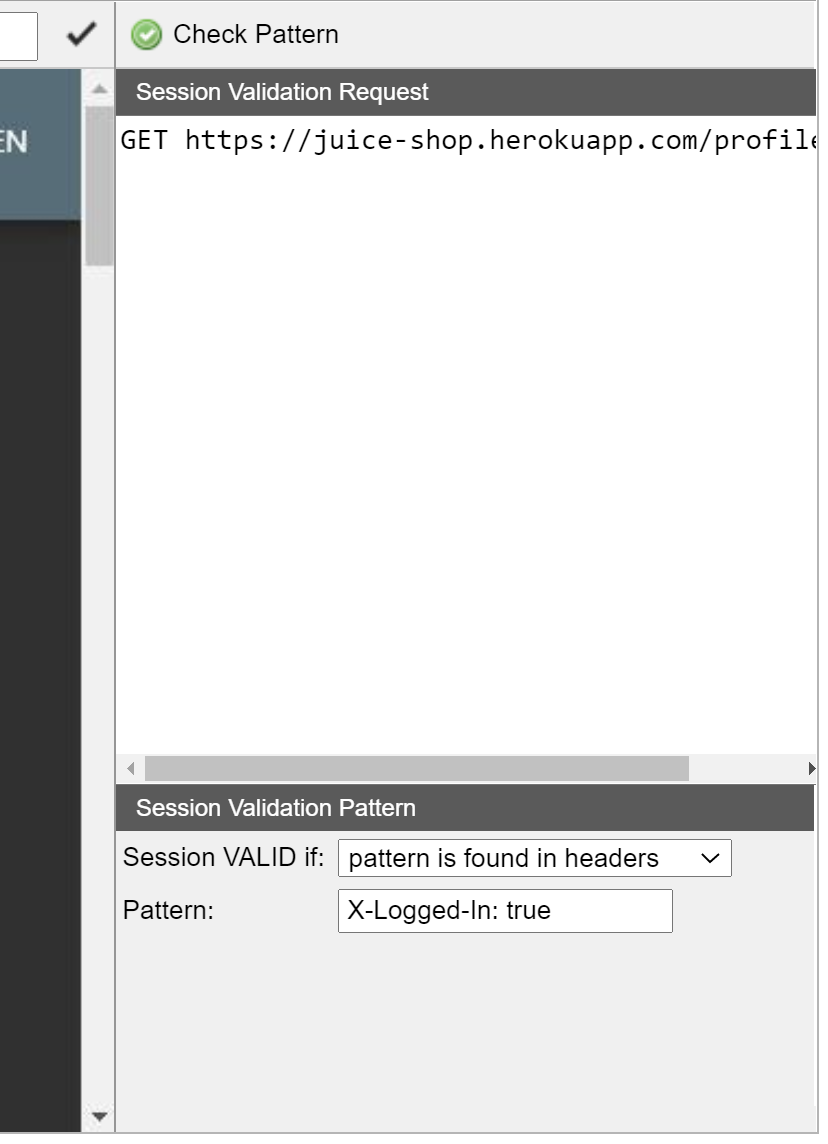
"X-Logged-In: true", but would be absent or have a different value such as"X-Logged-In: false".
- Set the drop-down labeled "Session VALID if:" to pattern is found in headers, and enter the identified header value into the Pattern field.
Option 3: Validate by HTTP status code
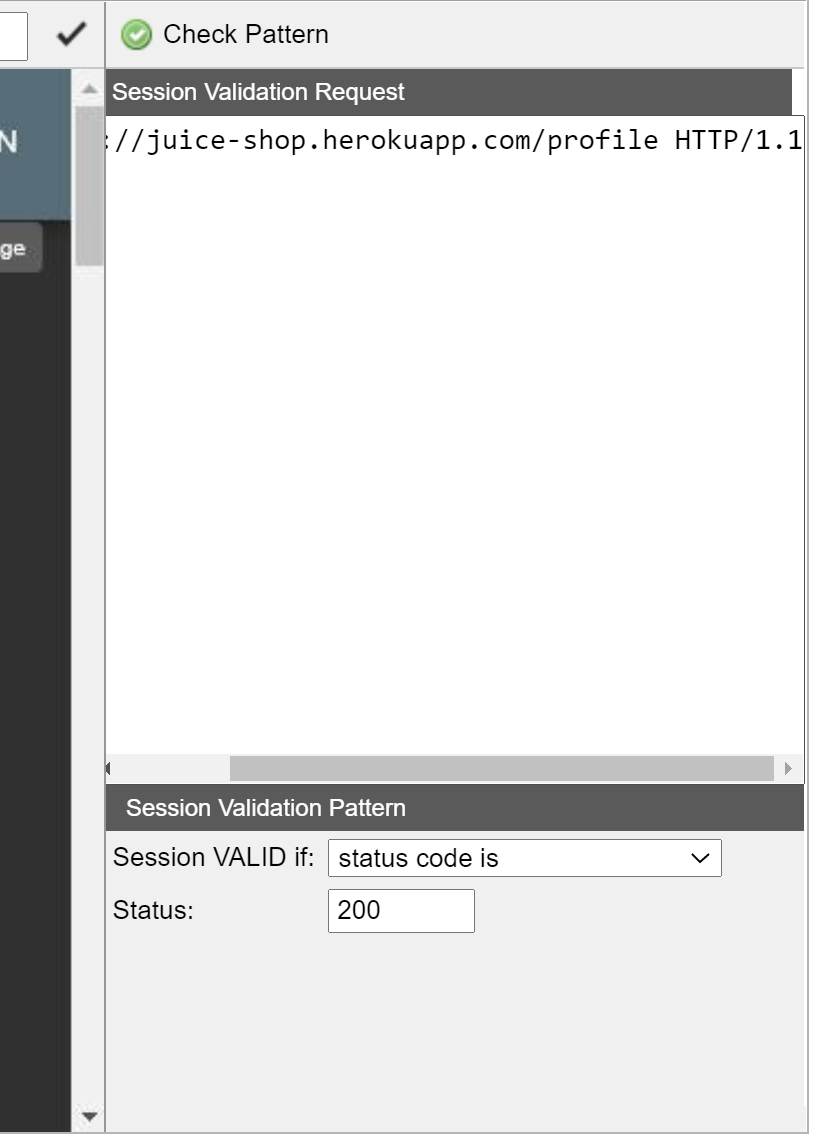
- Identify a web page that receives a numeric response when logged in (typically 200), and some other response when not logged in, such as a 404 (not found) or a 500 (server error). Set the drop-down labeled "Session VALID if:" to status code is, and enter the valid value into the Status field.
Troubleshooting
The Login Sequence Recorder window doesn't open after about a minute
For targets that use an internal scanning agent, the recorder waits for the agent's next polling cycle. If the window still doesn't open after the polling interval has passed:
- Confirm the internal scanning agent is running and shows as connected under Scans > DAST agents.
- Verify the
agent_token,auth_token, andurlin the agent'sagent.yamlare current. An expired or revokedauth_tokenprevents the agent from polling. - Make sure
poll_frequencyinagent.yamlhas a reasonable value. The default is 30 seconds; anything higher than a few minutes can make the recorder appear stuck.
"LSR session timed out" or "An error occurred during the Login Sequence Recording session"
The connection between the browser, the platform, and the internal scanning agent dropped. Close the recorder, then try again. If the error repeats:
- Confirm the agent is still running and connected.
- Confirm you haven't moved the browser tab running the recorder to a network with stricter outbound restrictions mid-recording (for example, switching from office Wi-Fi to a VPN).
- For long sequences, finish and save the recording in segments rather than leaving the recorder idle for extended periods.
A script action runs but the login fails
Replay the sequence with Play and watch which action fails, then check the following:
- Invalid JavaScript - a script action that contains invalid code is skipped and marked as failed. Check the browser console and the scan logs for a script error, and use
invicti.auth.log()to trace where the script stops. - Element not found yet - if the script acts on elements that load after the page (for example, in single-page applications), the selector may not exist when the script runs. Wait for the element first with
invicti.auth.waitForSelector('<css-selector>')before you click it or set its value. - Missing credentials - if you call
invicti.auth.login()without arguments, set the username and password under Pre-defined script variables. Without them, there are no credentials to submit. - Script needs more time - if the script does more than the default allows, increase the Timeout (ms) value in the Action properties panel. The recorder waits for the timeout to elapse before moving to the next action.
The LSR playback fails at the start of a scan
If the login sequence fails at the start of a scan because the target site has changed - for example, the login page was redesigned and the XPath selectors in your sequence are no longer valid, or the session pattern can no longer detect a valid session - Invicti can recover automatically using AI.
When recovery is triggered, Invicti uses AI to perform a new login and generate a replacement sequence, then uses it for the rest of that scan. Your saved LSR file on the target is left unchanged.
For recovery to work, all of the following must be true:
- AI-aided Login is enabled under Settings > AI
- Your LSR contains exactly one username input action and exactly one password input action (sequences that use only script actions, or that contain multiple credential sets, don't qualify)
- The target site is reachable and the initial navigation succeeds
For more information, refer to the Enable AI features document.
Need help?
Invicti Support team is ready to provide you with technical help. Go to Help Center