Package: Invicti AppSec Core (on-demand)
Configure scanners
This document explains how to add and configure security scanners for your projects in Invicti AppSec. Scanner availability and configuration options vary depending on your package type.
Scanner configuration allows you to customize security testing tools to match your project requirements, set scanning parameters, and integrate with your development workflow.
Available scanners by package
View scanner details by package
Invicti AppSec Core
Invicti AppSec Core includes 6 pre-configured security scanners that cover essential application security testing needs:
- Invicti SAST
- Invicti DAST
- Invicti SCA
- Invicti CS
- Invicti IaC
- Secrets
Invicti AppSec Enterprise
Invicti AppSec Enterprise provides access to a comprehensive suite of security scanners, including all 6 Core scanners plus many additional advanced options. The complete list of available scanners can be viewed in Integrations > Scanners.
Package-specific behavior
View package-specific differences
Invicti AppSec Core
If you're using Invicti AppSec Core, the scanner management process is streamlined:
- Automatic activation: the 6 Core scanners are activated automatically for your projects
- Automatic scan initiation: Invicti AppSec Core starts a new scan when you add scanners to your project
- Default schedule: a daily scan schedule is created automatically with no end date
- Customizable: you can modify the scan schedule to meet your specific needs
Invicti AppSec Enterprise
If you're using Invicti AppSec Enterprise, you have full control over the scanner management process:
- Manual configuration required: you need to activate scanners, add them to projects, and configure their settings
- Flexible scheduling: you can start scans manually or create custom scan schedules based on your requirements
- Advanced options: access to additional scanners and configuration options beyond the Core package
Scanner management workflow
The scanner management process consists of three main steps, with different requirements for each package:
Step 1: Activate scanners
Applies to: Invicti AppSec Enterprise only
Enterprise users must first activate scanners under Integrations before you can add them to projects.
Invicti AppSec Core users: This step is handled automatically. The 6 Core scanners are pre-activated for all your projects.
Step 2: Add scanners to project
Applies to: Invicti AppSec Enterprise only
After activating scanners, Enterprise users need to add them to specific projects:
- Select Inventory > Projects from the left side menu.
- Click the project name to open the project dashboard.
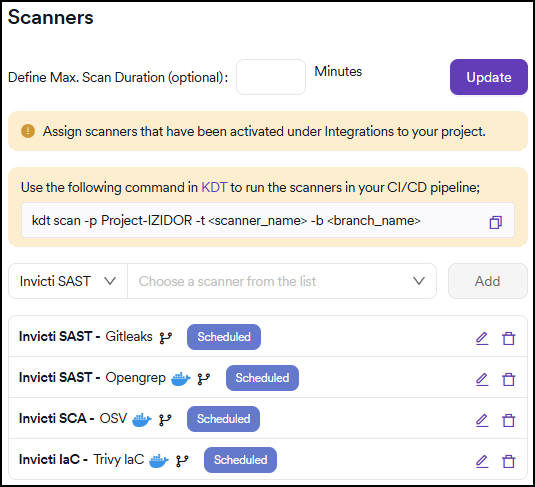
- Select the Settings tab and open the Scanners section.
- Use the drop-downs to specify the scanner type followed by the specific scanner, then click Add. This opens the scanner configuration drawer. Continue with the next step.
Invicti AppSec Core users: This step is handled automatically. Core scanners are automatically added to your project and ready to use.
Step 3: Configure or amend scanner configuration
Applies to: both Invicti AppSec Core and Enterprise
All users can configure scanner settings to meet their specific requirements:
- Navigate to your project's Settings tab and open the Scanners section.
- Optionally, define maximum scan duration and click Update to confirm.
- To configure a scanner, locate it in the scanner list and click the pencil icon on the right to open the scanner configuration drawer.

- Invicti AppSec Core: Core scanners appear automatically and adding them triggers an automatic scan and daily schedule creation.
- Invicti AppSec Enterprise: Only previously activated scanners appear in the Scanners section.
As an example, this document shows how to add a DAST/API scanner - Invicti Platform. These are the options in the drawer:
Scanner configuration:
- KDT command: command for KDT to run Invicti Platform in your CI/CD pipeline
- Environment: specify the environment (optional)
- Bind to: bind to an Invicti Platform target (target name - URL)
- Profiles: specify the scanning profile
- Branch: specify the branch to scan
- Meta data: configure scan metadata options:
- Use a new metadata to add new vulnerabilities to a project
- Use an existing metadata to compare discovered vulnerabilities against vulnerabilities discovered in previous scans
- Scan tag: use this free text field as an identifier for your scans. Unlike the metadata field, this field isn't used to correlate vulnerabilities
- Start scan: determines the operation type. By default, Invicti retrieves existing scan results from the scanner without triggering a new scan. This behavior depends on the scanner's API capabilities. If you want to trigger a new scan instead of pulling existing results, enable this checkbox
- Fork default branch: the vulnerabilities discovered in the branch specified earlier are compared against the vulnerabilities in the default branch to remove those that have been previously suppressed

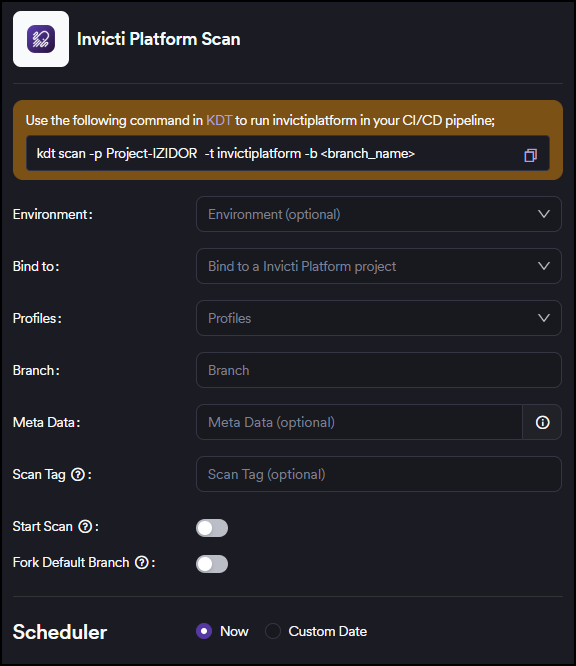
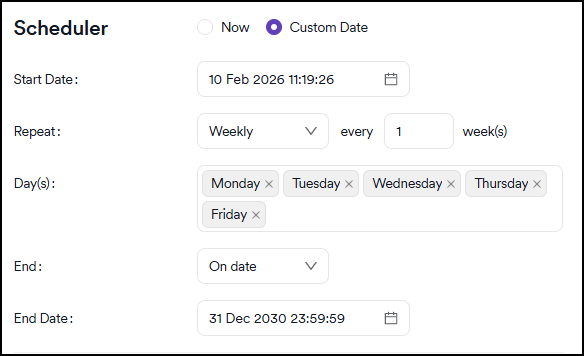
Scheduler: The scheduler defines the frequency at which Invicti runs the selected operation (either pulling existing scan results or triggering new scans, based on your Start scan setting):
- Now: runs the operation immediately after configuration
- Custom date: configure a scheduled operation with the following options:
- Start Date: specify when the scan should begin (format: DD MMM YYYY HH:MM:SS)
- Repeat: set scan frequency:
- Every: specify intervals (for example, 1 day, 2 weeks)
- End: define when the schedule should stop:
- Scans: specify number of scans to run (for example, 1 scan, 5 scans)
- After configuring the scanner settings, click Save to apply the configuration.
Invicti AppSec Core users: remember that for scanners that were added automatically, Invicti AppSec creates a daily scan schedule. You can modify this schedule in the scan scheduling section to meet your specific needs.
Need help?
Invicti Support team is ready to provide you with technical help. Go to Help Center