Package: Invicti AppSec Core (on-demand)
Configure issue assignees
This document explains how to configure issue assignees for your projects in Invicti AppSec. Issue assignee configuration controls who receives vulnerability findings when issues are created in your issue manager.
Properly configuring issue assignees ensures that the right team members are notified and responsible for remediating security vulnerabilities.
Prerequisites
Before configuring issue assignees, ensure you have:
- Activated issue managers under Integrations (refer to Activate issue managers)
- Added and configured issue managers for your project (refer to Configure issue managers)
Steps to configure issue assignees
To configure who receives issues for your project:
- Select Inventory > Projects from the left side menu.
- Click the project name to open the project dashboard.
- Select the Settings tab > Issue assignment.
- Configure the assignee options:
- Committer when the committer is known: when enabled, Invicti AppSec first attempts to assign issues to the committer found on the software development platform. If the attempt fails, the issue is assigned to the user specified in the Specific user field.
- Specific user: select the user to whom issues will be assigned when the committer of the vulnerability is unknown. This applies to all findings other than SAST and IaC findings. The user must be a licensed Invicti AppSec user to appear in the dropdown menu.
- Click Save on the bottom of the page to apply your assignee configuration.
Issue assignment hierarchy
When multiple assignee options are configured, Invicti AppSec follows this priority order:
- Committer of the vulnerability: assigned when the committer is known and the "Committer when committer is known" option is enabled.
- Specific user: the user selected under Issue assignment in project settings.
- Issue responsible for the team: the user assigned as issue responsible within the team working on the project.
- Token owner: if none of the above apply, the issue is assigned to the token owner generated on the issue manager.
The assignment hierarchy only applies when all options are configured. Each level acts as a fallback when the previous level cannot be resolved.
Set up custom criteria
You can create custom criteria to control which types of vulnerabilities automatically generate issues in your issue manager.
To set up custom criteria:
- Navigate to Inventory > Projects from the left side menu.
- Click the project name to open the project dashboard.
- Select the Settings tab > Issue assignment.
- In the Issue manager, open the Automation tab.
- Click +Add custom criteria to open the criteria modal.
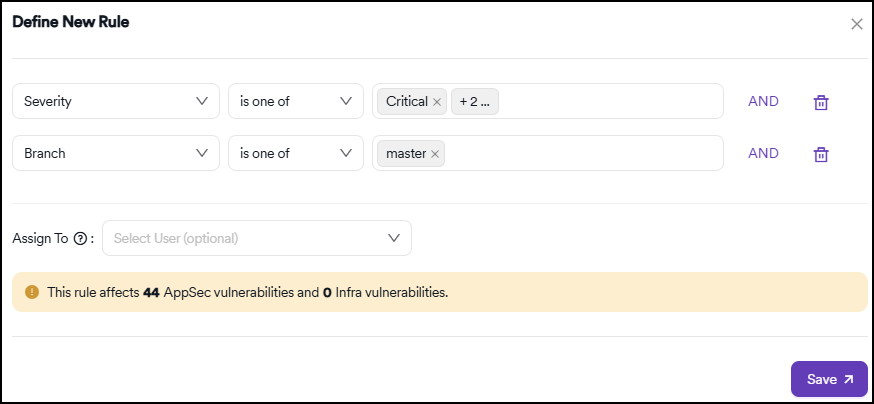
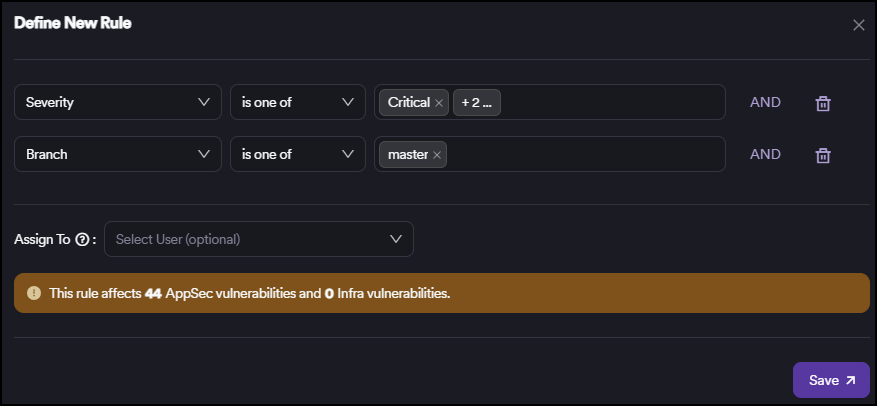
- Define your criteria using the available dropdowns:
- Field
- Operand
- Combine multiple conditions using AND statements to create specific rules.
-
Click Save to apply the criteria.
-
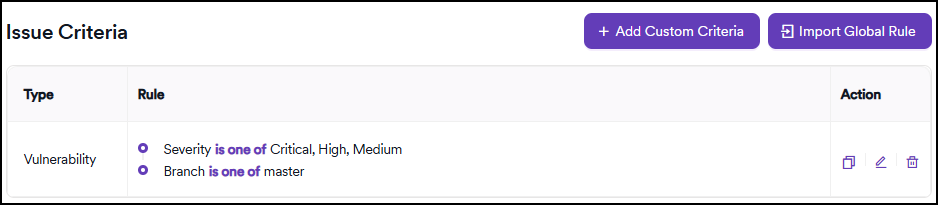
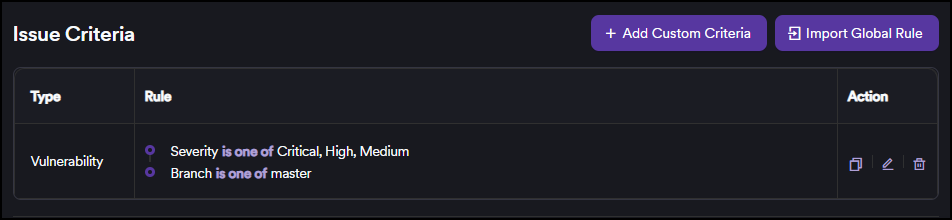
The saved rule appears in the issue criteria table. From here, you can edit (pencil icon), delete (trash bin icon), or duplicate (copy icon) the rule.
-
After saving, the criteria appear in the criteria table. You can also import globally defined presets by clicking Import Global Preset.
- Click Save on the bottom of the page to apply your configuration.
Use combined conditions to target specific vulnerability types. For example, you can create criteria that open issues only for vulnerabilities discovered in the default branch by a specific scanner that fall into certain OWASP categories with high and critical severity.
Automatic issue closure
When a vulnerability's status transitions to Closed in Invicti AppSec, the platform automatically attempts to close the associated issue in the issue manager. If the initial attempt fails, Invicti AppSec runs a scheduled job that retries closing the issue on a daily basis at 12 AM.
Need help?
Invicti Support team is ready to provide you with technical help. Go to Help Center