Deployment: Invicti Platform on-demand, Invicti Platform on-premises
Scan REST APIs
Invicti Platform can scan REST APIs. This document explains how to import a REST API specification file to a target and scan for vulnerabilities in your REST APIs. Alternatively, you can link to a hosted location containing your REST API definitions and scan that location for vulnerabilities. For information about REST APIs, refer to the section at the end of this document.
The processes described in this document are different from the Link Target option available with Invicti API Security Standalone or Bundle. To scan REST APIs from your API Inventory in Invicti, refer to the Link discovered APIs to targets document.
Scanning production APIs should be conducted with care. Some scanning methods may result in data deletion. It's recommended to:
- Carefully consider the permissions (authentication) you provide and which methods (PUT, POST, DELETE) are used.
- Manually exclude API operations (methods with endpoints) from the uploaded/linked file to prevent destroying or making undesirable changes to the production application.
If your API requires authentication, configure the credentials in the target's Authentication settings before scanning. API targets also support IDOR / BOLA authentication for multi-session access control testing. For details, refer to the IDOR/BOLA authentication document.
Why this matters
REST APIs expose your application's data and operations directly, often with less protection than a web front end, so untested endpoints are a common way attackers reach sensitive data. Giving Invicti your API definition lets it discover and attack every declared operation - including methods a crawler would never find on its own - so you catch vulnerabilities across the full API surface before release.
Scan a REST API for vulnerabilities
To scan a REST API for vulnerabilities with Invicti, you must provide the scanner with access to the API definitions. There are two ways to do this:
-
Option A: Import from a file
- This method involves uploading an OpenAPI3, Swagger2, RAML, WADL, or Postman collection specification file to a target.
-
Option B: Link to a URL
- This method adds a link to the target's URL, pointing to the location of the API definitions (for example, target.com/api/swagger.json).
Once you start a scan of that target, Invicti parses the imported specification file or accesses the linked URL and adds the necessary REST requests to the scanner. The following sections outline each method and provide instructions for starting a scan of your REST APIs.
Option A: Import from a file
Importing a specification file to a target means that whenever you update your REST API, you need to replace the imported specification file to ensure you're scanning the latest version of your REST API.
Upload a file to a target and start a scan
-
Ensure your REST API specification file is accessible for upload on the machine where you're accessing Invicti.
- Invicti supports these file formats: .json, .yaml, .yml, .raml, and .wadl.
-
Select Inventory > Targets from the left-side menu.
-
Click the three-dot menu (⋮) > Edit target by the target to which you import the file.
-
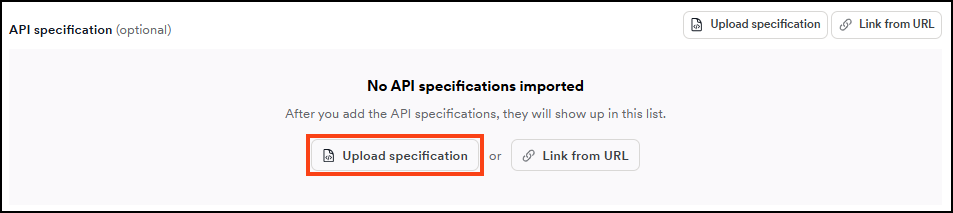
In the Scan Configuration section, select General. Then, use one of the two options to upload your file.
- API specification
- Postman collection
- Click Upload specification to add your file.
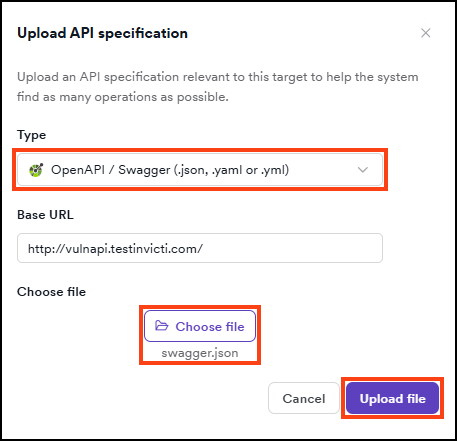
- Select the type of your REST API specification file, choose your file, then click Upload file. The file uploads automatically and appears in the API specification section of the Scan Configuration.
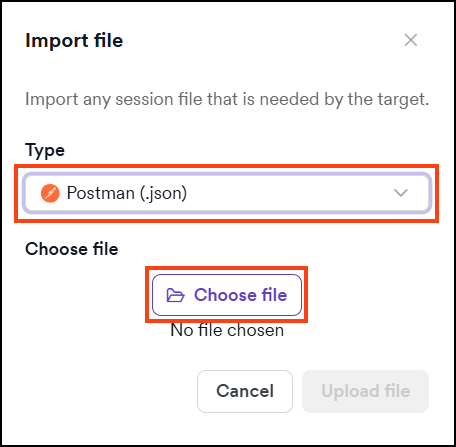
- Click Upload file to add your file.

- Select Postman (.json) type, choose your file, then click Upload file. The file uploads automatically and appears in the Imported file section of the Scan Configuration.
- The file is now imported to the target.
If you want to scan only the imported file and not all the other paths belonging to the target, select Yes next to Restrict scans to imported files and API specifications and save before starting the scan.
- To initiate a scan at a later time, click Save target configuration. To begin scanning the target now - including the imported file - click Scan and choose the default settings or customize them.
- When the scan is complete, go to the Vulnerabilities tab on the Scan details page for information about detected vulnerabilities in your REST API, which Invicti marks with an API tag next to the severity label.
- Filter the list by Target type > API only to limit the displayed results to vulnerabilities identified in your REST API.
- For more information about viewing scan results and vulnerabilities, refer to the following documents:
Option B: Link to a URL
Linking a URL to a target means you're adding the URL of the hosted location that holds your REST API definitions. This allows Invicti to always scan the latest version of your REST API without the need to provide a new specification file each time you update your API.
The engine accesses linked URLs. This means the engine or internal agent (if using one for the target) needs access to any linked URLs.
Link a URL to a target and start a scan
-
Select Inventory > Targets from the left-side menu.
-
Click the three-dot menu (⋮) > Edit target by the target to which you link the specification. The Configure target page opens.
-
In the Scan Configuration section, select General, then click Link from URL.
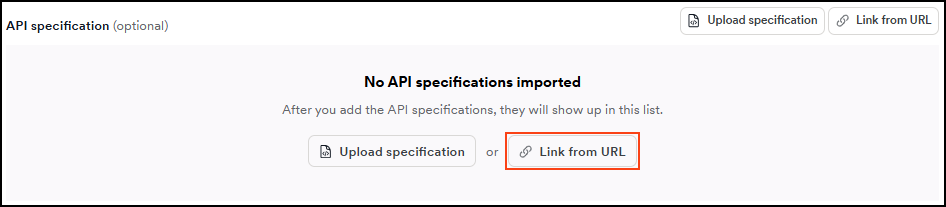
- Choose the type of your specification file, enter the URL where it's hosted, then click Link API specification. The URL appears in the API specification section of the Scan Configuration.
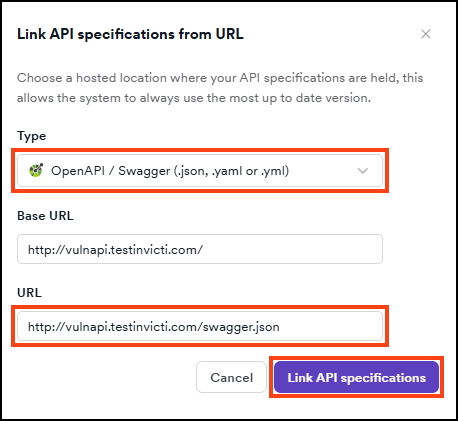
- The URL is now linked to the target.
If you want to scan only the linked API definition and not all the other paths belonging to the target, select Yes next to Restrict scans to imported files and API specifications and save before starting the scan.
- To initiate a scan at a later time, click Save target configuration. To begin scanning the target now - including the linked specification - click Scan and choose the default settings or customize them.
- When the scan is complete, go to the Vulnerabilities tab on the Scan details page for information about detected vulnerabilities in your REST API, which Invicti marks with an API tag next to the severity label.
- Filter the list by Target type > API only to limit the displayed results to vulnerabilities identified in your REST API.
- For more information about viewing scan results and vulnerabilities, refer to the following documents:
Preview API specification operations
After uploading or linking a REST API specification (OpenAPI/Swagger) in target settings, you can preview the operations included in the specification to verify its contents before scanning.
View API operations
The preview displays a table showing:
- HTTP methods (GET, POST, PUT, DELETE, etc.)
- Endpoint paths
To view the preview:
- Select Inventory > Targets from the left-side menu.
- Click the target and then Edit.
- Under Scan configuration, choose General.
- Click the API specification to open the preview drawer.
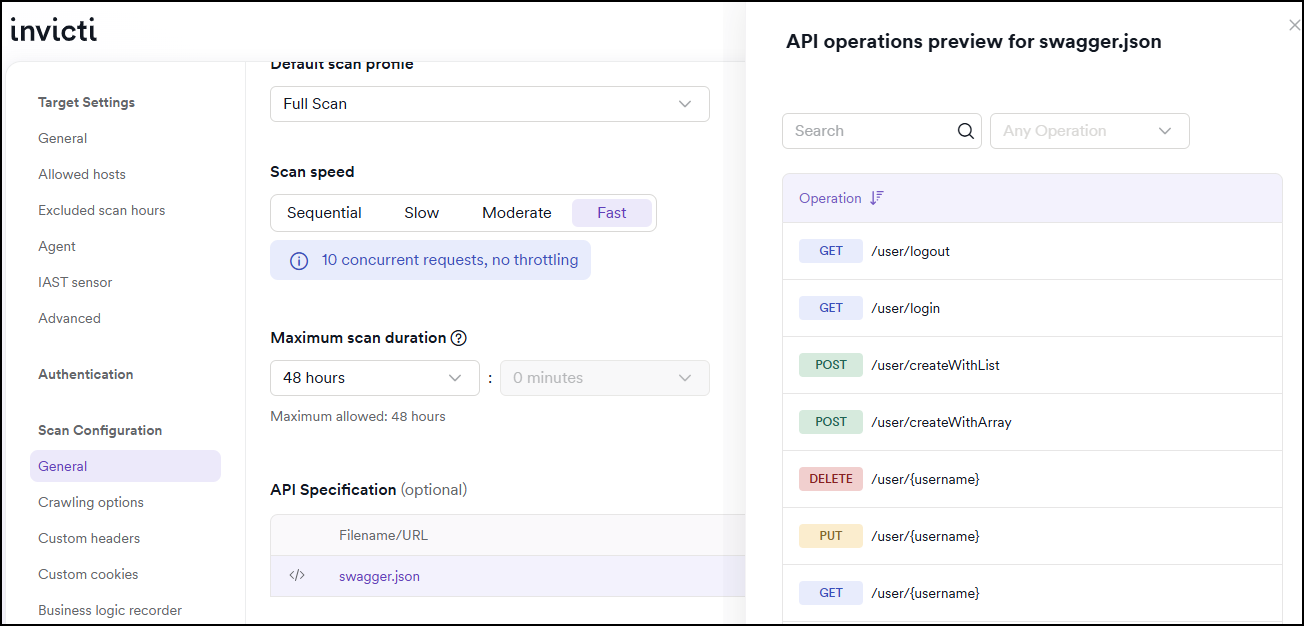
This helps you understand which API operations are included in the scan and verify that the specification contains the expected endpoints.
The preview feature is currently available only for REST APIs (OpenAPI/Swagger specifications). GraphQL and WSDL specifications don't support preview at this time.
If a scan doesn't test your API or can't reach a linked specification, refer to Troubleshooting API scans.
About REST
REST (Representational State Transfer) is an architectural style that can be used to communicate with web services. REST has a lot in common with protocols such as SOAP. It's used as a communication mechanism between two applications, or between an application and an online service. Many mobile web applications communicate with a REST API at the backend to communicate with the online service.
Differences between a web service and a REST API
Many web services rely on complex communication mechanisms such as SOAP, RPC, and CORBA. REST uses the standard HTTP methods for all four CRUD (Create, Read, Update, Delete) operations.
Commonly used HTTP methods in REST APIs
This list shows the commonly used HTTP methods (verbs) in REST:
- POST - create a resource.
- GET - retrieve a resource.
- PUT - change the state of a resource or update it.
- DELETE - remove or delete a resource.
Challenges of scanning REST APIs
Unlike RPC and others, REST can be easily consumed and understood by users because of its simple structure. For example, many REST-based web services can provide a response in JSON or XML format. But this same benefit is what makes it very difficult for an automated web vulnerability scanner to crawl and attack.
Lack of standards for REST
There's no consistent standard for REST API, as there is for WSDL and other similar protocols. Most RESTful web services have their own documentation, useful for developers but useless to automated web vulnerability scanners.
A number of projects aim to standardize the REST API:
Using parameters in URLs
Another challenge automated scanners encounter when scanning RESTful web services for vulnerabilities is that REST APIs use parameters in URLs.
For example, in the HTTP GET request following, 123 is a parameter and not a directory in the web application:
Need help?
Invicti Support team is ready to provide you with technical help. Go to Help Center