Comparison Report (Invicti Standard)
The Comparison Report in Invicti Standard enables you to compare two or more scan reports.
- This helps you to track changes in your web applications.
- You can compare scan sessions conducted at different times, using either the currently active scan session or previously completed scans (stored by default in
C:\Users\[username]\Documents\Invicti\Scans).
- Invicti displays the results chart, so you can gain an overview of how the security state has evolved over time and whether previously detected vulnerabilities have been fixed.
- This report is ideal for non-technical roles, such as executives and managers.
- Currently, only the Invicti Standard edition allows you to generate a Comparison Report. You can access a report with similar information in Invicti Enterprise (see Trend Matrix Reports).
Click to view a sample Comparison Report.
For further information, see Overview of Reports, Report Templates, and Built-In Reports.
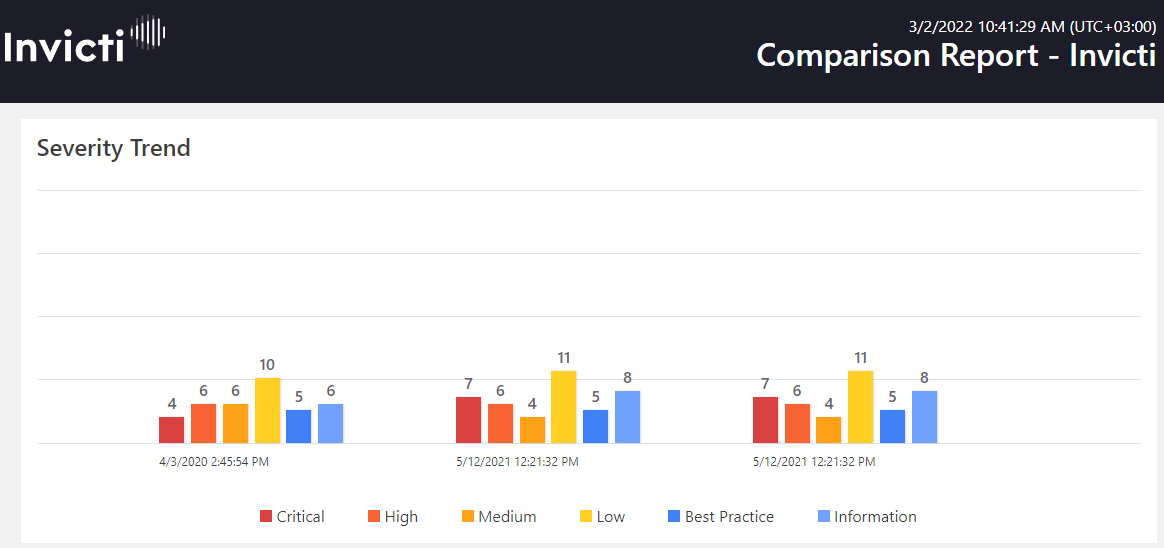
Severity Trend
This chart allows you to view how the number of vulnerabilities and Vulnerability Severity Levels have changed over time.

Vulnerability Summary
This section provides a summary of information about each discovered vulnerable URL and categorizes them based on their severity. For example, if Invicti determines a vulnerability as Critical, it requires immediate attention.
This table lists and explains the columns in the Vulnerability Summary.
| Column | Description |
|---|---|
| CONFIRM | This shows whether Invicti has verified a vulnerability. |
| VULNERABILITY | This displays the name of the issue and provides a link to a detected issue that attackers can exploit. |
| METHOD | This is the HTTP method of the request in which Invicti sent the payload. It demonstrates what Invicti deployed in order to identify an issue. |
| URL | This is a reference to a resource that contains the issue. |
| PARAMETER | This is the variable used to identify the issue. |
| Date and Time | This shows when a scan was run. New: This indicates that this issue has been identified for the first time. Not Existing: This indicates Invicti had not found this vulnerability in previous scans but identified it in the new scan. Not Fixed: This indicates the vulnerability has not been fixed. Fixed: This indicates the vulnerability has been fixed. Revived: This indicates that the issue had been fixed in previous scans but revived again. |
How to Generate a Comparison Report in Invicti Standard
- Open Invicti Standard.

- From the ribbon, select the File tab. Local Scans are displayed. Double-click the relevant scan to display its results. (This will be the first scan you want to add to the report.)
- From the Reporting tab, click Comparison Report. The Save Report As dialog box is displayed, prompting you to save the report in your preferred location.
- Select a save location and click Save.
- The Export Report dialog is also displayed at this point, with the Path field already populated from the previous dialog.

- From the Export Report dialog, you can decide on:
- Policy: Select the default policy or customized policy report(s) (see Custom Report Policies).
- Format: Select HTML and/or PDF format.
- Vulnerability Options (select one or all):
- Export Confirmed: Includes confirmed vulnerabilities.
- Export Unconfirmed: Includes unconfirmed vulnerabilities.
- Export All Variations: If Invicti identified some passive or Information level issues in more than one page, it does not show all these variations. You can change this by enabling or disabling this option.
- Header and Footer: Enter relevant information that will appear in the header and footer section of the report.
- Open Generated Report: When selected, your report(s) will be shown when you click Save.
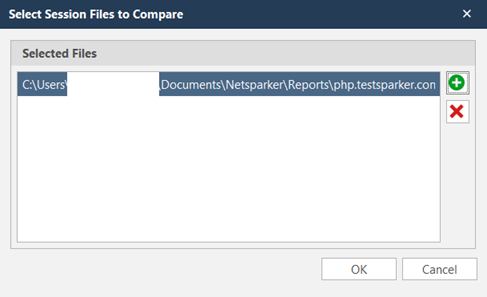
- Click Save. The Select Session Files to Compare window is displayed, prompting you to add more than one previously completed scan.
- Click OK to generate your report.
How to Generate the Comparison Report in Invicti Standard without Starting a New Scan
- Open Invicti Standard.

- From the Reporting tab, click Comparison Report. The Save Report As dialog box is displayed, prompting you to save the report in your preferred location.
- Select a save location and click Save.
- The Export Report dialog is also displayed at this point, with the Path field already populated from the previous dialog.

- From the Export Report dialog, you can decide on:
- Policy: Select the default report policy or customized report policy (see Custom Report Policies).
- Format: Select HTML and/or PDF format.
- Vulnerability Options (select one or all):
- Export Confirmed: Includes confirmed vulnerabilities.
- Export Unconfirmed: Includes unconfirmed vulnerabilities.
- Export All Variations: If Invicti identified some passive or Information level issues in more than one page, it does not show all these variations. You can change this by enabling or disabling this option.
- Header and Footer: Enter relevant information that will appear in the header and footer section of the report.
- Click Save. The Select Session Files to Compare window is displayed, prompting you to add more than one previously completed scan.

- Click OK to generate your report.
Invicti Standard compares scan results based on date and time, and creates a chronological report.
Need help?
Invicti Support team is ready to provide you with technical help. Go to Help Center