Post-request scripts
Post-request scripts allow you to access and manipulate responses, set global environments for use in subsequent scans (in coordination with pre-request scripts), and improve scan coverage and accuracy.
This document covers when to use post-request scripts, how to enable them, and how to write, test, debug, and validate them.
Post-request script usage
Post-request scripts are typically used in the following scenarios:
- Case 1: Verifying if the request was successful and logging the status
- Case 2: Parsing a JSON response to extract a token (e.g., from a login response)
- Case 3: Checking for a specific message within a JSON response
For more details and examples, refer to the Use cases section.
Enable Post-request scripts
Invicti scanners can manipulate responses since they run Post-Request Scripts automatically after a dispatched request.
You can write your script in the Post-Request Scripts tab. Alternatively, you can write it in any text editor and copy it in.
Enable a Post-request script in Invicti Enterprise On-Premises
- Select Scans > New Scan from the left-side menu.
- In the Scan Settings section, click Post-Request Script to display the new section.
- Enable the Enabled checkbox.
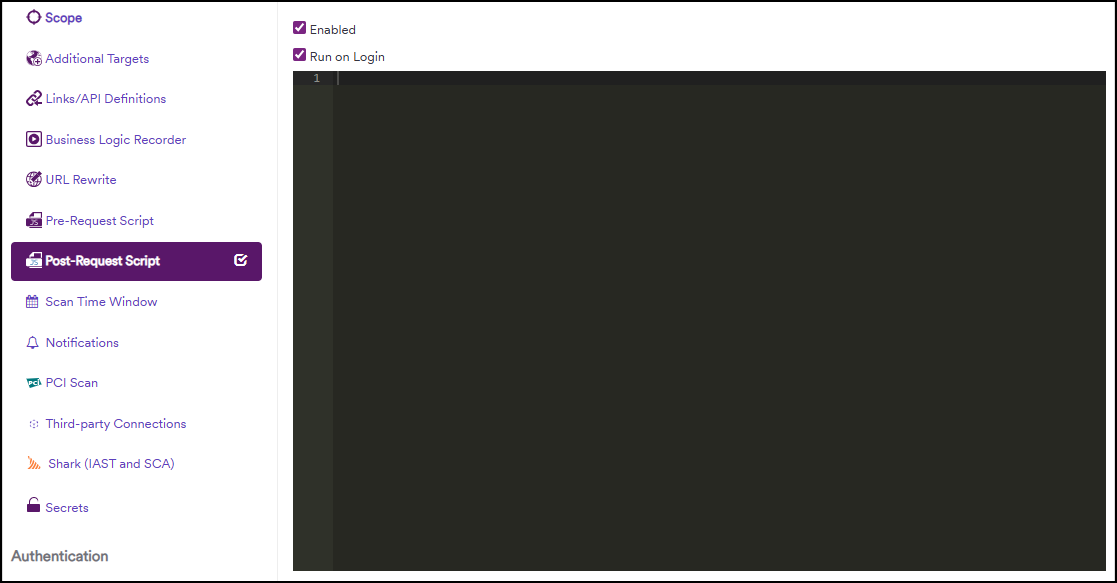
- Enable the Run on Login checkbox to execute the script on the login response.
- Write your script using JavaScript.
Enable a Post-request script in Invicti Standard
- In the Home tab, click New to open a new website or service to scan.
- In the Scan Settings section, click the Post-Request Script to display the new section.
- Enable the Enabled checkbox.
- Enable the Run on Login checkbox to execute the script during the login response.
- Write your script using JavaScript.
Test Post-request scripts
Invicti Enterprise and Standard can check the script syntactically to make sure that it does not contain any errors. When the scanner verifies that the script contains no errors, you can begin scanning.
Test a Post-request script in Invicti Enterprise
- Write a Post-Request script as explained in the Enable a Post-Request Script in Invicti Enterprise section.
- Click the Test Script button to validate if it works properly. If Invicti finds no error in your script, a confirmation dialog is displayed.
- Click Launch to start the scan.
- Once the scan has completed, if you used the
logInfo,logWarn,logErrorfunctions in your script, they can be seen in the logs. - To access logs, navigate to the Scan Summary and click the arrow by Download Scan Data button and click Download Scan Data for Windows.
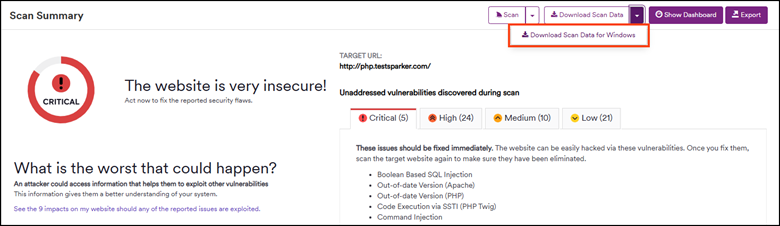
To access the Scan Summary:
- Select Scans > Recent Scans from the left-side menu.
- Click on any of the numbers in the Results column to access the Scan Summary.
Test a Post-request script in Invicti Standard
- Write a Post-Request script as explained in the Enable a Post-Request Script in Invicti Standard section.
- Click the Test Script button to validate if it works properly. If Invicti finds no error in your script, a confirmation dialog is displayed.
- Click Start Scan to begin the scanning.
- Once the scan has completed, you can view the effect of the post-request scripts in the logs.
Scanning with post-request scripts in Invicti Enterprise On-Demand
To use a post-request script in Invicti Enterprise On-Demand you need to submit a ticket to our Support Team. Only a support engineer can add a Post-Request script in your account.
- Once activated, write your own post-request script.
- Then, create a scan profile configured for the post-request script in Invicti Enterprise On-Demand.
- Share your script with the Support engineers. They will add the script to the customized scan profile and update it.

How to write post-request scripts
To write a post-request script, you need to specify the global variables; facets, objects and helpers; and the flow of the script (examples provided below). Even though the main goal remains the same, the implementation can vary according to your needs.
In this section we will explain the building blocks in turn and post-request script use cases.
Global Variables
In any programming language, variables are very important for storing values and retrieving them later. You can use variables to change some part of a request dynamically. Invicti's Post-Request ScriptsS enable you to use these variables with the Post and Pre-Request Scripts.
invicti.setGlobalVariable('responseStatusCode', response.StatusCode);
invicti.setGlobalVariable('responseStatusText', response.StatusText);
invicti.setGlobalVariable('responseBody', response.Body);
You can also use a secret as a global variable. For more information, refer to the Secrets document.
The building blocks of post-request scripts: facets, objects and helpers
Facets, objects and helpers are among the ingredients of the post-request scripts feature that you can use when writing scripts. You can use the request object to access the current request Invicti is about to send. This object also allows you to modify the HTTP request.
response.Body
Accessing the response.body is crucial for post-request scripts. The HTTP Requester provides the response body when we send requests during a scan.
response.StatusCode
Method to get the status code of the response (200, 404, 503, etc.).
response.StatusText
Method to get the status text of the response (OK, Not Found, etc.).
Invicti
The object invicti offers some properties and methods that can be useful while writing a pre-request script.
The most important one amongst them is the request method. It helps to initiate HTTP requests in a pre-request script. As shown, it is very useful when request chaining is needed.
var request = new Request('http://example.com/action');
request.parameters.add(new Parameter('foo', 'bar', 1));
var res = invicti.request(request);
CryptoJS
Invicti's Post-Request Script feature can use the CryptoJS library. CryptoJS is a growing collection of standard and secure cryptographic algorithms implemented in JavaScript using best practices and patterns.
Here is an example: Hashing response body with SHA512
responseBody = response.Body;
CryptoJS.SHA512(responseBody);
invicti.isLoginContext
This flag indicates whether the current context is a login process.
Use cases
Case 1: Basic check and log
This script checks if the request was successful and logs the status.
if (response.StatusCode === 200) {
  console.log("Request was successful!");
  console.log("Status: " + response.StatusCode + " " + response.StatusText);
  // You could also store the body if needed for simple logging or verification
  // invicti.setGlobalVariable('lastSuccessfulResponseBody', response.Body);
} else {
  console.error("Request failed or returned a non-200 status.");
  console.error("Status: " + response.StatusCode + " " + response.StatusText);
  // invicti.setGlobalVariable('lastFailedResponseBody', response.Body);
}
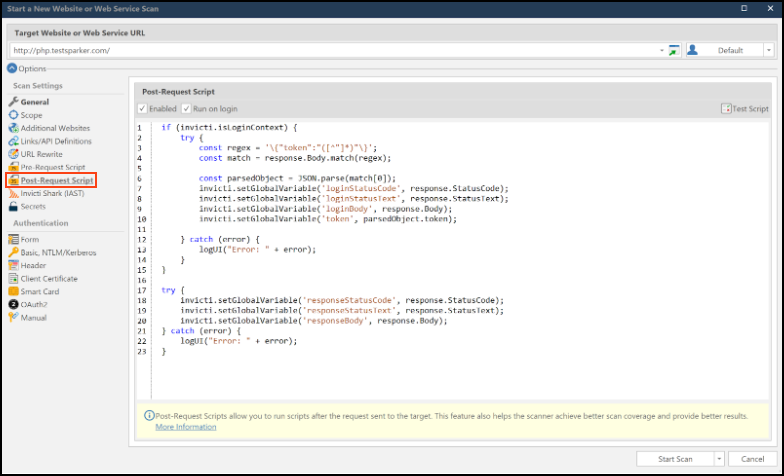
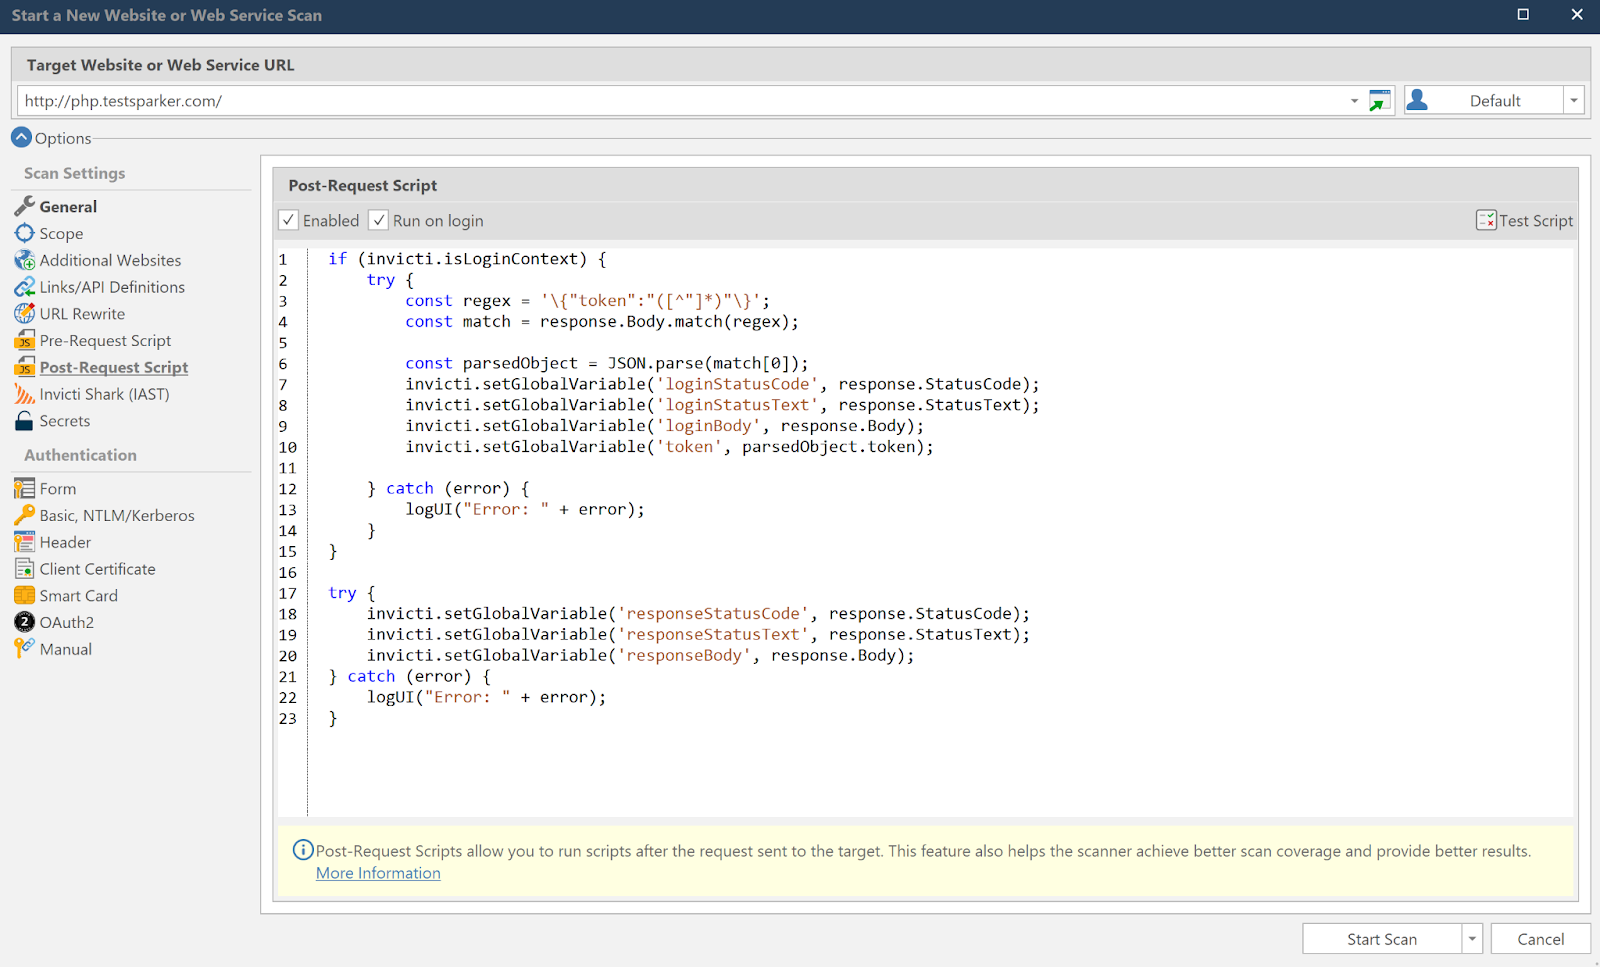
Case 2: Parsing JSON and extracting a token from login response
This script assumes the response body is JSON and tries to extract a token. isLoginContext indicates that it is a response to a login process. It runs only at the beginning of the scan.
if (invicti.isLoginContext) {
  if (response.StatusCode === 200) {
    try {
      // Attempt to parse the response body as JSON
      var jsonData = JSON.parse(response.Body);

      // Check if the token exists in the parsed JSON
      // Adjust 'data.token' or 'session_token' based on your actual JSON structure
      if (jsonData && jsonData.token) {
        var authToken = jsonData.token;
        console.log("Auth Token Extracted: " + authToken);
        // Store the token in a global variable for use in subsequent requests
        invicti.setGlobalVariable('authToken', authToken);
      } else if (jsonData && jsonData.session_token) { // Alternative token key
        var sessionToken = jsonData.session_token;
        console.log("Session Token Extracted: " + sessionToken);
        invicti.setGlobalVariable('authToken', sessionToken);
      } else {
        console.warn("Token not found in the expected JSON structure.");
      }
    } catch (error) {
      console.error("Failed to parse response body as JSON: " + error);
    }
  } else {
    console.error("Login request failed. Status Code: " + response.StatusCode);
  }
}
Case 3: Conditional logic based on response content
This script checks for a specific message in a JSON response.
if (response.StatusCode === 200) {
  try {
    var jsonData = JSON.parse(response.Body);

    // Example: Check for a specific status message in the JSON
    if (jsonData && jsonData.status === "success" && jsonData.message === "User logged in successfully") {
      console.log("User login confirmed by server message.");
      if(jsonData.user_id){
        invicti.setGlobalVariable('loggedInUserId', jsonData.user_id);
        console.log("User ID: " + jsonData.user_id + " stored.");
      }
    } else if (jsonData && jsonData.status === "error") {
      console.warn("Server reported an error: " + jsonData.message);
      // invicti.setGlobalVariable('lastErrorMessage', jsonData.message);
    } else {
      console.log("Response JSON parsed, but no specific action taken.");
    }
  } catch (error) {
    console.error("Failed to parse response body as JSON: " + error);
  }
} else {
  console.warn("Received a non-200 status code: " + response.StatusCode);
}
Debugging post-request scripts
The Post-Request Script panel only allows you to check the code's syntax. If you need further assistance, Invicti offers some helper functions that you can use while writing your scripts.
logUI
This function logUI("Error: " + error); allows you to print out messages to log panels in the UI. It helps you to debug your code.
logInfo, logWarn, logError
Instead of printing out messages to the UI Logs panel directly, you can write them into Invicti's log file with different levels (Activity Tracking, Verbose, Information, Warning, Error, and Critical).
Writing to a log file depends on the Logging Levels you selected. For example, if you select the Critical level, only Critical level messages will be shown in the log file (not Warning or Error level ones). You can change the Logging Levels setting in the Logging tab in the Options dialog.
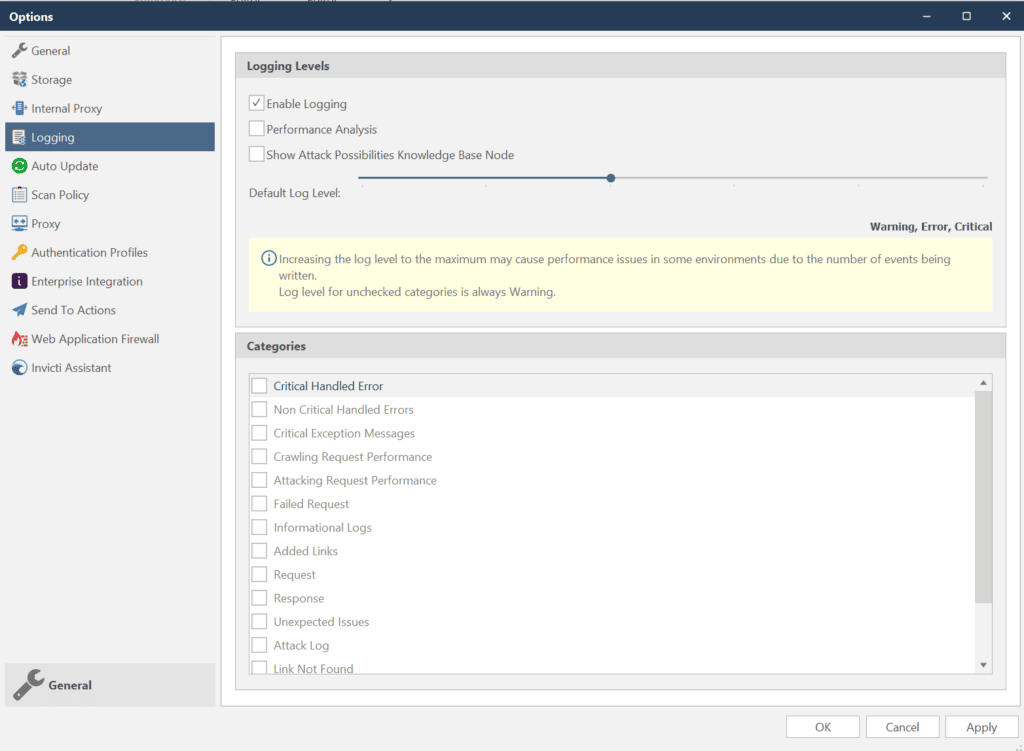
At the default level, information level logging messages will not be shown in the nstrace file. Nevertheless, the logUI function can directly write to the log panel in the UI. It does not depend on the Logging Levels setting.
You can view the log files produced by Invicti from the scan directory located at C:\Users\USER\Documents\Invicti\Scans\. For more information, refer to the Logging document.
Verify post-request scripts
Invicti can check the script syntactically to make sure that it doesn't contain any errors. To see whether the post-request script worked in your scan, you need to use a pre-request script and manually verify it.
To verify the post-request script, follow those steps:
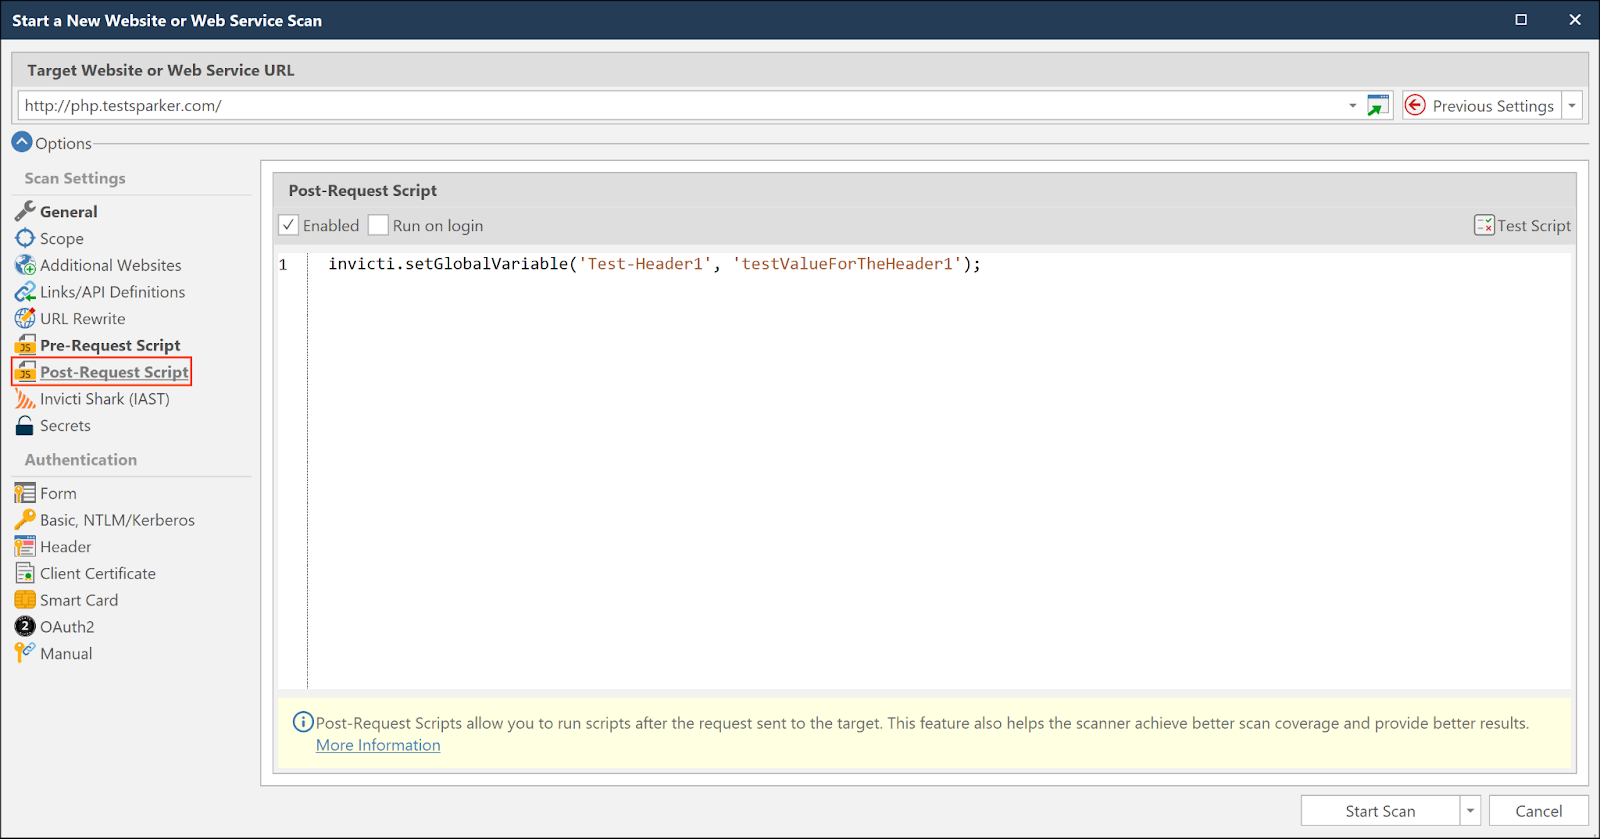
- Add a global variable in your post-request script to validate its effectiveness. It will be used to confirm that the correct value has been set by the post-request script.
invicti.setGlobalVariable('Test-Header1', 'testValueForTheHeader1');
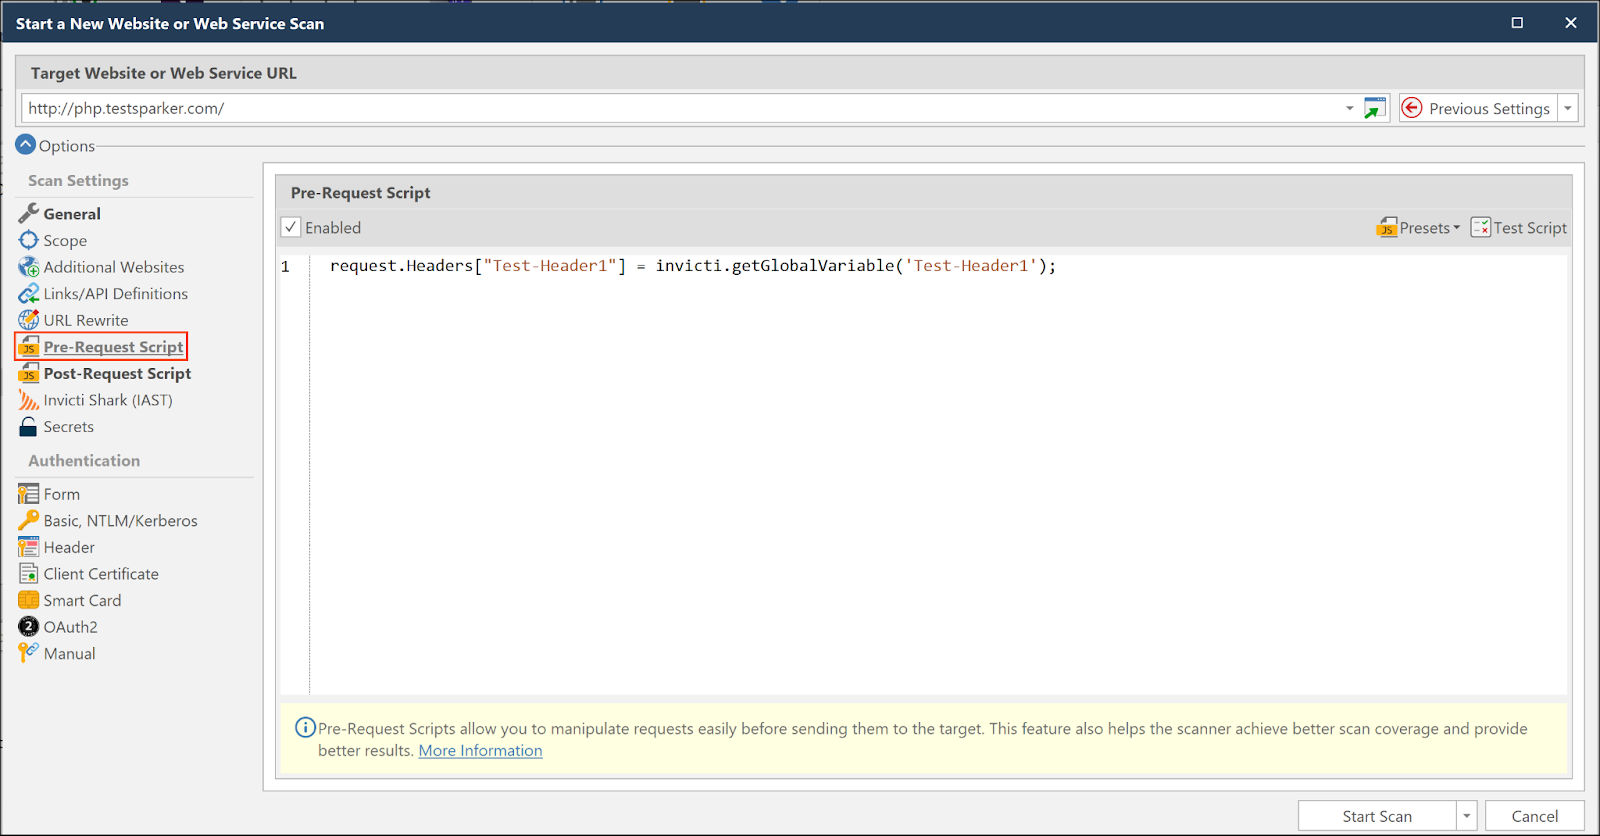
- Refer to that global variable in the pre-request script. The pre-request script will add this header to the requests, allowing you to view it in the user interface.
request.Headers["Test-Header1"] = invicti.getGlobalVariable('Test-Header1');
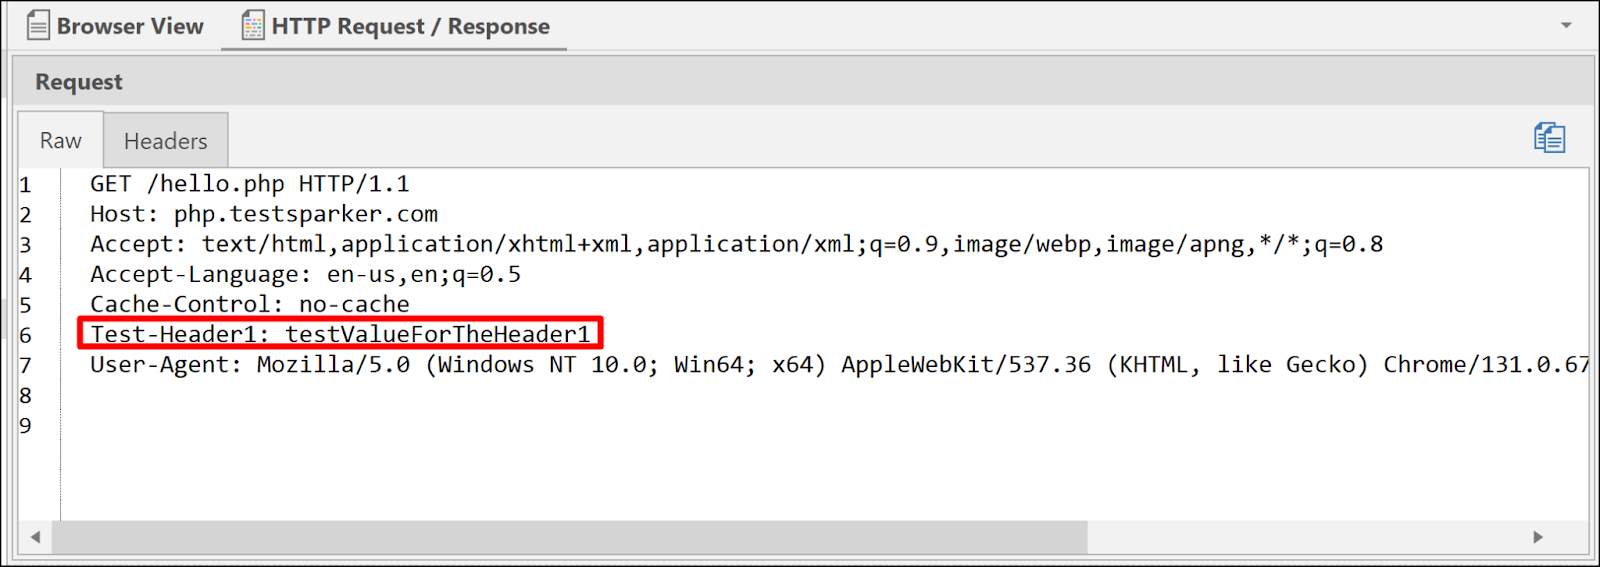
- Check the HTTP Request/Response after the scan. For more details on this step, refer to the below-mentioned sections for Invicti Enterprise and Invicti Standard.
Verify requests and responses in Invicti Enterprise
- Select Scans > Recent Scans from the left-side menu.
- Next to the relevant scan, select Report.
- Scroll down to the Technical Report section and select the Issues tab.
- From the Scan Summary section, select one of the issues you want to check.
- Select the Request/Response tab to verify whether your script is added to the request.
Verify requests and responses in Invicti Standard
- Click the File tab in the ribbon to display local scans.
- Double-click the relevant scan to display its results.
- From the Sitemap panel, select one of the issues you want to check.
- Select HTTP Request/Response > Raw to check whether your script is added to the request.
Need help?
Invicti Support team is ready to provide you with technical help. Go to Help Center