Deployment: Invicti Platform on-demand, Invicti Platform on-premises
Scan dynamic URL target
For Dynamic URL (also known as ephemeral) targets, scans can only be triggered via the API or during CI/CD. They can't be initiated from the UI with the dynamic URL.
For instructions on how to add a dynamic URL target, refer to the linked document.
All scans are associated with the same dynamic URL (ephemeral or short-lived) target, even though they're performed on different URLs.
There are two ways to scan a dynamic URL target:
- Scan a dynamic target via API
- Using any of the CI/CD integrations - just select your ephemeral target in the Asset field.
This document walks you through triggering a scan using API through Visual Studio.
All scans must comply with the Authorized target scanning policy. Review this document before executing the scans.
Scan a dynamic URL target via API
To scan a dynamic URL target using Visual Studio:
- Open Visual studio, paste in the following sample script, and amend the variables.
POST https://platform.invicti.com/api/v1/scans HTTP/1.1
Content-Type: application/json
accept: application/json
X-Auth-Token: {YOURTOKEN}

{
  "user_authorized_to_scan": "yes",
  "target_id": "{YOUTARGETID}",
  "profile_id": "11111111-1111-1111-1111-111111111117",
  "schedule": {
    "disable": false,
    "time_sensitive": true,
    "history_limit": 10,
    "triggerable": false
  },
  "max_scan_time": 0,
  "incremental": false,
  "address": "{YOURTESTURL}"
}
{YOURTOKEN}: Replace with your Invicti Platform API key.{YOUTARGETID}: Replace with the target ID taken from Inventory > Targets > Target ID in the right-side drawer.{YOURTESTURL}: Replace with the URL you would like to scan.
-
Execute the script in Visual Studio to trigger the scan via the API.
-
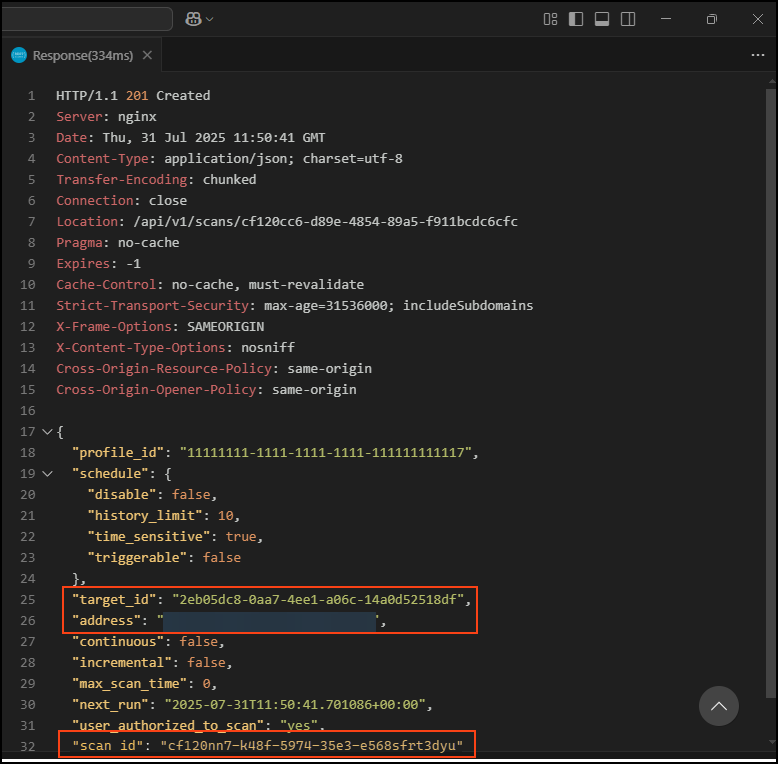
The response then looks similar to this.
-
If you navigate to the Scans > DAST scans page, you see a scan starting.
-
Using the scan_id, you can locate the scan in Invicti Platform.
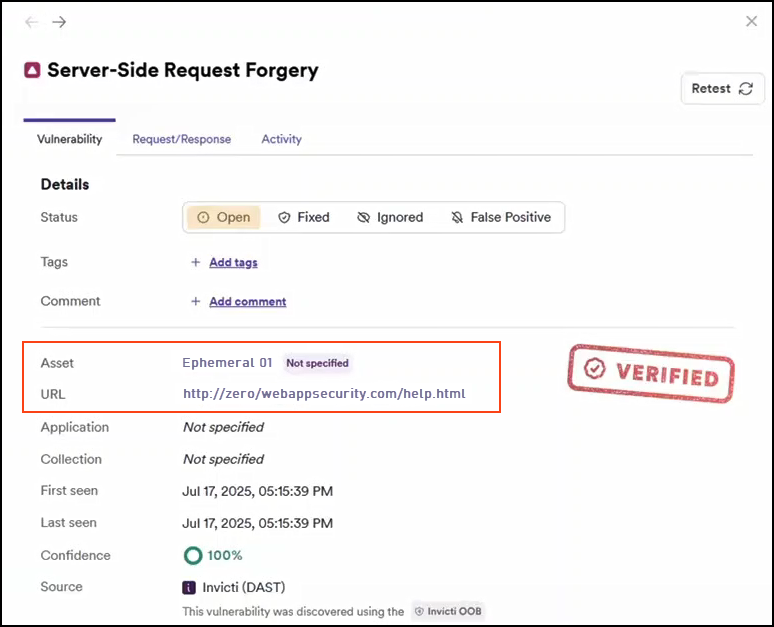
Find what URL was used for a scan
To see what URL was used for a Dynamic URL target scan follow these steps:
-
Select Scans from the left-side menu to open the DAST scans page.
-
Select the scan you want to review.
-
Go to the Vulnerabilities tab, select a specific vulnerability, and view the associated URL in the panel that appears on the right.
Alternative scan options
- Instant scan - starts a scan immediately on the selected target.
- Future scan - schedules a one-time scan for a specific date and time.
- Scheduled scan - sets up recurring scans through DAST scan schedules.
- Recurring scan - sets up automated recurring scans from the DAST scans page.
- Incremental scan - scans only newly discovered or modified pages.
- PCI ASV scan - runs official PCI DSS compliance scans through Clone Systems.
Need help?
Invicti Support team is ready to provide you with technical help. Go to Help Center