Package: Invicti AppSec Enterprise (on-premise, on-demand)
Polaris fAST Static
Invicti AppSec supports Polaris fAST Static (formerly Black Duck fAST) as a SAST (Static Application Security Testing) scanner. This guide explains how to activate and configure the Polaris fAST Static integration.
Polaris fAST Static is a fast, cloud-native static application security testing solution by Synopsys (now Black Duck). It provides rapid SAST scanning with low false-positive rates.
Prerequisites
Before starting the integration, ensure you have the following information from your Polaris account:
| Field | Description | Required |
|---|---|---|
| Token | API access token generated from your Polaris account | Yes |
| URL | Your Polaris instance URL (e.g., https://<your-org>.polaris.blackduck.com) | Yes |
Get a token (on Polaris Side)
- Log in to your Polaris instance.
- Go to your profile by clicking on your username (upper left-hand corner).
- Click Access Tokens.
- Click Create New Token.
- Enter a token name and save.
- Copy the generated token immediately (it won't be shown again).
Step 1: Navigate to Integrations
From the left sidebar menu, click Integrations.
Step 2: Select the SAST Tab
On the Integrations page, you will see the Scanners section with multiple tabs. Click the SAST tab (it is selected by default).
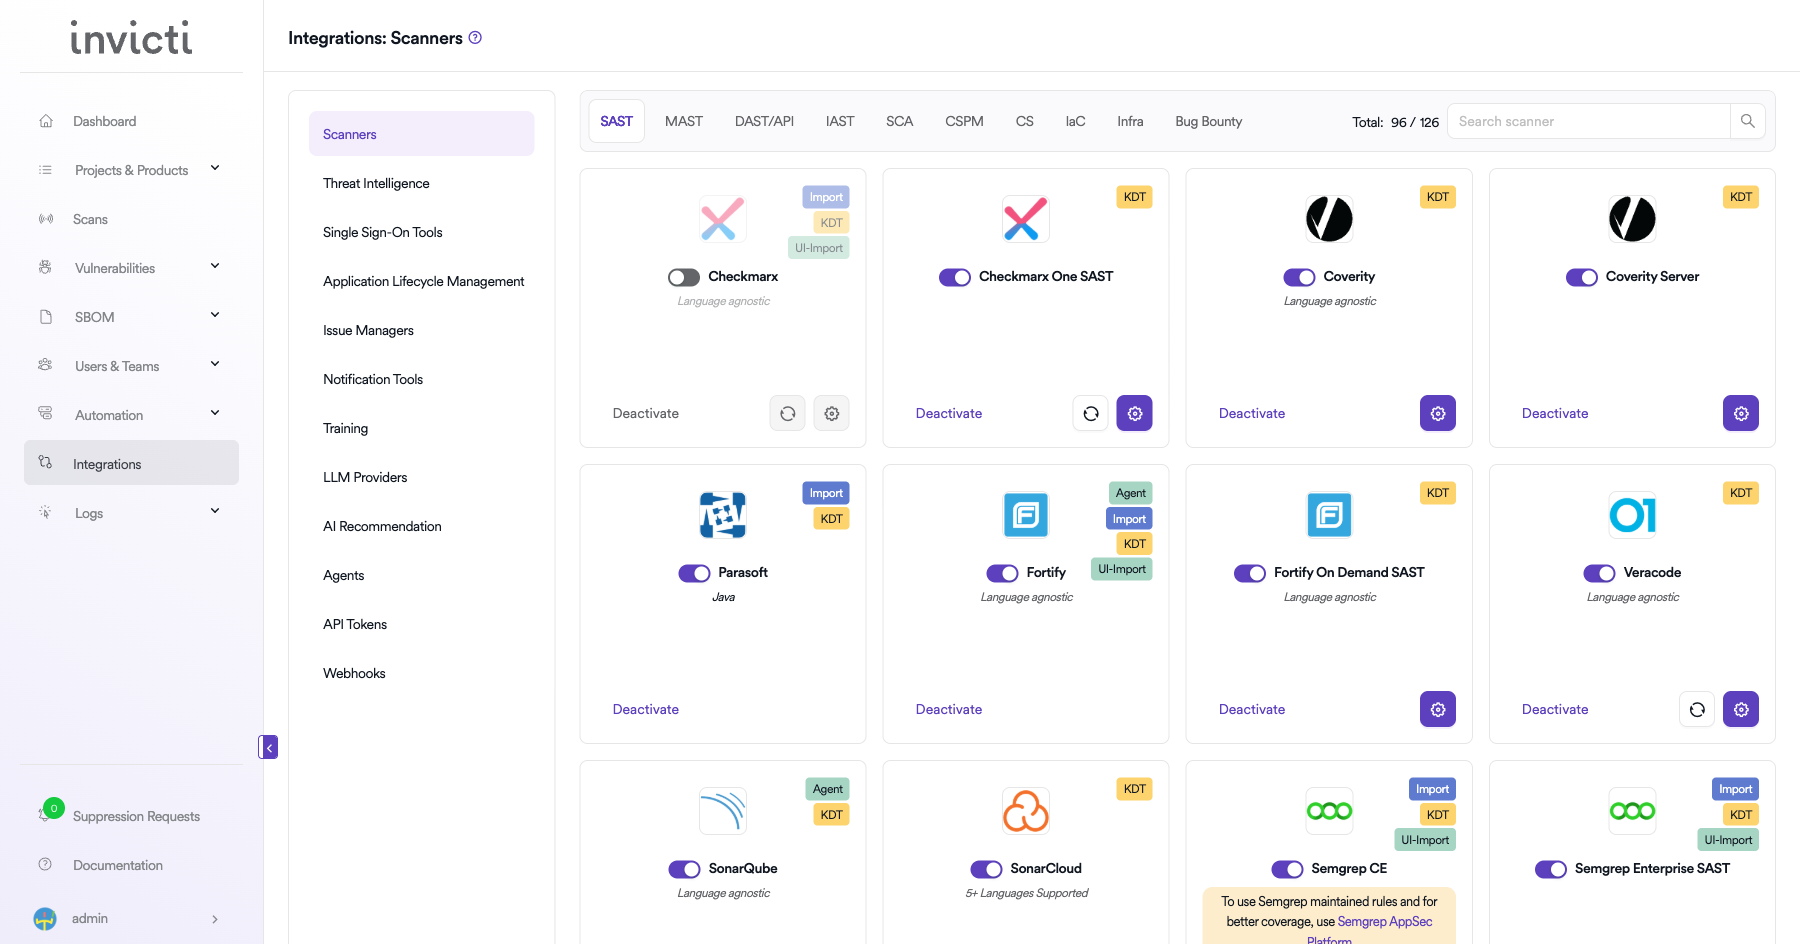
Step 3: Find and Activate Polaris fAST Static
Scroll through the list of SAST scanners to find Polaris fAST Static.
- If Polaris fAST Static is not activated, you will see an "Activate" button. Click it to enable the integration.
- If Polaris fAST Static is already activated, you will see a toggle switch in the ON position and a "Deactivate" button, along with a gear icon for configuration.
The scan method badge on the Polaris fAST Static card shows KDT, which means scans are triggered through the Kondukto CLI tool (KDT).
Step 4: Configure Connection Settings
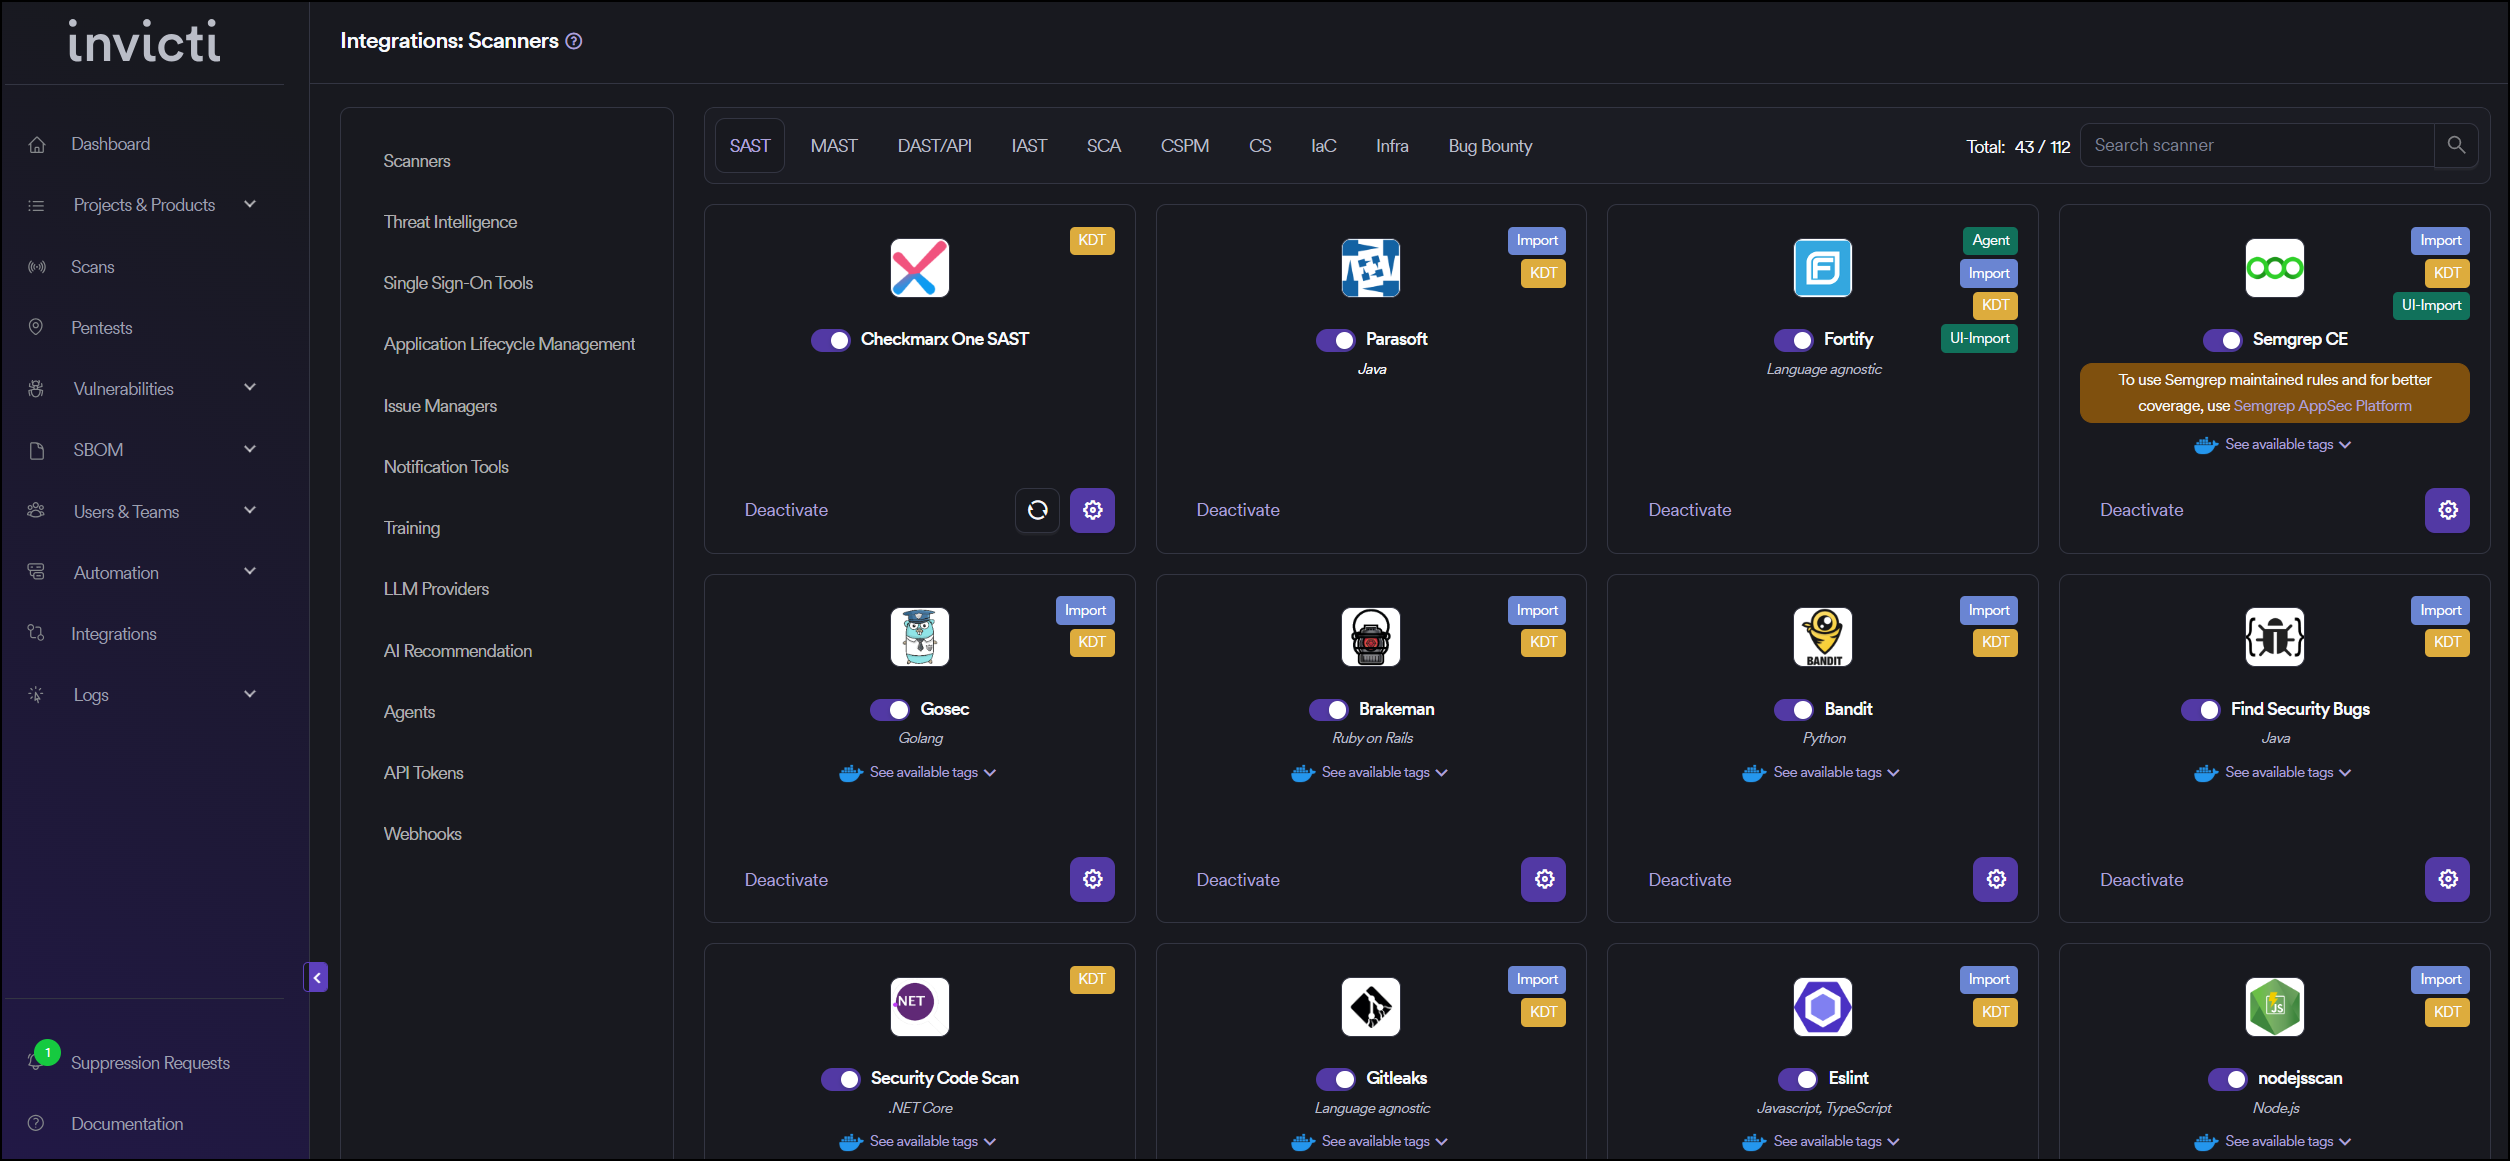
Click the gear icon on the Polaris fAST Static card to open the configuration panel. Fill in the required fields:
- Token: Paste the API access token you generated from Polaris.
- URL: Enter your Polaris instance URL (e.g.,
https://<your-org>.polaris.blackduck.com).
Step 5: Test the Connection
Click the Test Connection button at the bottom of the configuration panel to verify that the provided credentials and URL are correct.
- If the connection is successful, the integration is ready to use.
- If the connection fails, verify your Token and URL values.
- For existing integrations, you can use the Retest Connection button at the top of the panel.
Step 6: Advanced Settings (Optional)
Click on Advanced Settings to expand additional options:
| Setting | Description | Default |
|---|---|---|
| Allow team leads to scan this instance | Permits team leads to trigger scans using this Polaris fAST Static instance | Off |
| Allow team leads to create new instances | Permits team leads to create additional Polaris fAST Static instances | Off |
After modifying advanced settings, click Save Advanced Settings to apply changes.
Summary
| Step | Action |
|---|---|
| 1 | Navigate to Integrations from the sidebar |
| 2 | Select the SAST tab under Scanners |
| 3 | Find Polaris fAST Static and click Activate (if not already active) |
| 4 | Click the gear icon and fill in Token, URL, and optionally Instance |
| 5 | Click Test Connection to verify |
| 6 | (Optional) Configure Advanced Settings for team lead permissions |
Create a Scan
After activating and configuring Polaris fAST Static, you can create scans from your project's scanner settings.
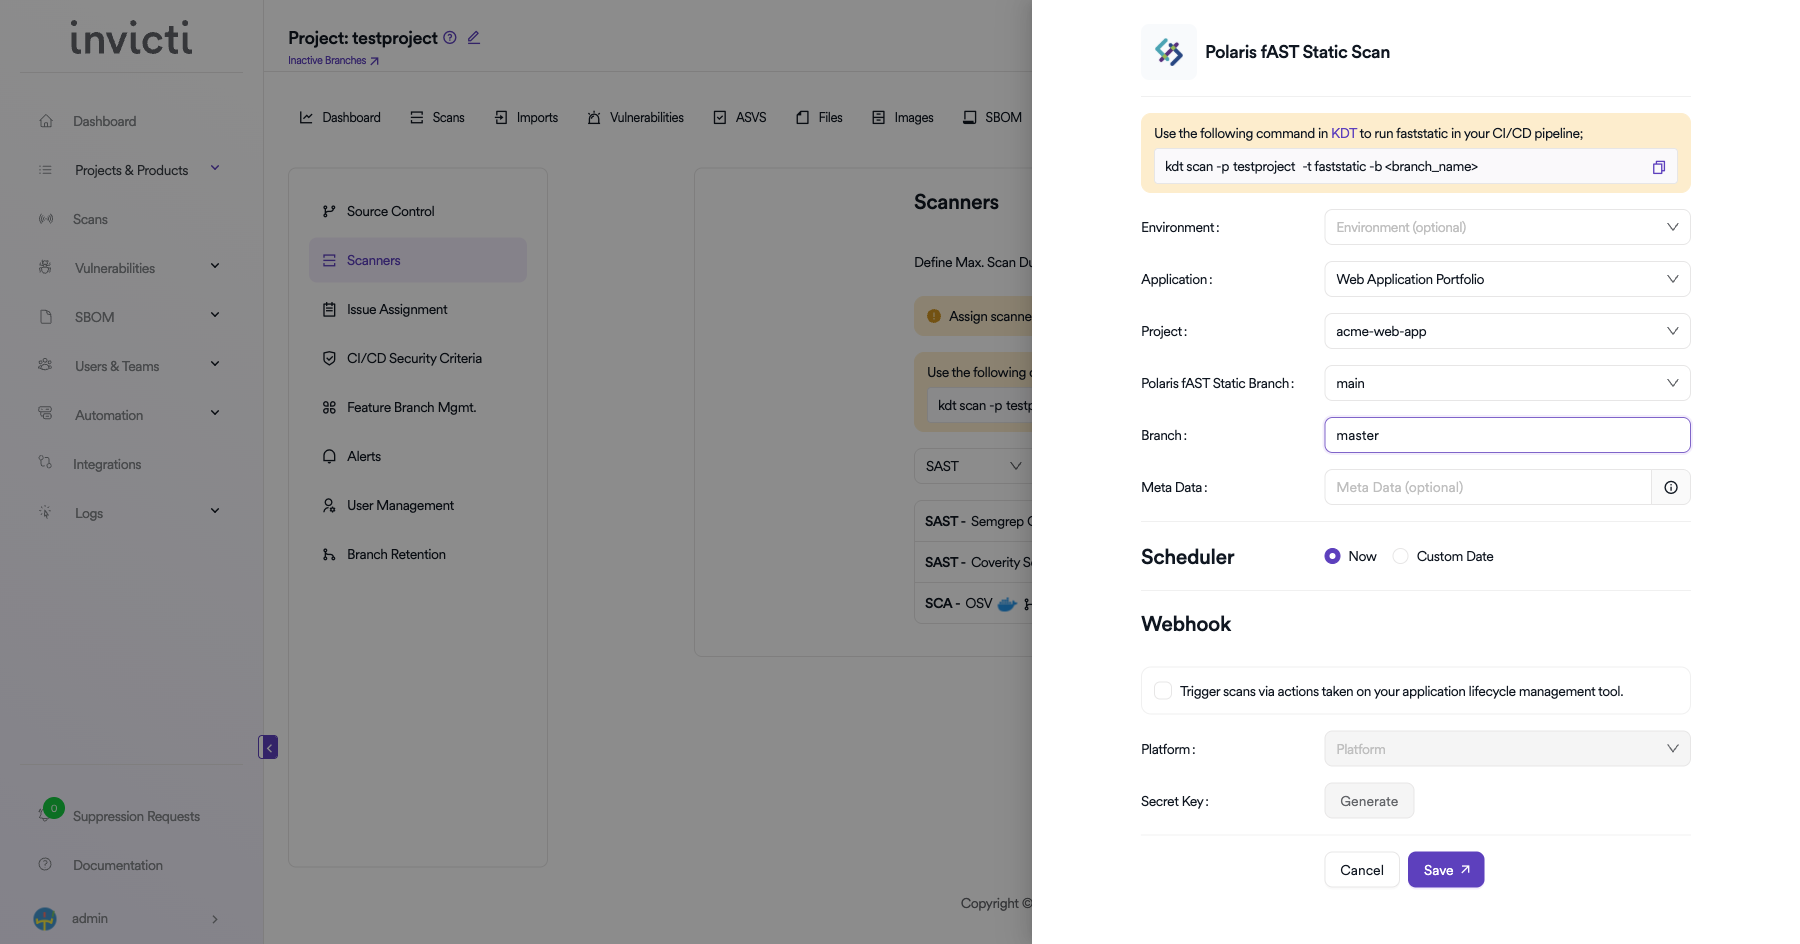
Navigate to Project Scanners
- Go to your Project page.
- Click on the Settings tab.
- Select Scanners from the left sidebar.
Add Polaris fAST Static Scanner
- In the scanner type dropdown, select SAST.
- In the scanner dropdown, search for and select Polaris fAST Static.
- Click the Add button to open the scan configuration drawer.
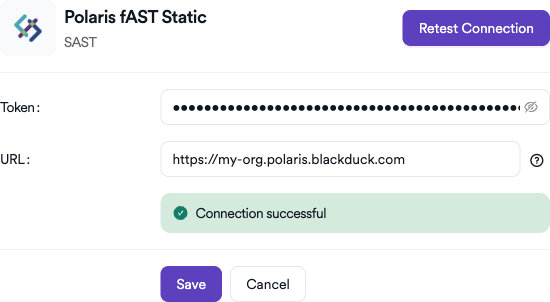
Scan Configuration Fields
| Field | Description | Required |
|---|---|---|
| Application | Select the Polaris application portfolio | Yes |
| Project | Select the Polaris project to bind to | Yes |
| Polaris fAST Static Branch | Select the Polaris branch for the scan | No |
| Branch | Specify the branch to scan | No |
| Meta Data | Additional metadata for the scan (optional) | No |
| Scan Tag | Tag to identify the scan (optional) | No |
| Fork Default Branch | Enable to fork the default branch before scanning | No |
Scheduler
- Now: Run the scan immediately after saving.
- Custom Date: Schedule the scan for a specific date and time.
Webhook (Optional)
Enable webhook to trigger scans via actions taken on your application lifecycle management tool:
- Check the Trigger scans via actions checkbox.
- Select the Platform (e.g., GitHub, GitLab, Bitbucket).
- Click Generate to create a Secret Key for webhook authentication.
KDT Command
You can also trigger Polaris fAST Static scans from your CI/CD pipeline using KDT:
kdt scan -p <project_name> -t fast -b <branch_name>
Click Save to create the scan configuration.
Troubleshooting
Connection Fails
- Invalid Token: Ensure the Polaris access token is correct and has not expired. Generate a new token from the Polaris portal.
- Incorrect URL: Verify the URL matches your Polaris instance (e.g.,
https://<your-org>.polaris.blackduck.com). - Network/Firewall: Ensure the Invicti AppSec instance can reach the Polaris API endpoint.
Scan Issues
- No Applications Found: Verify the token has sufficient permissions to list applications in Polaris.
- No Projects Found: Ensure the application has projects configured in Polaris.
- Branch Not Found: Verify the specified branch has been analyzed in Polaris fAST Static.
- Empty Results: Confirm that the fAST Static analysis has completed successfully on the Polaris side.
Best Practices
- Use Dedicated Access Tokens: Create a dedicated Polaris access token for the Invicti AppSec integration.
- Rotate Tokens Regularly: Regenerate access tokens periodically as part of your security practices.
- Application Binding: Ensure the correct Polaris application and project are selected for accurate result mapping.
- Use HTTPS: Always use HTTPS for the Polaris URL.
Limitations
- Cloud-Based: Polaris fAST Static is a cloud-native service. An active Polaris subscription is required.
- Token Expiration: Polaris access tokens may have expiration policies. Check your organization's token management settings.
- Application/Project Binding: Each scan configuration is bound to a specific Polaris application and project.
Need help?
Invicti Support team is ready to provide you with technical help. Go to Help Center