Authentication verifier settings
Install the Authentication Verifier Service and Agent to run authenticated scans within your local environment. If the website you're scanning requires form-based authentication, an authentication verifier agent validates the authentication and ensures your scans stay properly authenticated across the network.
The Authentication Verifier Settings are available exclusively in the Invicti Enterprise On-Premises edition.
Starting from Invicti Enterprise On-Premises 2.3, the Authentication Verifier Agent communicates with the Authentication Verifier Service to verify the login. You can install the agent without installing the service, but the agent works correctly only if the service is already installed.
This document explains how to configure the Authentication Verifier Service and install the Authentication Verifier Agent.
View the authentication verifier settings
-
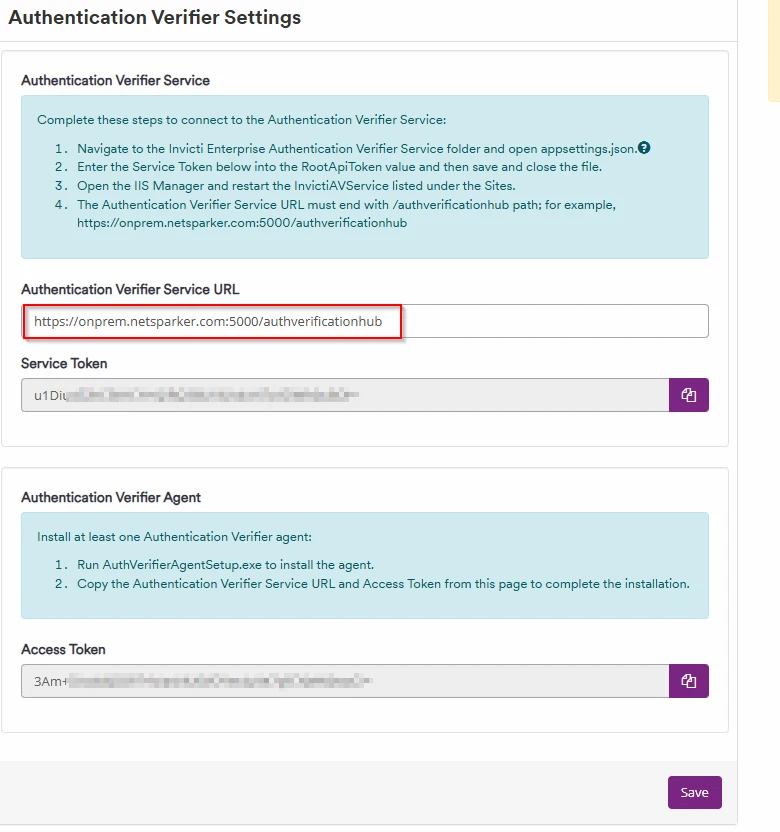
Select Settings > Authentication Verifier from the left-side menu.
-
These are the fields on the page:
a. Authentication Verifier Service URL: this is the URL where the service is running, and it must end with
/authverificationhub. For example:https://onprem.netsparker.com:5000/authverificationhubNetwork access requirementTo access the verifier service, bind the Invicti AV Service to either the domain name or the IP address with port 5000. Each user must also allow port 5000 from their network.
b. Service Token: this token enables communication between the Authentication Verifier Service and the Invicti Enterprise web application. You use this token in the Authentication Verifier Service
appsettings.json.c. Access Token: this token enables communication between the Authentication Verifier Agent and the Authentication Verifier Service. You use this token in the Authentication Verifier Agent
appsettings.json.
Install the Authentication Verifier service
- Run the
AuthVerifierServiceSetup.exefile included in theInvictiEnterprise.zippackage (see Step 1 - Download the installer files). - On the installation folder step, select Next to install to the default folder. Alternatively, select Browse… to choose a different location, then select Next.

- On the Ready to install step, select Install.
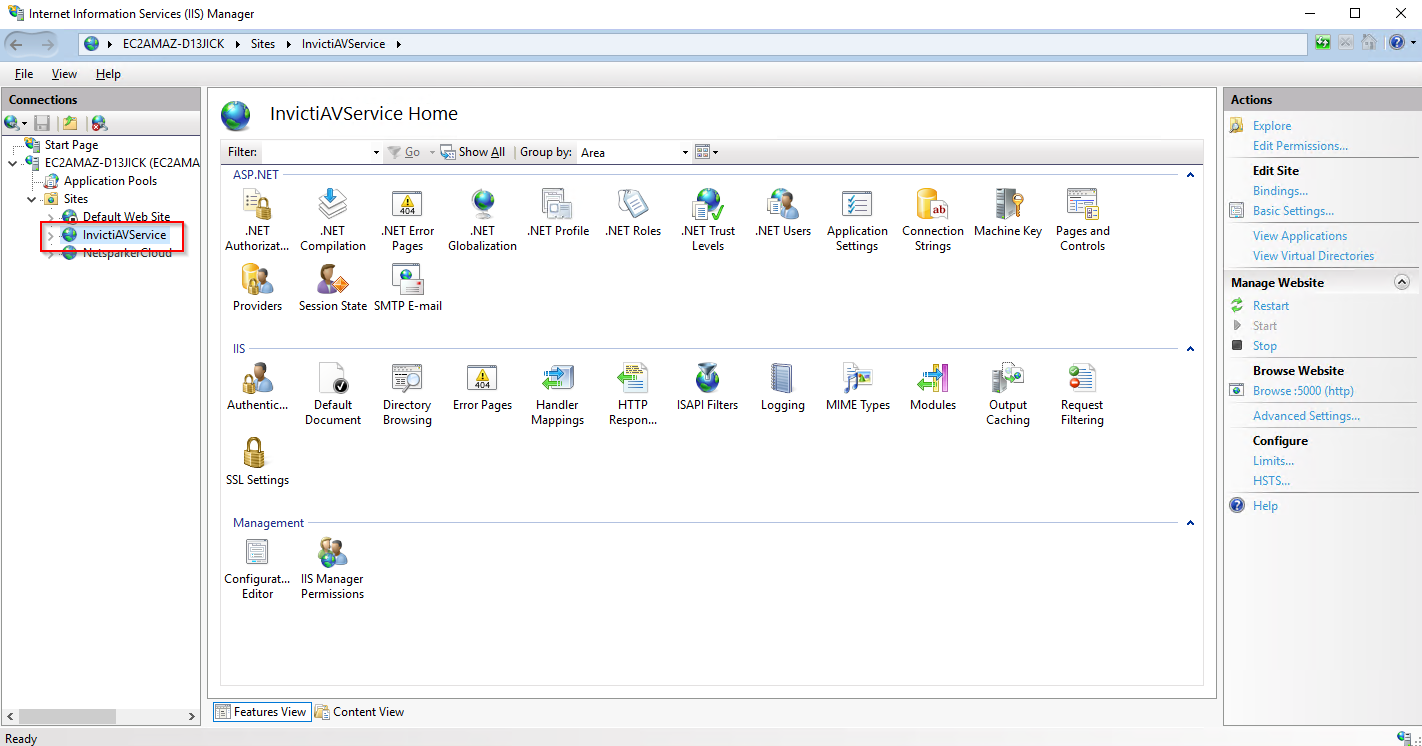
This installs the Authentication Verifier Service and creates InvictiAVService in Internet Information Services (IIS).
Configure IIS bindings for the AV service
After installation, configure the InvictiAVService IIS site to use HTTPS on port 5000.
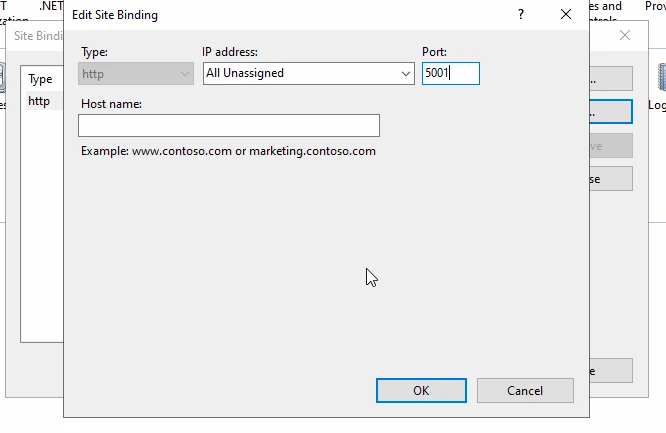
- In IIS Manager, select InvictiAVService under Sites and click Bindings. Double-click the existing http binding on port 5000, change the port to
5001, then click OK.
-
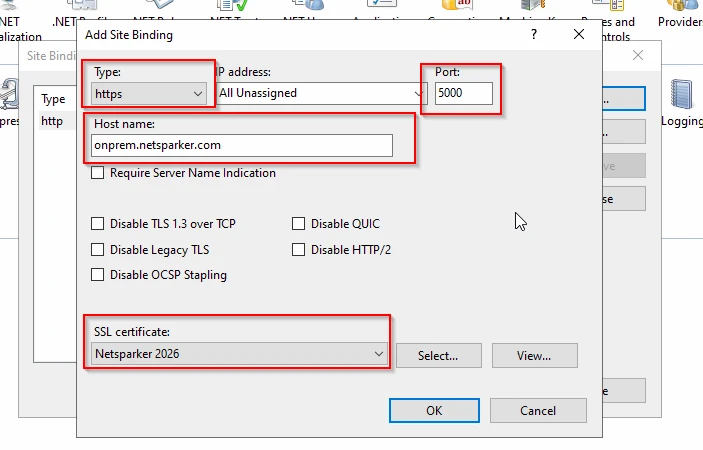
Click Add and set the following values, then click OK:
- Type: https
- Port: 5000
- Host name: your domain (for example:
onprem.netsparker.com) - SSL certificate: the same certificate used for the Invicti Enterprise web application
- Select the http:5001 binding and click Remove.
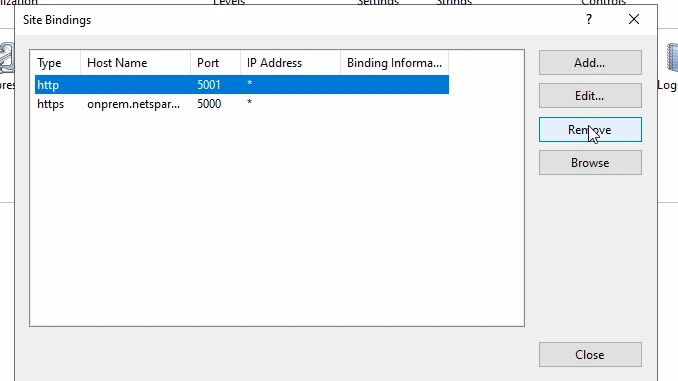
To confirm the binding is working, navigate to https://yourdomain:5000 in a browser. You should see a successful connection page.
Configure the AV service hub
- Select Settings > Authentication Verifier from the left-side menu.
- Copy the Service Token value.
- In IIS Manager, right-click InvictiAVService under Sites and select Explore to open the service folder. Alternatively, navigate to
C:\Program Files (x86)\Invicti Enterprise Authentication Verifier Service. - Open
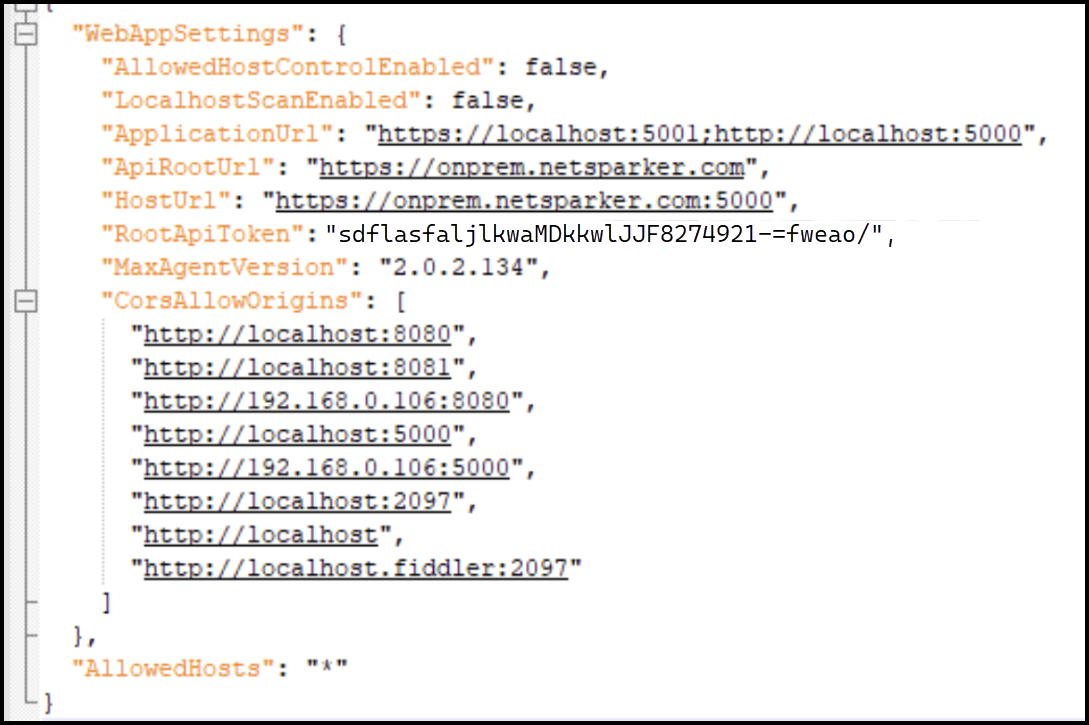
appsettings.jsonwith a text editor. - Update the following fields, replacing
onprem.netsparker.comwith your domain and pasting the Service Token intoRootApiToken:
"ApplicationUrl": "https://localhost:5001;https://onprem.netsparker.com:5000",
"ApiRootUrl": "https://onprem.netsparker.com",
"HostUrl": "https://onprem.netsparker.com:5000",
"RootApiToken": "<Service Token>",
Also update CorsAllowOrigins:
- Change
"http://localhost:5000"to"https://onprem.netsparker.com:5000" - Change
"http://localhost"to"https://onprem.netsparker.com"
- Save and close the file.
- Open Command Prompt as administrator and run the following command to restart IIS:
iisreset
Any changes to appsettings.json, including token updates, require restarting the service. Run iisreset from an administrator Command Prompt to apply them.
Install the authentication verifier agent
Use the setup wizard to install the Invicti Enterprise Authentication Verifier Agent.
Starting from Invicti Enterprise On-Premises 2.3, the Authentication Verifier Agent communicates with the Authentication Verifier Service. You must uninstall any older agent versions before proceeding.
-
Run the
AuthVerifierAgentSetup.exefile included in theInvictiEnterprise.zippackage (see Step 1 - Download the installer files). -
On the Welcome to the Invicti Enterprise Authentication Verifier Setup Wizard window, select Next.
-
Select Browse… to change the installation folder if needed, then select Next.
-
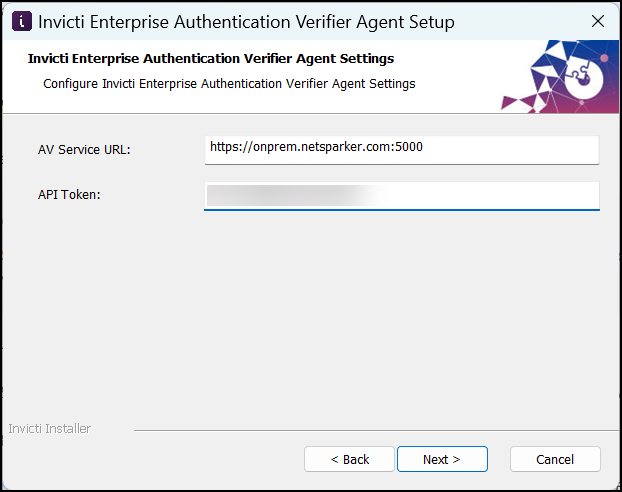
On the Invicti Enterprise Authentication Verifier Agent settings step, enter the following values and select Next:
- AV Service URL: Enter your AV Service URL in the format
https://yourdomain:5000(for example:https://onprem.netsparker.com:5000) - API Token: Paste the Access Token from Settings > Authentication Verifier
- AV Service URL: Enter your AV Service URL in the format
- Select Install.
After the installation completes, configure the agent's appsettings.json:
- Navigate to the Authentication Verifier Agent folder. By default:
C:\Program Files (x86)\Invicti Enterprise Authentication Verifier Agent. - Open
appsettings.jsonwith a text editor. - Update the following fields, replacing
onprem.netsparker.comwith your domain and pasting the Access Token intoApiToken:
"AgentName": "<your agent name>",
"ApiRootUrl": "https://onprem.netsparker.com:5000",
"ApiToken": "<Access Token>",
- Save and close the file.
- Open Services (
services.msc), locate the Invicti-Verifier-1 service, and restart it. - Select Agents > Manage Verifiers from the left-side menu to confirm your agent appears in the list.
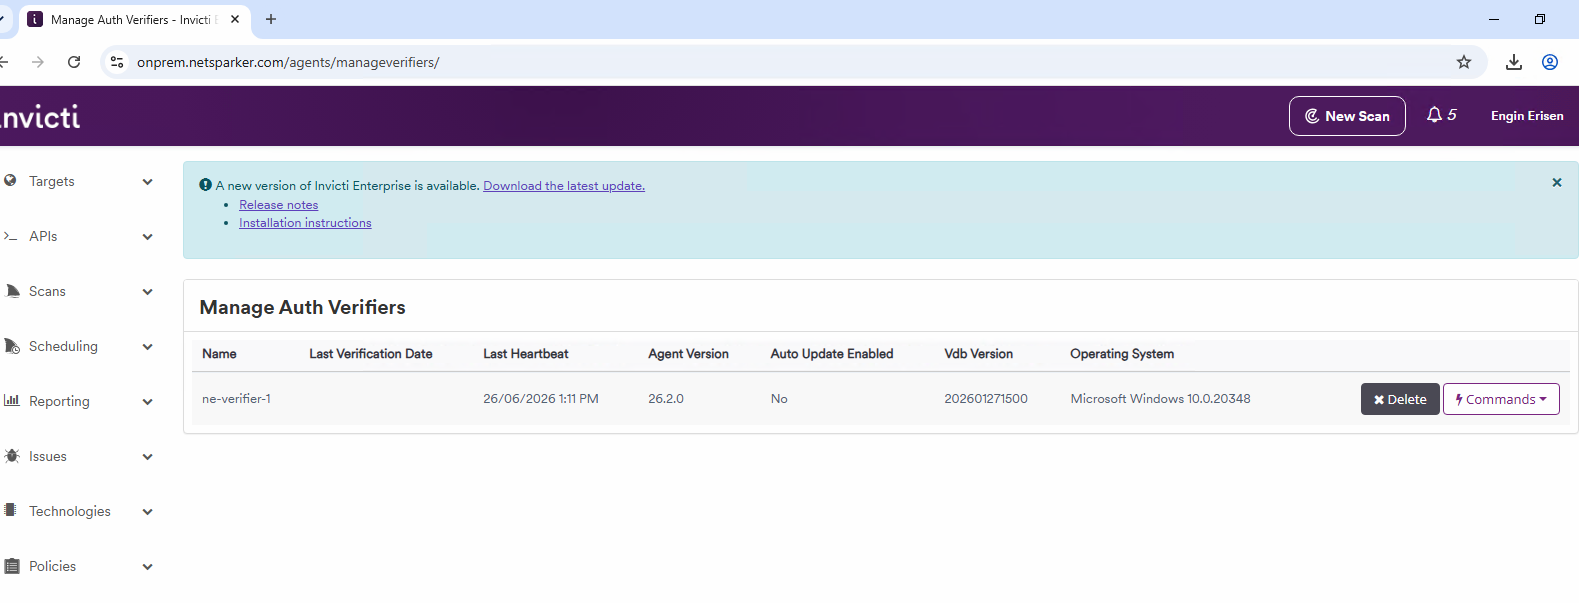
If you configured the agent mode as cloud on the website settings page, set "AgentType": "Cloud" in appsettings.json. Use "AgentType": "Standard" for the internal agent mode.
For information on managing your agents after installation, see Managing Authentication Verifier Agents in Invicti Enterprise.
Install multiple authentication verifier agents on the same OS
If you want to install more than one authentication verifier agent on the same system, first install the Invicti Enterprise Authentication Verifier Agent using the AuthVerifierAgentSetup.exe file.
-
Copy all files from the default Authentication Verifier Agent's folder to the new Verifier Agent's folder. The default installation path is:
C:\Program Files (x86)\Invicti Enterprise Authentication Verifier Agent.For example, if you decided to use Agent-2 as the new Agent name, you could use this command to copy all files to the new Agent's folder:
xcopy "C:\Program Files (x86)\Invicti Enterprise Authentication Verifier Agent\*.*" "C:\Program Files (x86)\Invicti Enterprise Authentication Verifier Agent-2" /yieThis creates a new directory in
C:\Program Files (x86)\Invicti Enterprise Authentication Verifier Agent-2and copies all the required files. -
Locate the new Verifier Agent's folder and open the
appsettings.jsonfile with a text editor. Set the new agent's name. -
Open a command prompt with Administrator rights and install the new Verifier Agent as a Windows Service using these commands:
- Change the current folder to the new Agent's folder:
cd C:\Program Files (x86)\Invicti Enterprise Authentication Verifier Agent-2- Install the new Verifier Agent as a Windows Service:
Netsparker.Cloud.Agent.exe /i- Start the new Agent's Windows Service:
Netsparker.Cloud.Agent.exe /s
If your machine has more than one authentication verifier agent installed, Invicti shows a drop-down menu to select the one you want to use.
Need help?
Invicti Support team is ready to provide you with technical help. Go to Help Center