Step 3: Install and configure the agent
The Invicti Enterprise Agent is installed using a wizard. This document guides you through the installation process and provides information about installing multiple agents on the same operating system.
You can also install the Invicti Enterprise Agent in silent mode. For more information, refer to the Install the Invicti Enterprise Agent in silent mode document.
Install the Invicti Enterprise Agent
- Run the
AgentSetup.exefile. - On the Invicti Enterprise Agent Setup window, select Next.
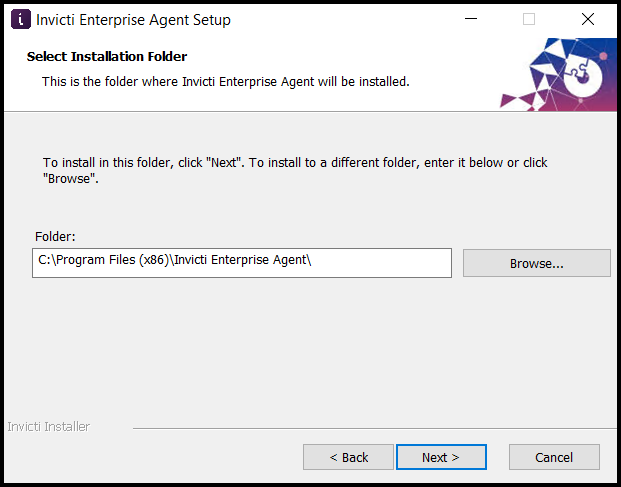
- In the Select Installation Folder step, click Next to install the Agent in the default folder. Alternatively, click Browse to choose a different installation folder, then select Next.
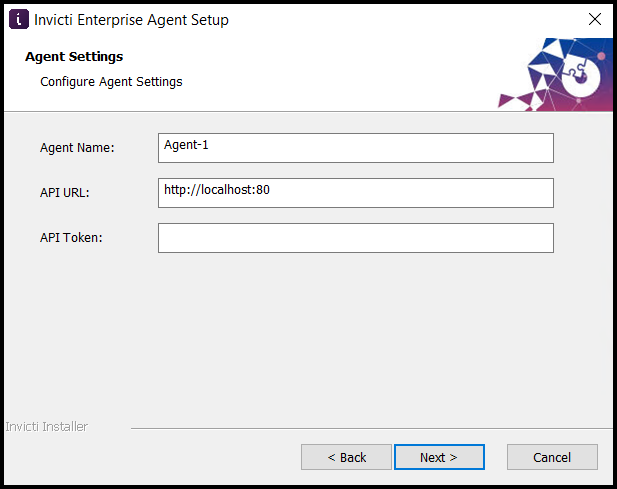
- At the Agent Setup step, fill in the following information, then select Next:
- Agent Name: This can be configured to any value to help you distinguish one Agent from another.
- API URL: This needs to point to the Web App URL.
- API Token: This is the token you copied from step 8 - Scanner Agent of the installation wizard during the configuration of the web app server. If you didn't copy the Access Token from the wizard, after the installation is completed, you can find it in Agents > Manage Agents > + Configure New Agent.
If you have already configured SSL/TLS for your Invicti Enterprise Application Server, then you should enter that URL and ensure that you use HTTPS (for example: https://ncserver/).
-
On the Ready to Install step, select Install.
-
Click Finish to complete the installation.
Prevent the agent from starting automatically
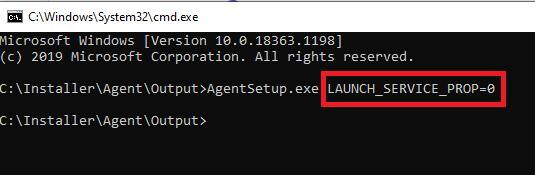
Once the agent is installed in your environment via the wizard or command prompt, the agent starts automatically. If you prefer to prevent this behavior, you need to take the following steps:
- Open a command prompt in Administrator mode.
- Run
cdto navigate to the folder containing theAgentSetup.exefile. - Run
AgentSetup.exe LAUNCH_SERVICE_PROP = 0
If you want to start the agent later, there are two methods available:
Method 1:
- Open a command prompt in Administrator mode.
- Run
cdto navigate to the folder containing theAgentSetup.exefile. - Run
AgentSetup.exe -s
Method 2:
- Press Windows+R, type
services.mscand press Enter. - Find
Netsparker Enterprise Scanning Service - [YOUR_AGENT_NAME]. - Right-click it and select Properties.
- Make sure the Startup type is set to Automatic, and click Start.
If you wish, you can select a specific agent while launching a scan. Refer to the Configuring agent selection document for more information.
Install multiple agents on the same operating system
If you want to install more than one agent on the same system, first install the Invicti Enterprise Agent, as usual, using the AgentSetup.exe file. Then follow the instructions to install additional agents on the same operating system.
- Copy all files from the default agent’s folder to a new folder for the new agent. The default installation path is:
C:\Program Files (x86)\Invicti Enterprise Agent.
For example, if you decided to use Agent-2 as the new agent name, you could use the following command:
xcopy "C:\Program Files (x86)\Invicti Enterprise Agent\*.*" "C:\Program Files (x86)\Invicti Enterprise Agent-2" /yie
This creates a new directory in C:\Program Files (x86)\Invicti Enterprise Agent-2 and copy in all the required files.
- Locate the folder for the new agent and open the
appsettings.jsonfile with a text editor. Set the new agent’s name. - Open a command prompt in Windows with Administrator rights and install the new agent as a Windows Service using these commands:
- Change the current folder to the new agent’s folder:
cd C:\Program Files (x86)\Invicti Enterprise Agent-2 - Install the new agent as a Windows Service:
Netsparker.Cloud.Agent.exe /i - Start the new agent’s Windows Service:
Netsparker.Cloud.Agent.exe /s
- Change the current folder to the new agent’s folder:
Need help?
Invicti Support team is ready to provide you with technical help. Go to Help Center